How to Set Up Litecoin Mining with LitecoinPool and Home Assistant
In this guide, we will walk through setting up a Elphapex DG Home 1 miner on LitecoinPool and integrating it with Home Assistant. You’ll learn how to monitor your miner, track profitability, and automate energy management, making your mining experience efficient and cost-effective.
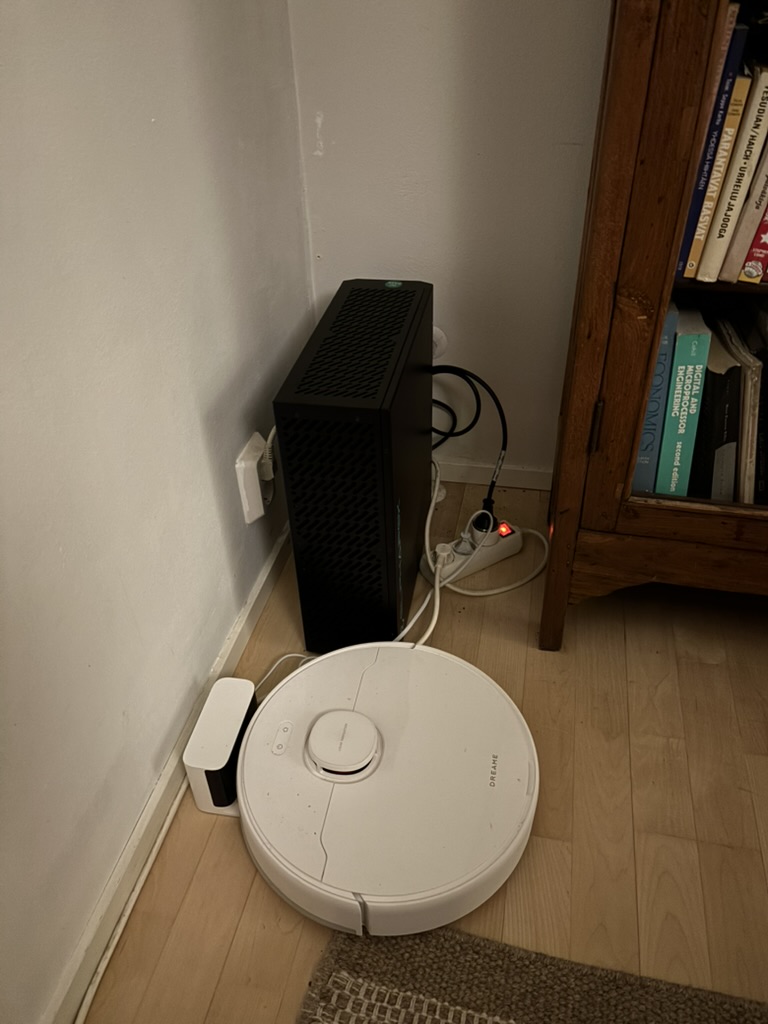
Above the robovacuum in front showing how small the miner actually is. I decided to move the miner later under the stairs for spreading the heat across the apartment more evenly. The noise level is acceptable – around 50db – and comparable what my heat pump generates. I could live without it but I can also tolerate it. It is noticeable but not disturbingly noticeable. That’s what printing money sounds I guess.
Why Mine LTC and DOGE with LitecoinPool?
- No fees: LitecoinPool offers fee-free mining, maximizing your earnings.
- Pay-per-Share (PPS): Guaranteed payout per share submitted.
- Secure payouts: You can receive rewards directly to your wallet.
Step 1: Setting Up Your Miner on LitecoinPool
- Create an account on LitecoinPool.
- Log in to your account and navigate to the “Settings” section to retrieve your worker credentials.
- Configure your miner with the following pool details:
- URL:
stratum+tcp://litecoinpool.org:3333 - Username: Your LitecoinPool username
- Password: Your chosen worker password
- URL:
- Ensure your miner is online and submitting shares to the pool.
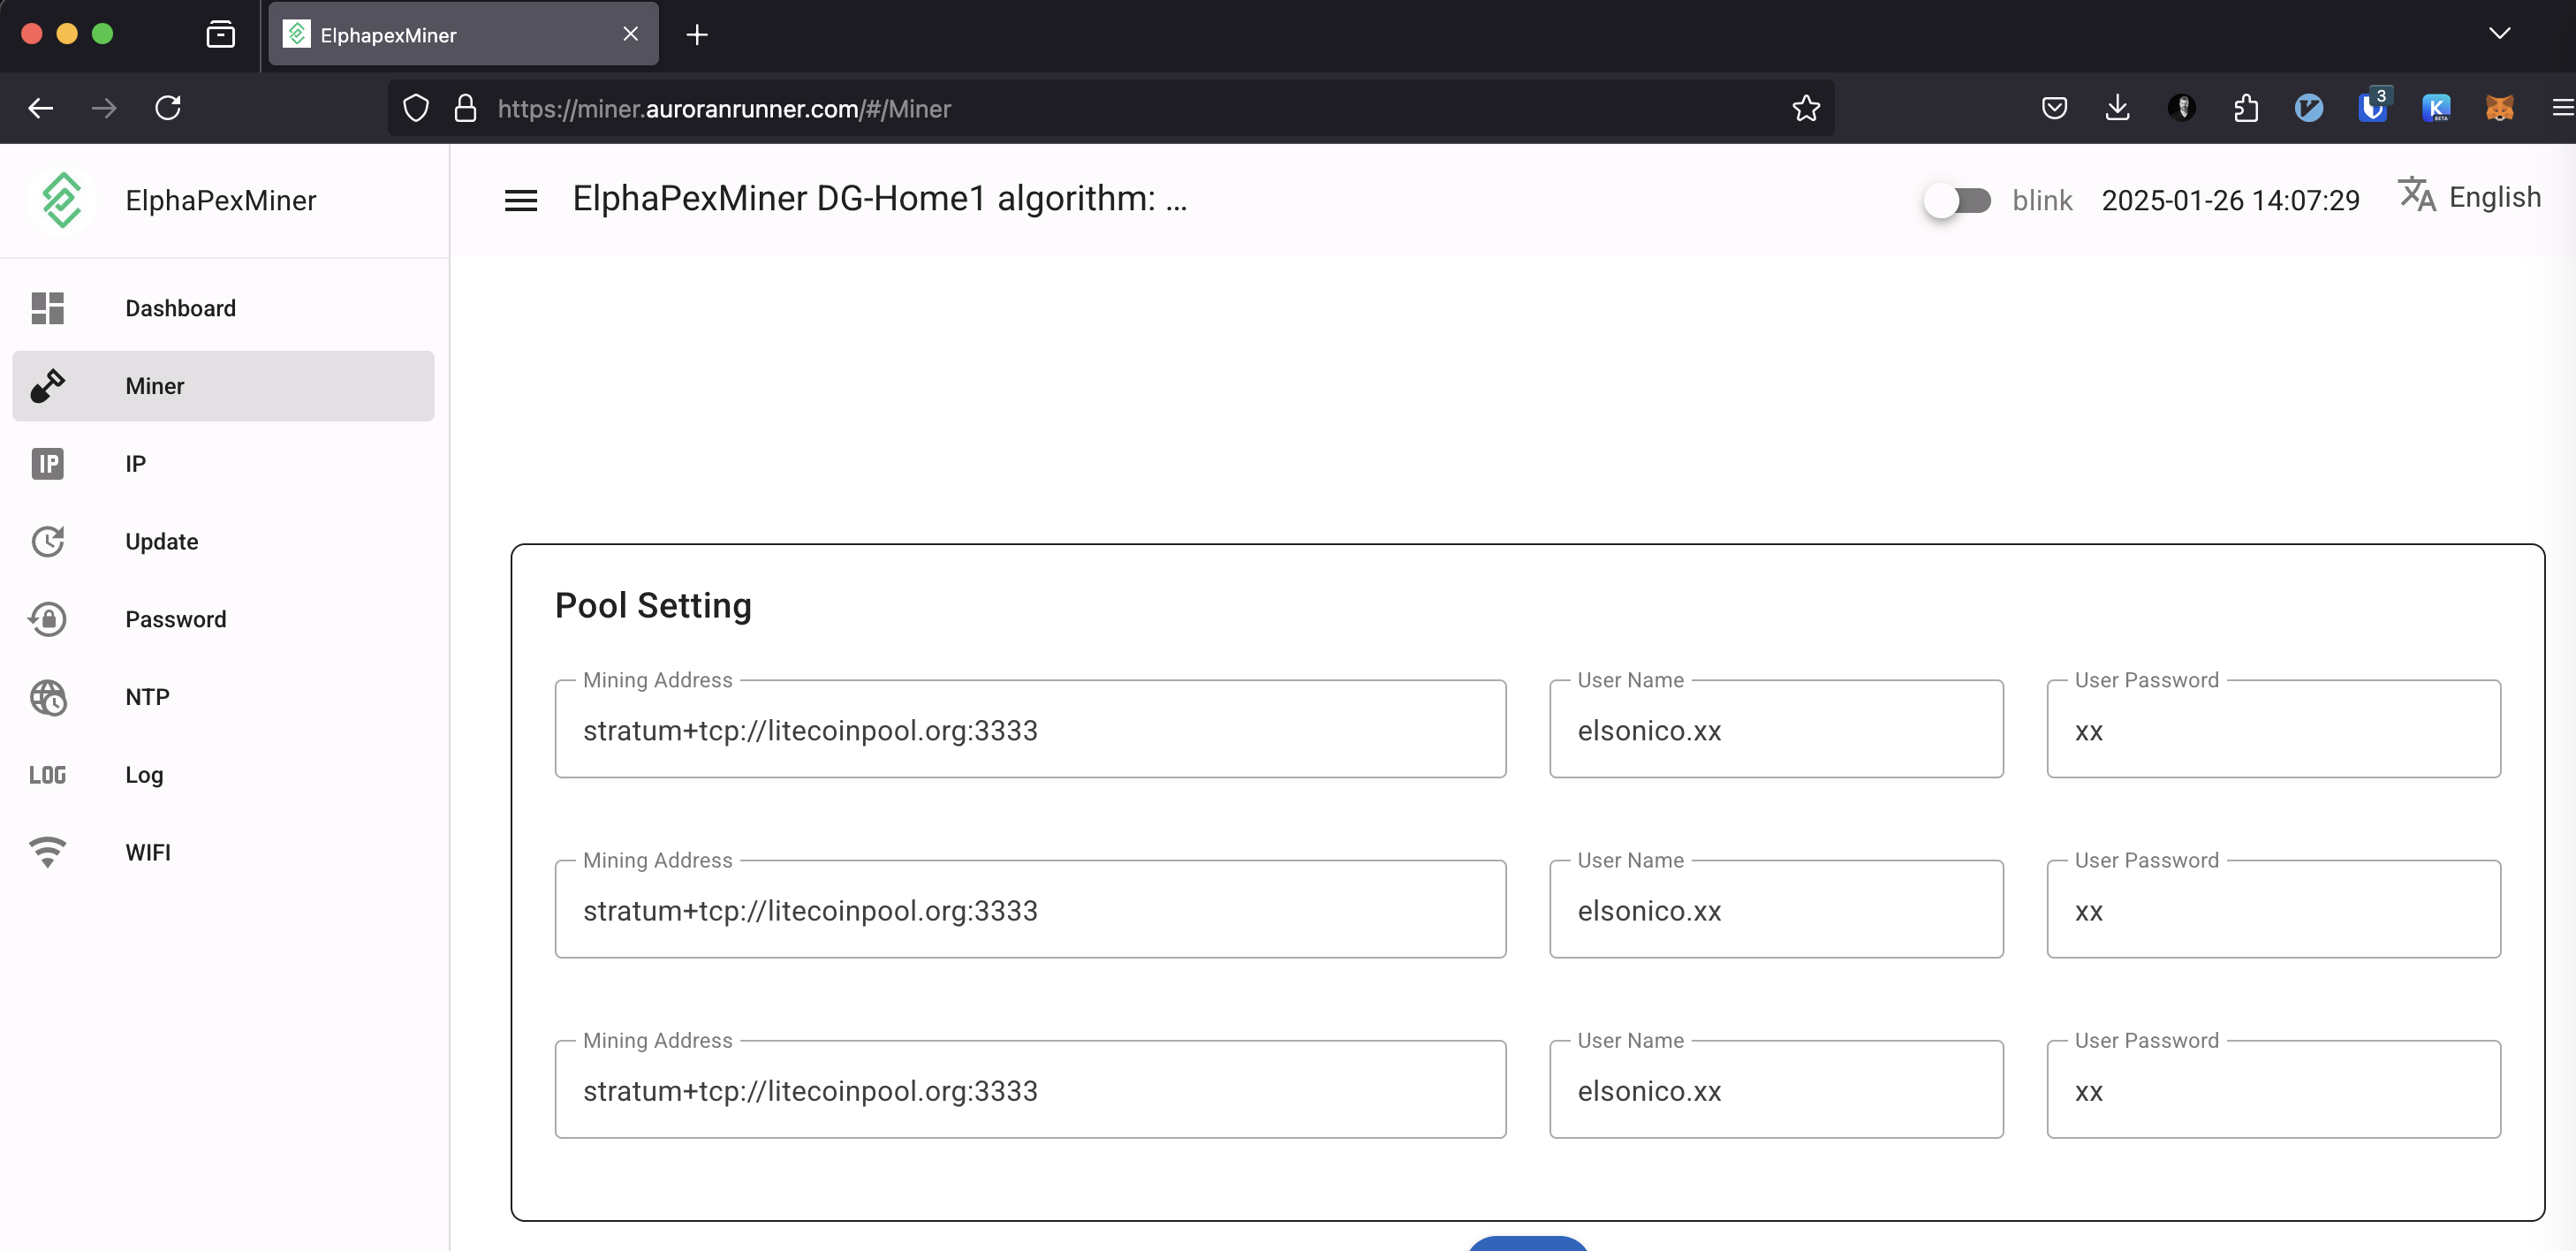
In the end I ended up setting litecoinpool.org thrice on the miner configuration as seen below. The litecoinpool.org resolves to several IPs so there’s high availability through round robin effect on DNS. The default litecoinpool.org is located in Europe AFAIK and I could have used also us.litecoinpool.org as well us2.litecoinpool.org or even other mining pools, but after tinkering with the idea I figured out this is the most reasonable setup. Initially I had only one pool, and when that thread died, I wasn’ä’t mining anything either. I have covered that issue also on my Home Assistant configuration later on.
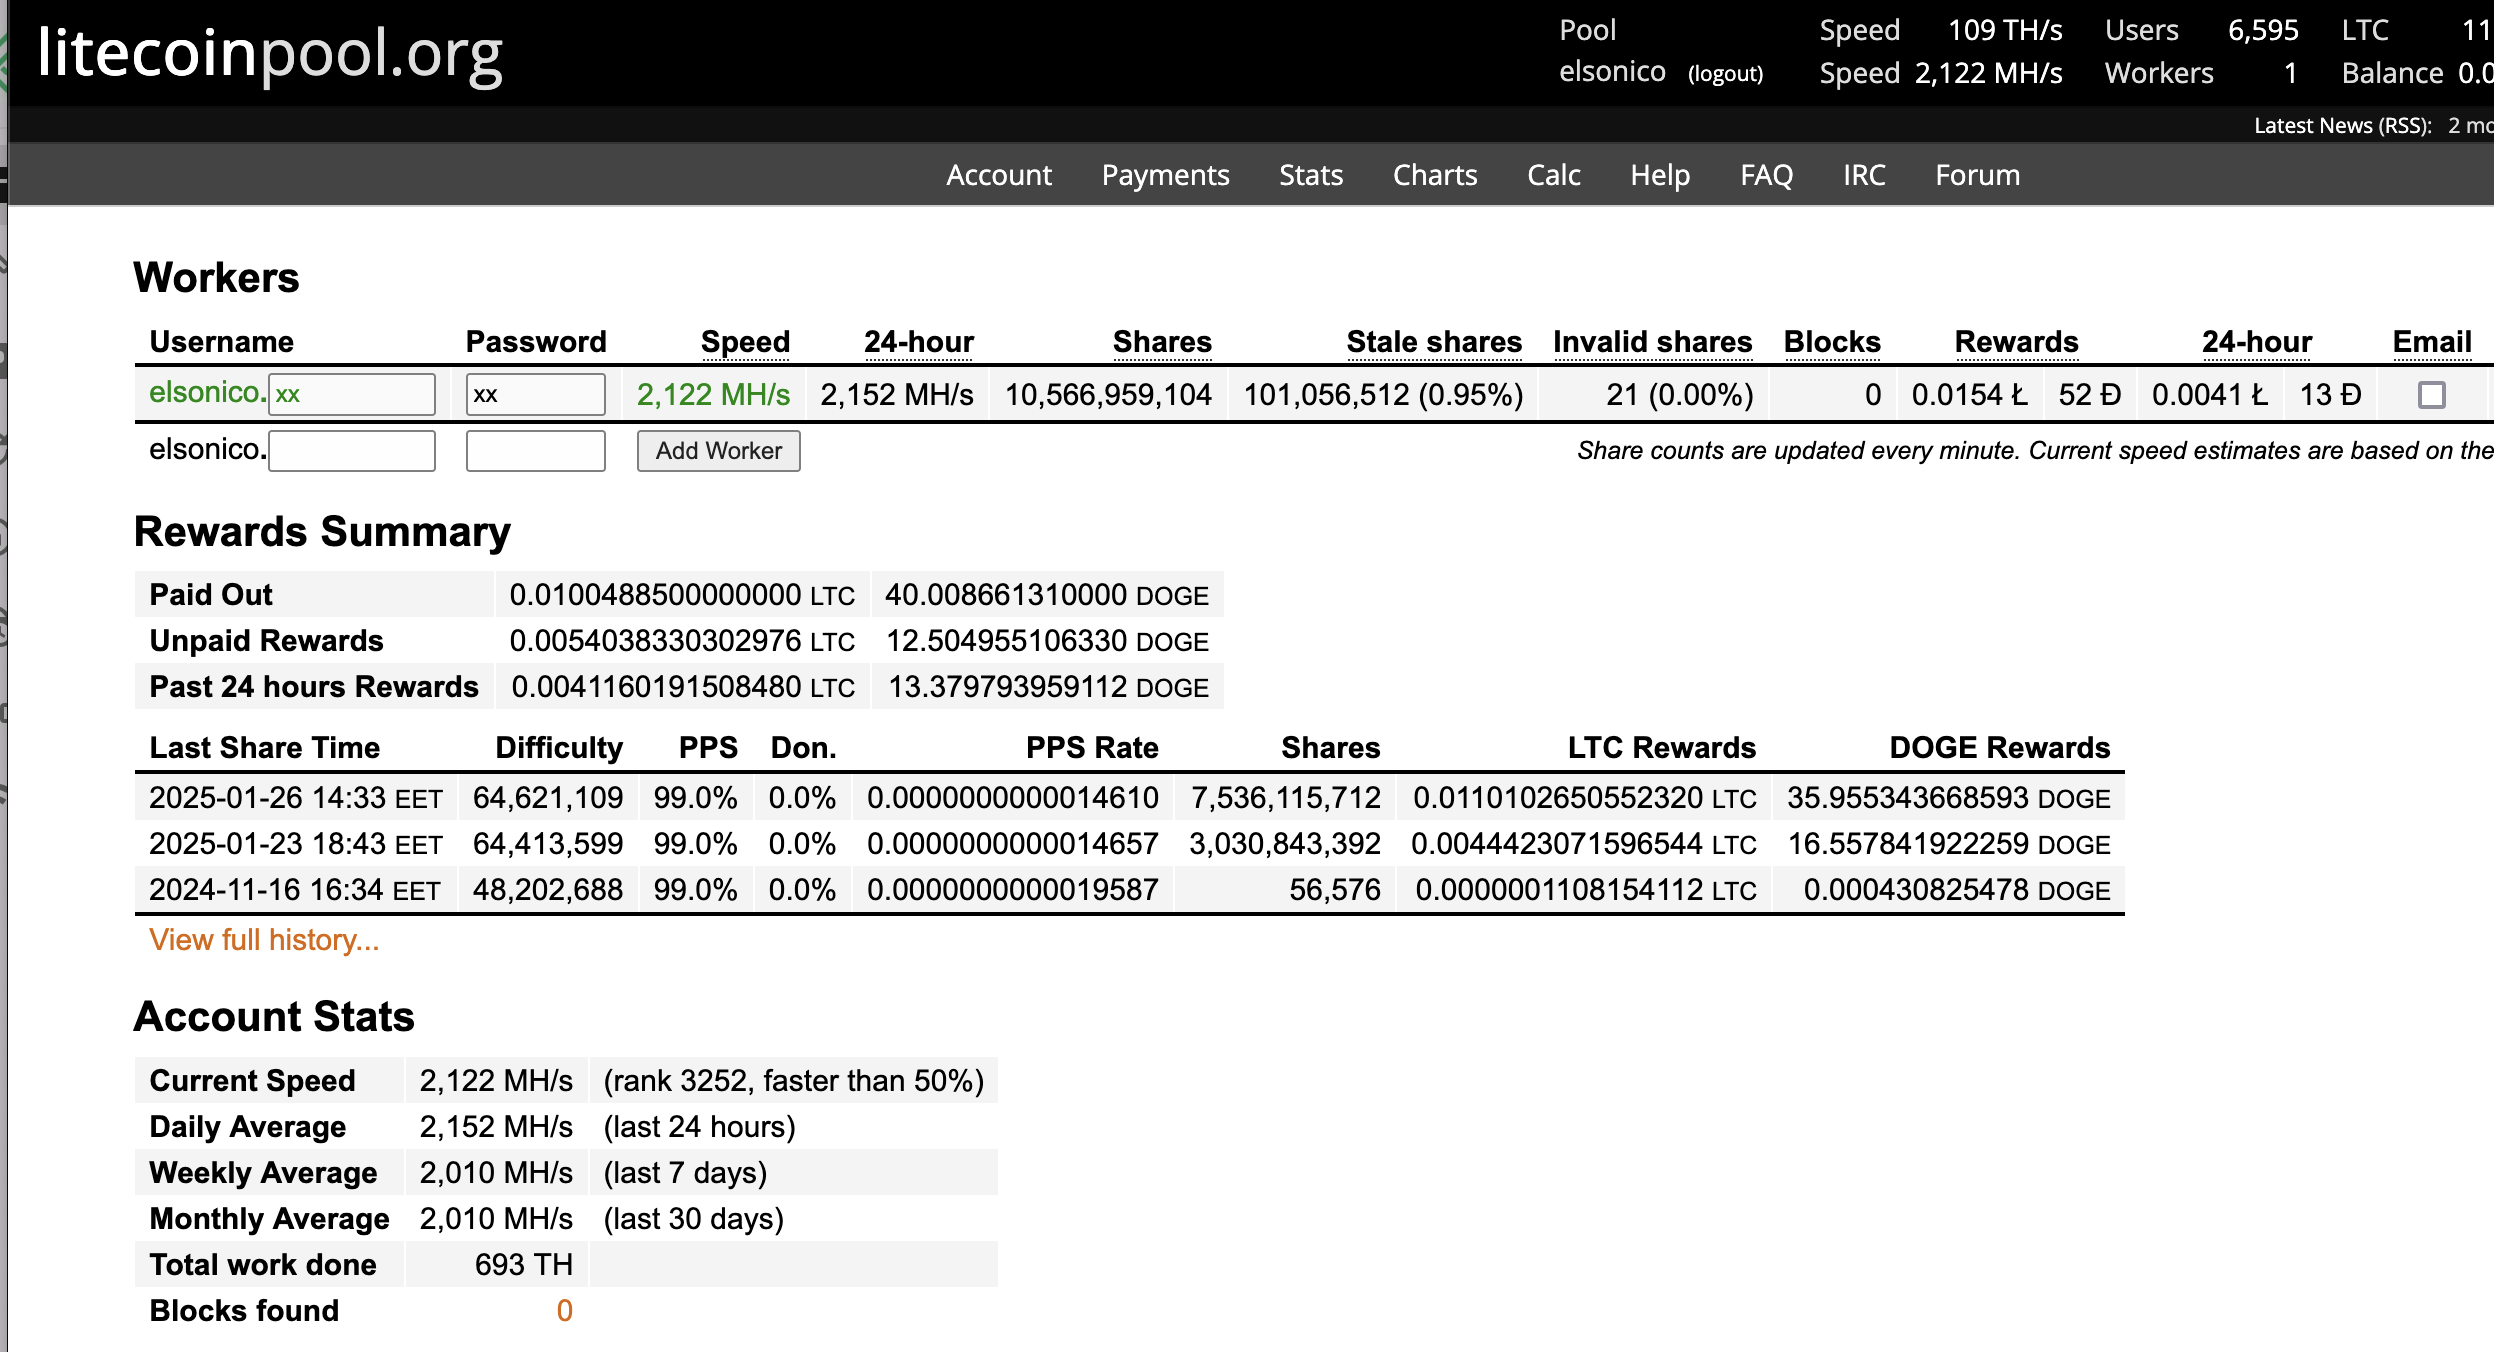
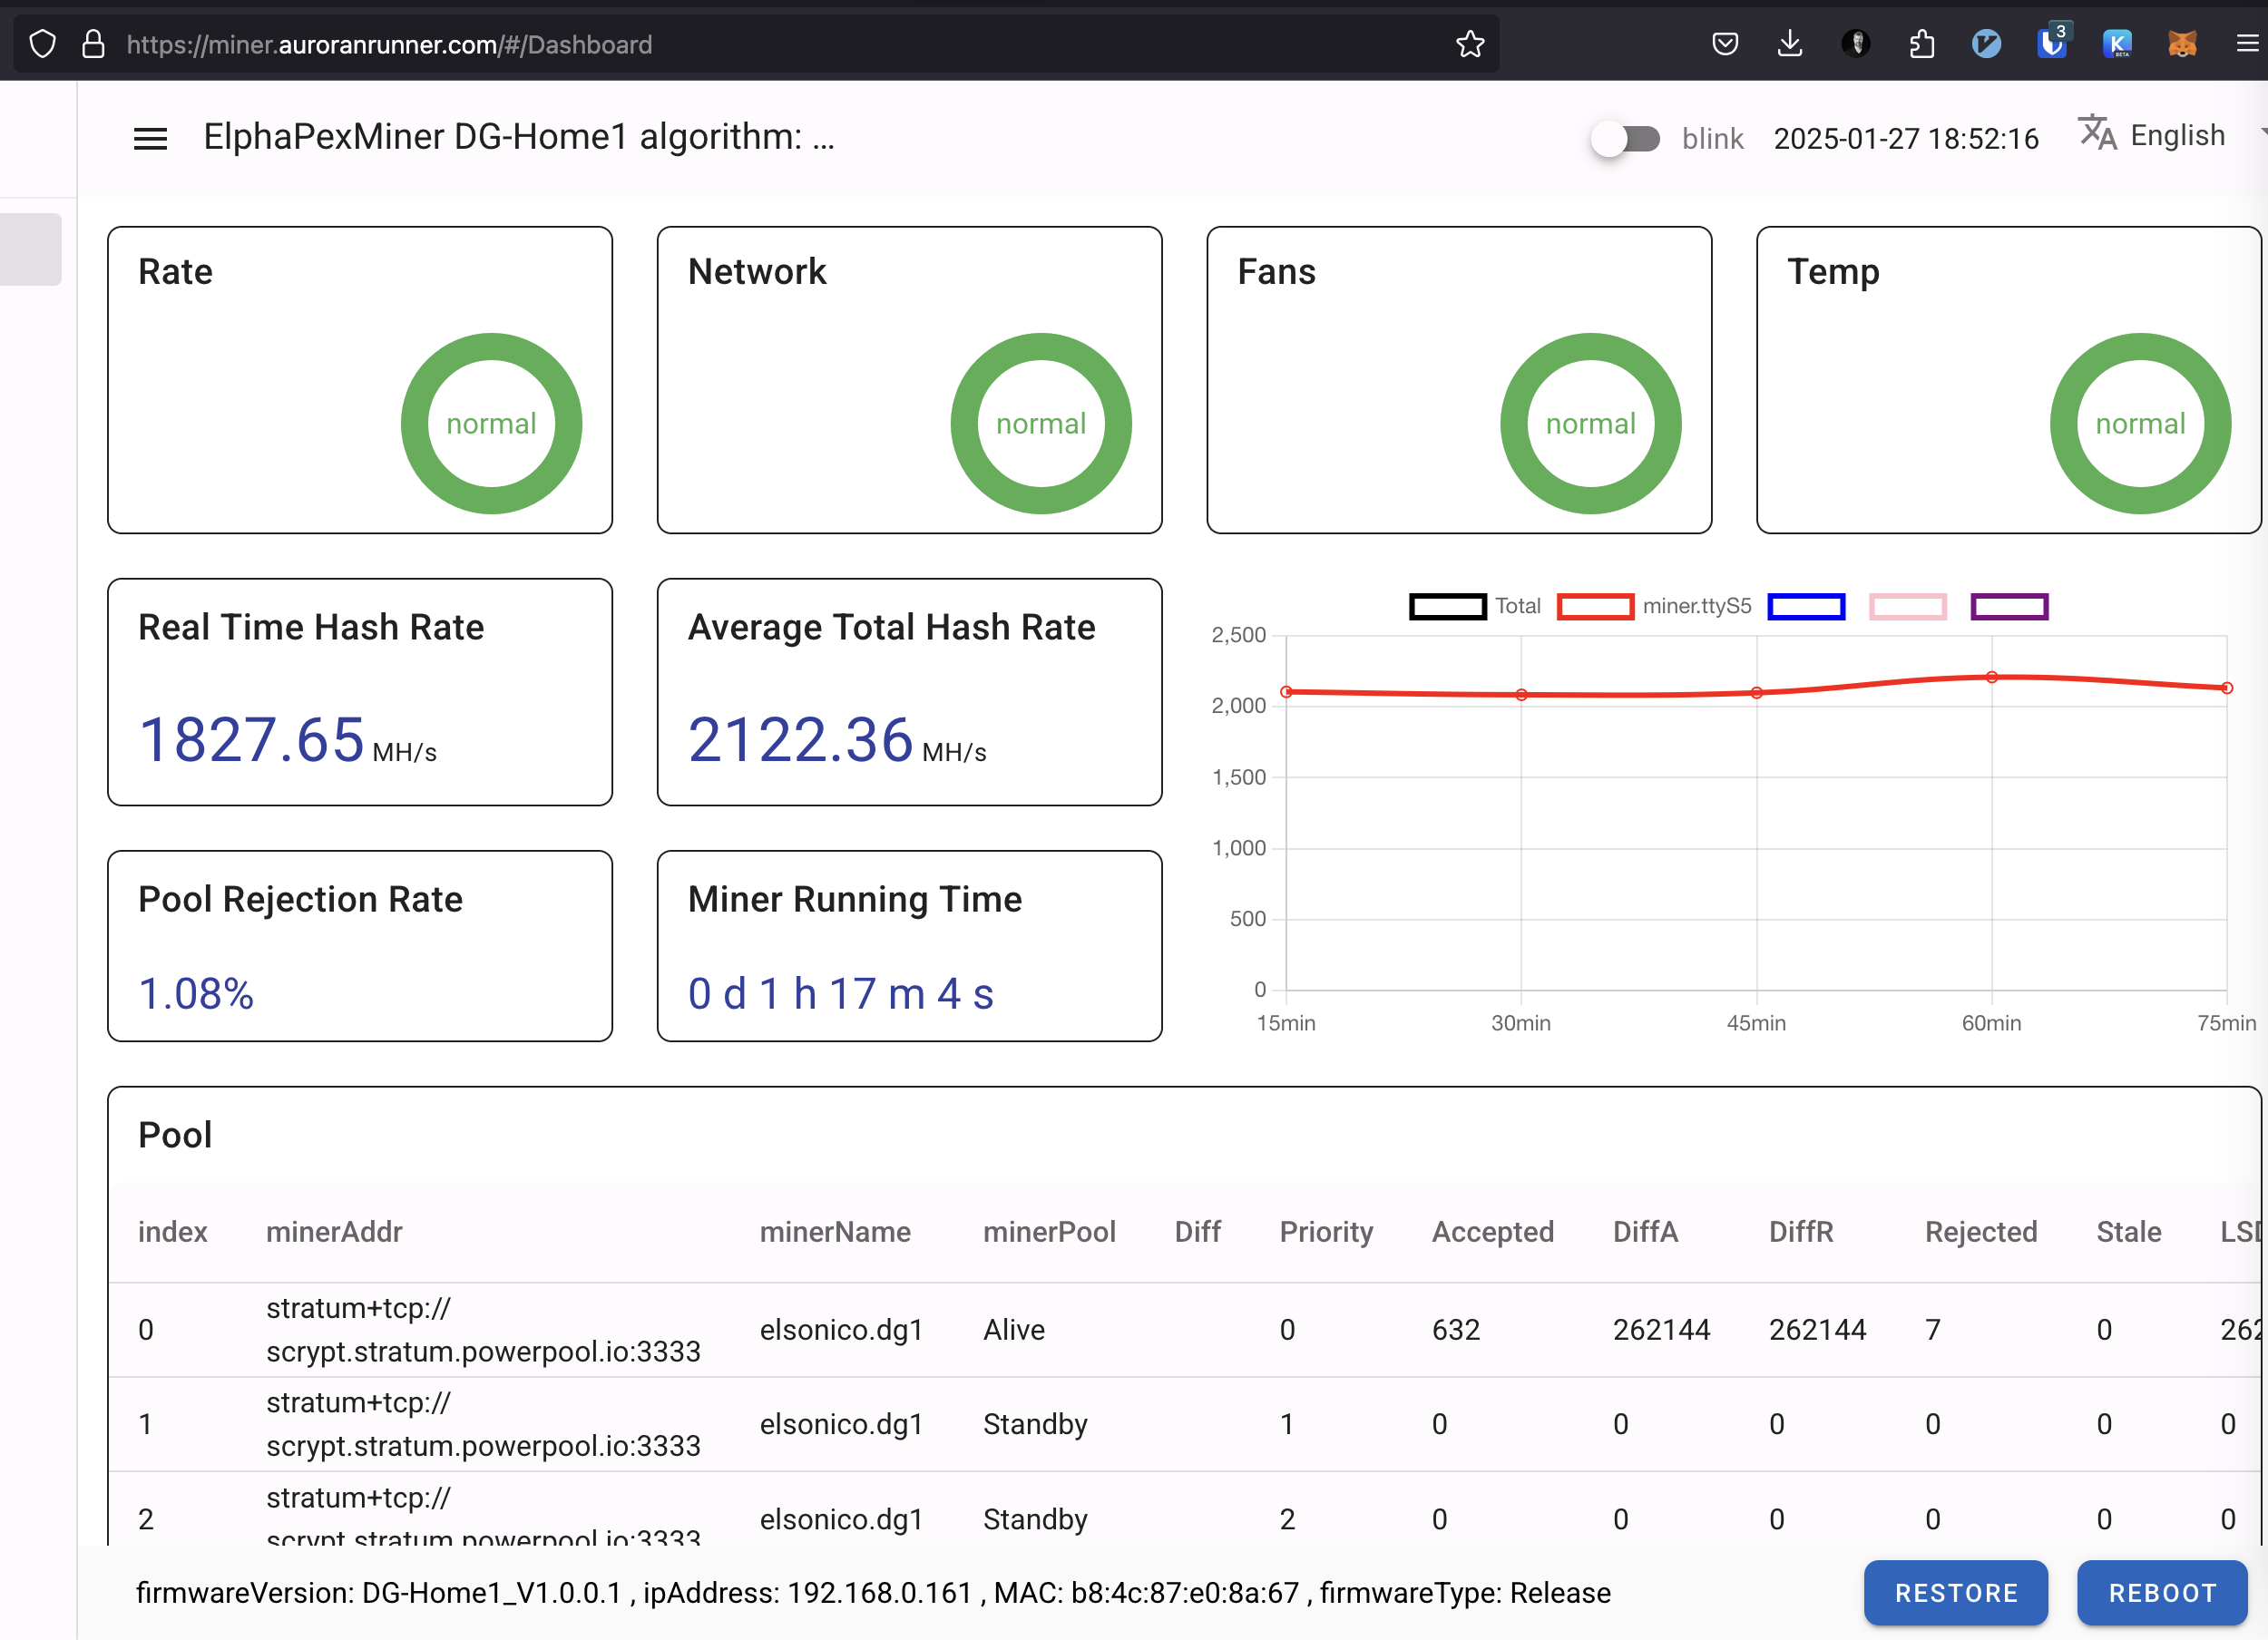
When running the miner the dashboard looks like below on mine setup:
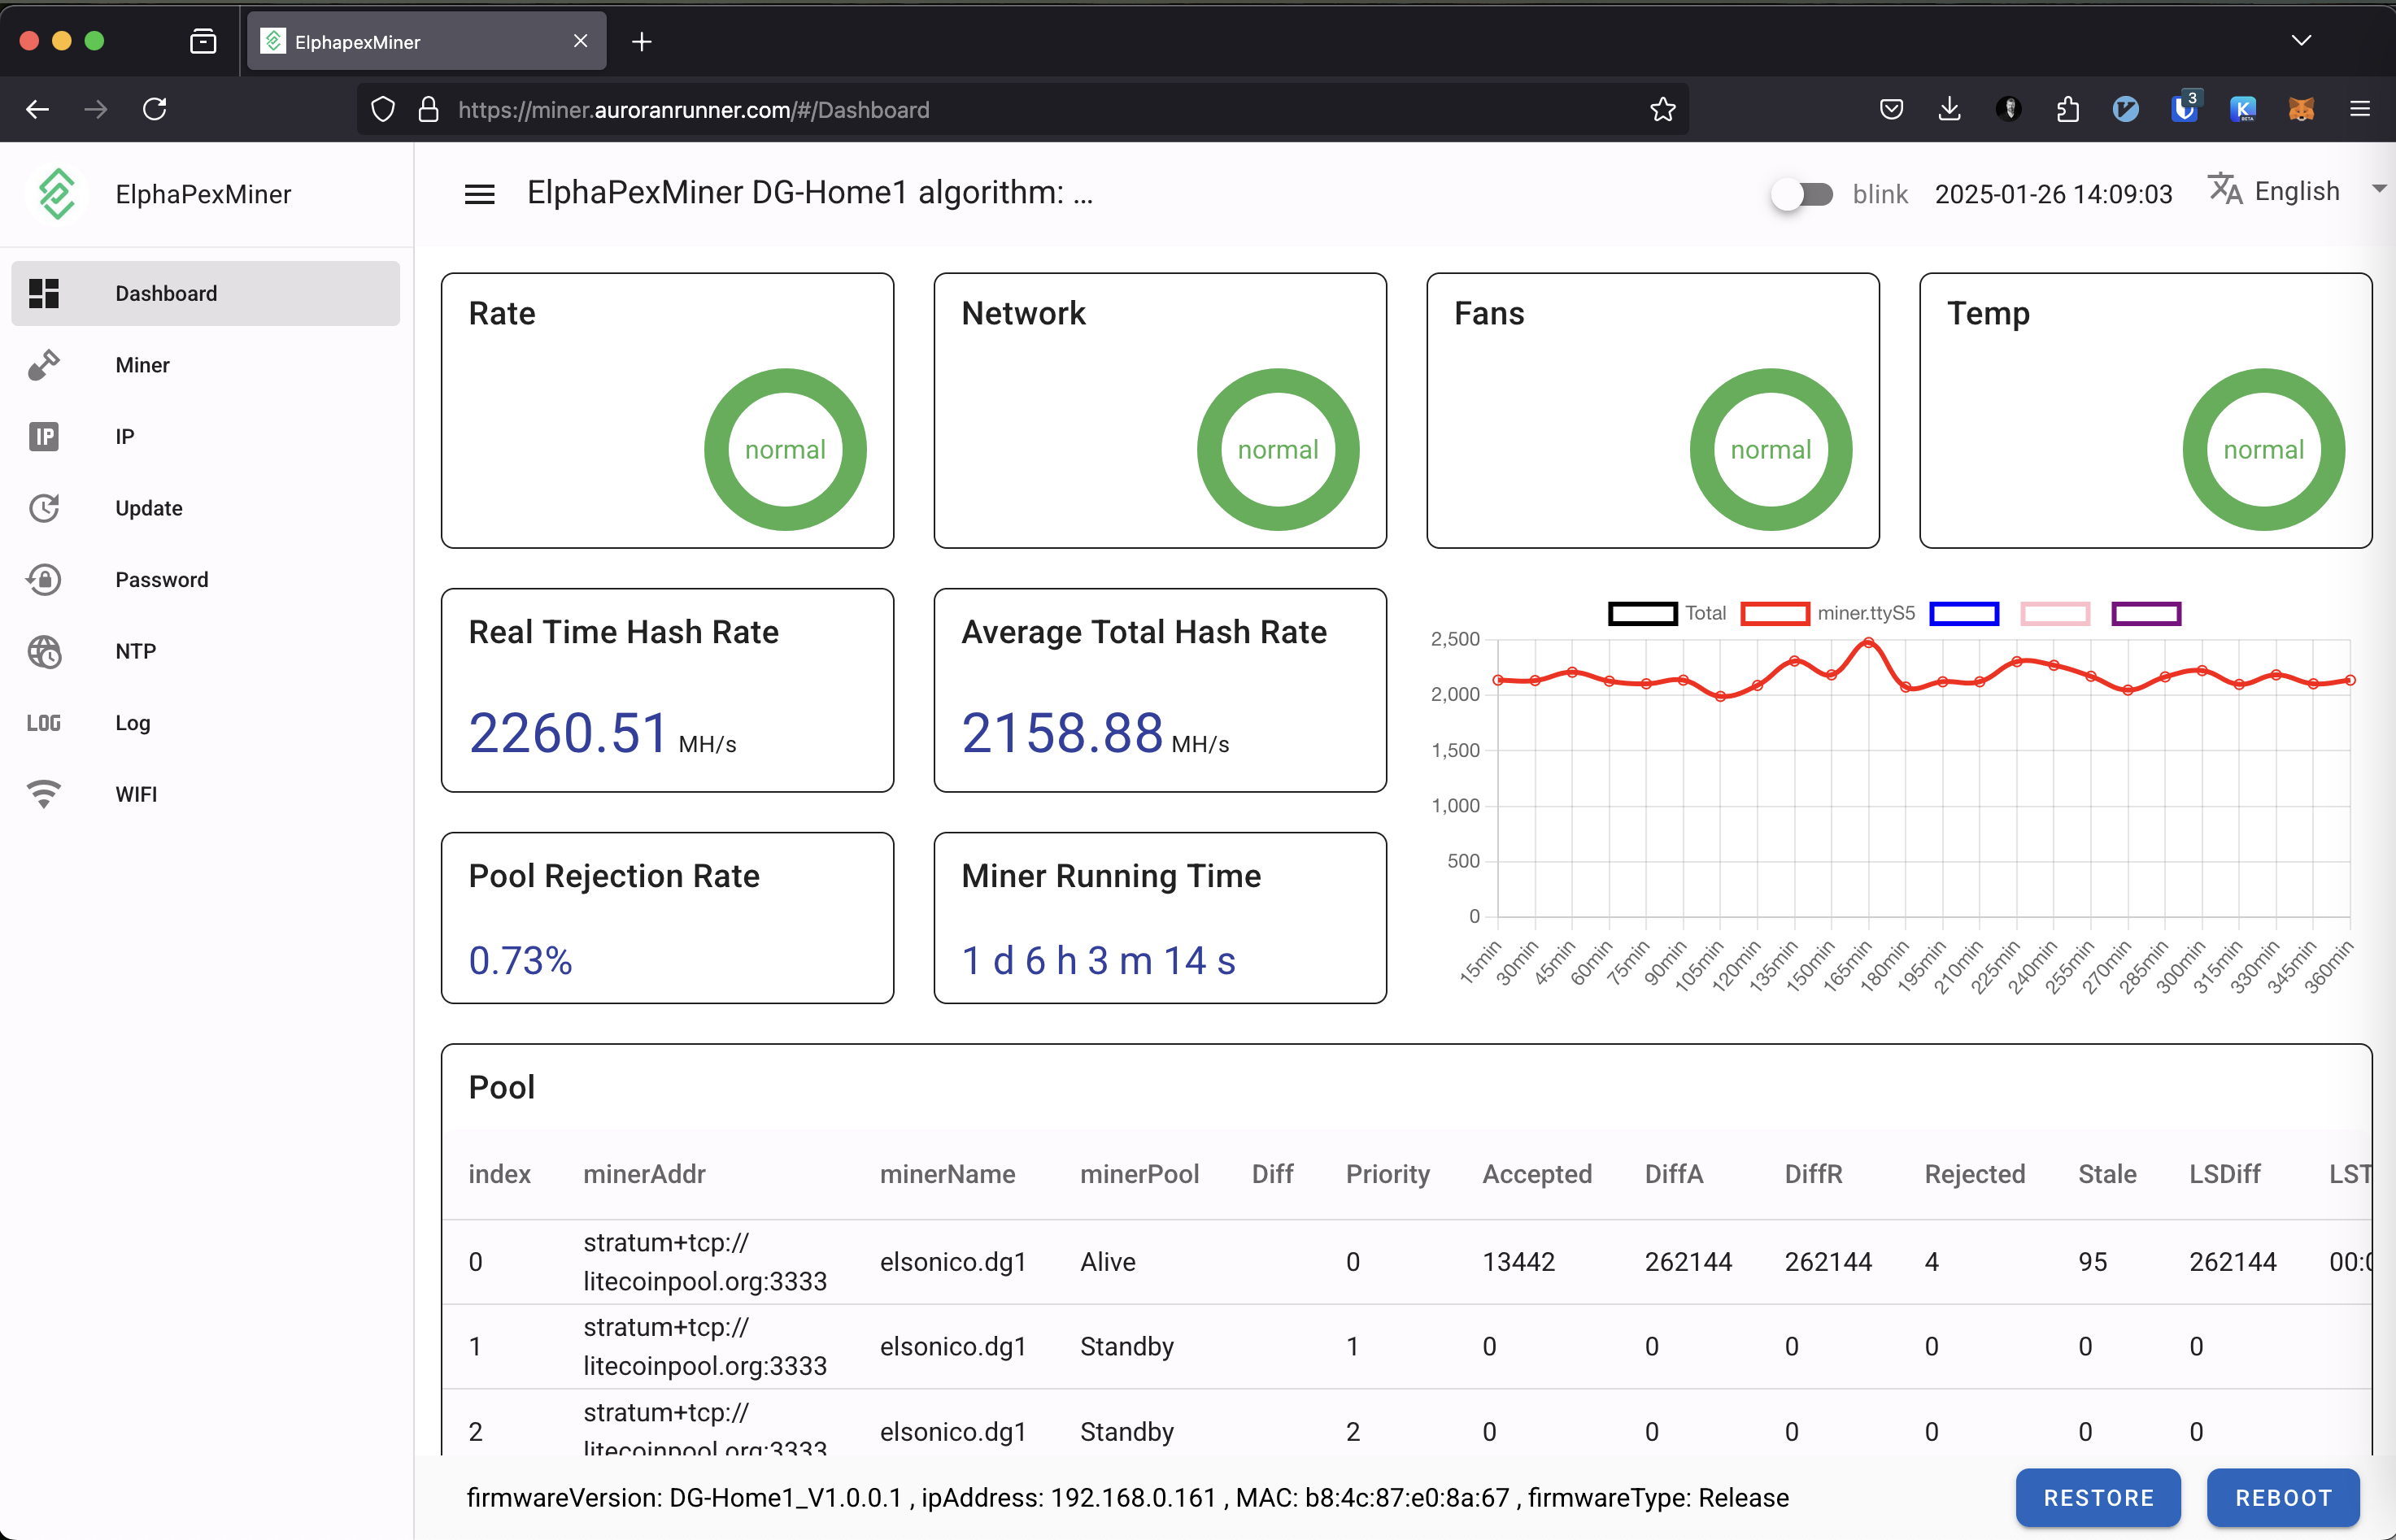
The miner itself is easy to setup so I’m not going much to details here. The default user/password is root/root and I got the IP from my router. It had an issue when using both wireless and wired and I ended up not being able to disable wireless due to that, but I’m ok with it, since I only want to have wireless in the end, although the issue indicates how unfinished the current firmware is.
If you wonder the https URL I’m using above it is because I’ve setup accessing the miner through nginx and I have my own DNS as well. The box is not accessible outside my home network without VPN though.
The box does have ssh daemon listening, but I’m not able to log into it with using root / [web password] which is a bit of a shame. Hopefully that will change with future firmwares.
Step 2: Integrating Your Miner with Home Assistant
Home Assistant provides advanced monitoring and automation capabilities for your mining setup. Here’s how to integrate it:
Requirements
- A running instance of Home Assistant
- The REST API URL and API key from LitecoinPool
- A smart plug for controlling your miner (e.g., Shelly Plug)
Adding LitecoinPool API to Home Assistant
First, add the REST API integration to Home Assistant:
- platform: rest
  name: Litecoinpool Market Data
  resource: https://www.litecoinpool.org/api?api_key=YOUR_API_KEY
  method: GET
  scan_interval: 300
  value_template: "OK"
  json_attributes_path: "$.market"
  json_attributes:
    - ltc_eur
    - doge_eur
Creating Sensors for Monitoring
Use these template sensors to track your rewards:
    total_rewards_eur:
      friendly_name: "Total Rewards EUR"
      unit_of_measurement: "€"
      value_template: >
        {% set total_rewards_ltc = state_attr('sensor.litecoinpool_market_data', 'user')['total_rewards'] | float(0) %}
        {% set total_rewards_doge = state_attr('sensor.litecoinpool_market_data', 'user')['total_rewards_doge'] | float(0) %}
        {% set ltc_price_eur = state_attr('sensor.litecoinpool_market_data', 'market')['ltc_eur'] | float(0) %}
        {% set doge_price_eur = state_attr('sensor.litecoinpool_market_data', 'market')['doge_eur'] | float(0) %}
        {{ ((total_rewards_ltc * ltc_price_eur) + (total_rewards_doge * doge_price_eur)) | round(2) }}
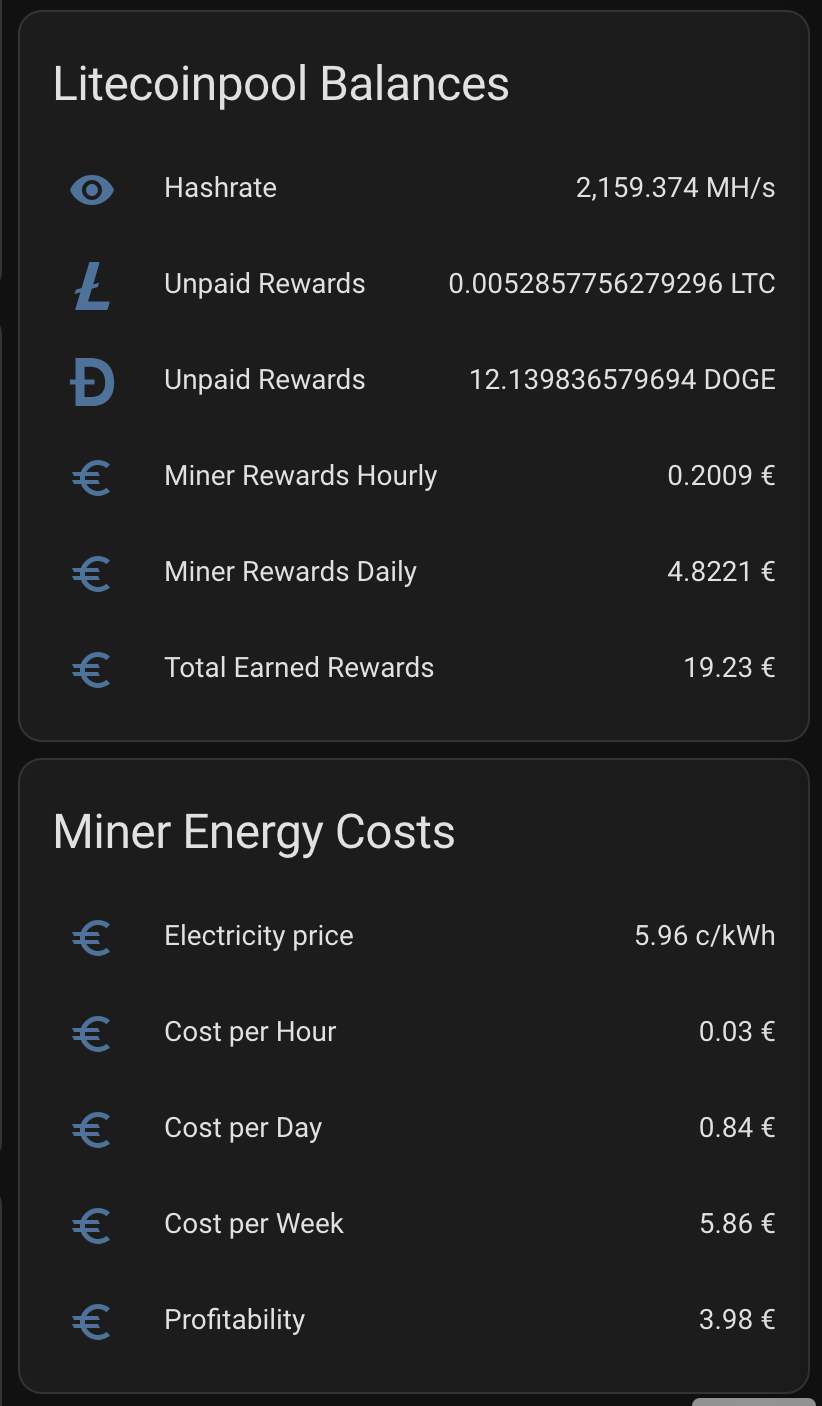
I have also created sensor template for my SPOT electricity price both in €/kWh and c/kWh:
- platform: template
  sensors:
    electricity_cost_per_kwh:
      friendly_name: "Electricity Cost Per kWh"
      unit_of_measurement: "€/kWh"
      value_template: >
        {% set spot_price = (states('sensor.nordpool_kwh_fi_eur_3_10_0255') | float(0)) / 100 %}
        {% set electricity_tax = 0.0283 %}
        {% set transfer_day = 0.0262 %}
        {% set transfer_night = 0.0137 %}
        {% set now = now() %}
        {% set transfer_cost = transfer_night if now.hour >= 22 or now.hour < 7 else transfer_day %}
        {{ (spot_price + electricity_tax + transfer_cost) | round(4) }}
    electricity_cost_in_cents_per_kwh:
      friendly_name: "Electricity Cost in Cents Per kWh"
      unit_of_measurement: "c/kWh"
      value_template: >
        {% set spot_price = (states('sensor.nordpool_kwh_fi_eur_3_10_0255') | float(0)) %}
        {% set electricity_tax = 2.83 %}
        {% set transfer_day = 2.62 %}
        {% set transfer_night = 1.37 %}
        {% set now = now() %}
        {% set transfer_cost = transfer_night if now.hour >= 22 or now.hour < 7 else transfer_day %}
        {{ (spot_price + electricity_tax + transfer_cost) | round(4) }}
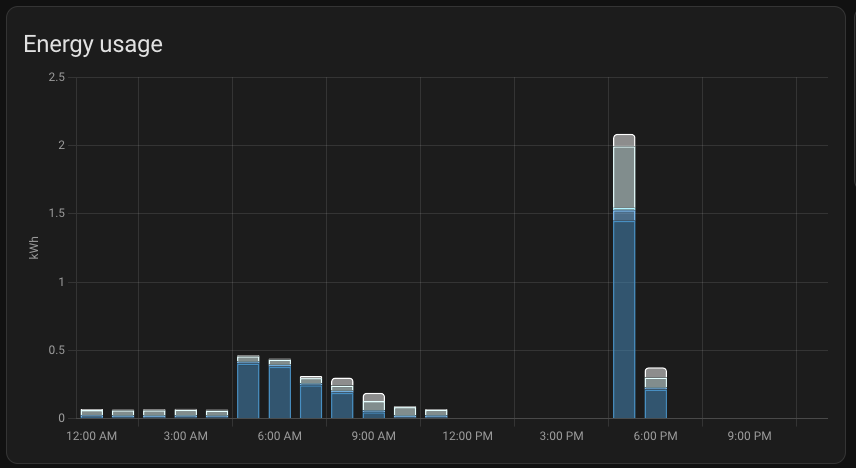
When above are set I get nice graph for my hash rate and real electricity price including taxes and transfer fees:
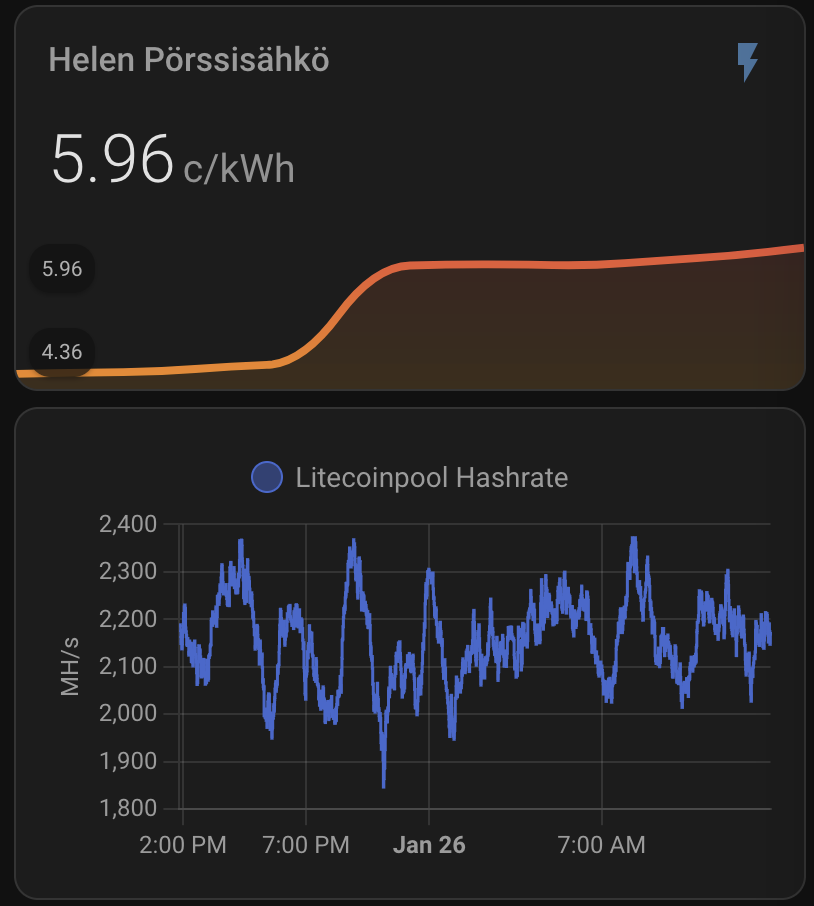
Plus I get daily rewards, paid rewards, profitability, electricity consumption and all key parameters to monitor the appliance.
Automating Miner Power Management and Crash Detection
I created an automation to turn off the miner if electricity prices exceed a threshold when it is not profitable anymore. When electricity price goes lower the miner will be powered on again. I might need to change the threshold, but below is based on current profitability calculation without taking profit generated by heating the house:
 alias: Turn Off Miner When Electricity Price Is High
  description: "Turns off the miner when electricity price goes above 33c/kWh"
  trigger:
    - platform: numeric_state
      entity_id: sensor.electricity_cost_in_cents_per_kwh
      above: 33
  action:
    - service: switch.turn_off
      target:
        entity_id: switch.shellyplug_s_3ce90ee04b97

- alias: Turn On Miner When Electricity Price Is Low
  description: "Turns on the miner when electricity price goes below 33c/kWh"
  trigger:
    - platform: numeric_state
      entity_id: sensor.electricity_cost_in_cents_per_kwh
      below: 33
  action:
    - service: switch.turn_on
      target:
        entity_id: switch.shellyplug_s_3ce90ee04b97
I also wanted to restart the miner if there is no mining detected on Litecoinpool. For this I use hashrate. If hashrate is 0 then I will reboot the miner.
- alias: Reboot or Power Cycle Miner
  description: Reboot the miner on low hash rate, fallback to power cycle if needed
  trigger:
    - platform: state
      entity_id: sensor.litecoinpool_hashrate
      to: "0"
      for: "00:15:00"
  condition: []
  action:
    - service: button.press
      target:
        entity_id: button.shellyplug_s_3ce90ee04b97_reboot
    - delay: "00:10:00"  # Wait 10 minutes to see if reboot resolves the issue
    - condition: state
      entity_id: sensor.litecoinpool_hashrate
      state: "0"  # Hashrate is still 0
    - service: switch.turn_off
      target:
        entity_id: switch.shellyplug_s_3ce90ee04b97
    - delay: "00:00:10"  # Wait 10 seconds
    - service: switch.turn_on
      target:
        entity_id: switch.shellyplug_s_3ce90ee04b97
  mode: single
Benefits of Integrating Mining with Home Assistant
- Real-time monitoring: Track hash rate, rewards, and energy consumption.
- Profitability tracking: Automatically calculate earnings and costs.
- Energy efficiency: Automate miner power based on electricity prices.
Profitability
This is small miner so it will not generate much profit, but at best it is around 4€/day. It also generates a lot of heat which saves me on heating costs. That being said, I have heat pump which is more effective on heating. On the other hand I save on heating more than just the direct cost, since I can deduct the electricity cost from tax return on profit
We will see where the average profit will land – that depends on DOGE price as well as on how the mining rewards will progress in the future. I’d expect the miner not to be gold mine, but I also assume it will generate some profit and capital gain within next five years. It is more of a hobby than real money maker though.
Initial conclusion
By combining LitecoinPool and Home Assistant, you can optimize your mining setup for maximum profitability and efficiency. The integration allows you to monitor rewards, manage costs, and automate operations seamlessly.
Choosing the mining pool
I initially chose LitecoinPool because it has good profitability and easy to setup. LitecoinPool is excellent choice in my opinion but obviously no one should not settle with the first choice. I investigated a bit more. It seems at least if you check from powerpool.io that PowePool has the highest rewards and litecoinpool.org comes 2.4% with less rewards when I checked. Obviously PowerPool is biased on this, so I need to monitor longer to do the final decision.
Anyhow since powerpool.io lets choose the crypto currency to get the rewards paid on I decided to give it a try. In my case just getting everything in BTC makes sense, since I have actually planned to convert all the rewards to BTC anyway. I haven’t really decided what my final strategy will be though.
LitecoinPool.org
Within my first week of experimenting I started with litecoinpool.org where I ended up earning around 25€ for the few days there. I liked the API options available and how the web page is simple. The reward are payed on both DOGE and LTC and payments are easy to set up. When you set for example payments to 30DOGE and 0,001LTC you get paid almost every second day around 11€.
Powerpool.io
Powerpool.io is my cohice for now, since it seems to provide be best profitability and I can get paid everything in BTC so I don’t need to do any conversions which in my country are by the way all taxable operations and needs to be reported on tax return.
mining-dutch.nl
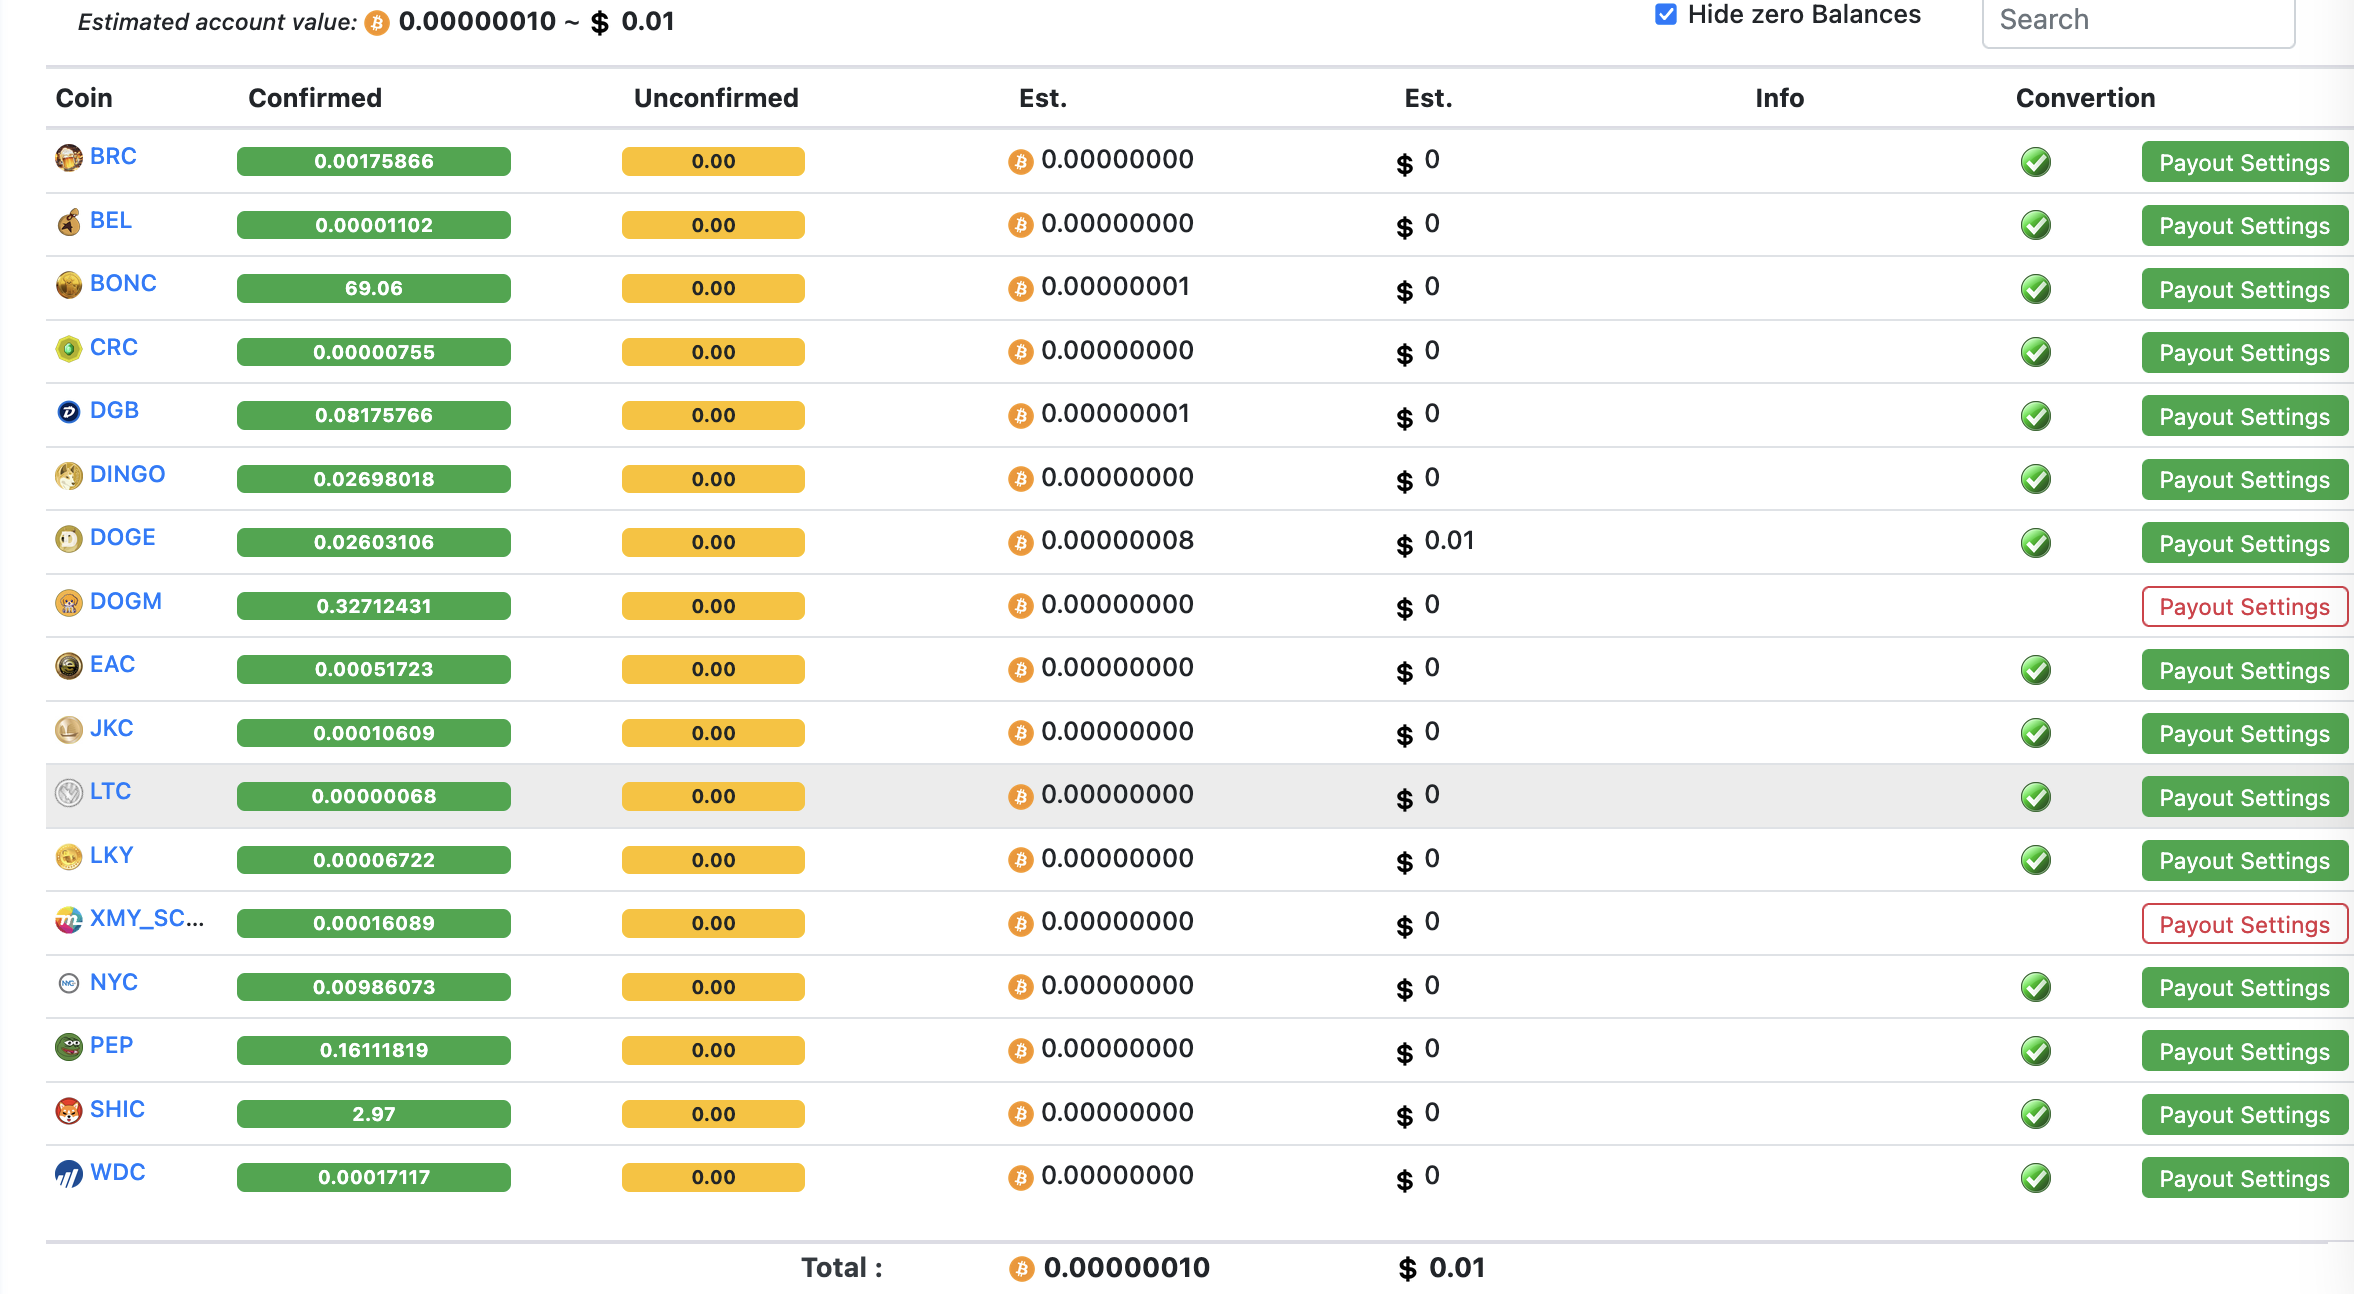
I tried out also mining-dutch.nl. It has the widest selection of options and coins you can get your rewards. The profitability on all these three depends on various factors. I didn’t run on mining-dutch.nl to really receive any rewards. BUt as you can see from below picture, it truly supports several coins in a way miner can see exactly what he or she is mining.
Switching to to a different pool means basically just changing the stratum UR, username and password. These
Elphapex configuration for PowerPool
Since I decided in the end stick on PowerPool here are the few things I did there.
Setting up another pool is as easy as create an account and the new miner URLs on Elphapex miner page and save. Even restart is not necessarily needed.
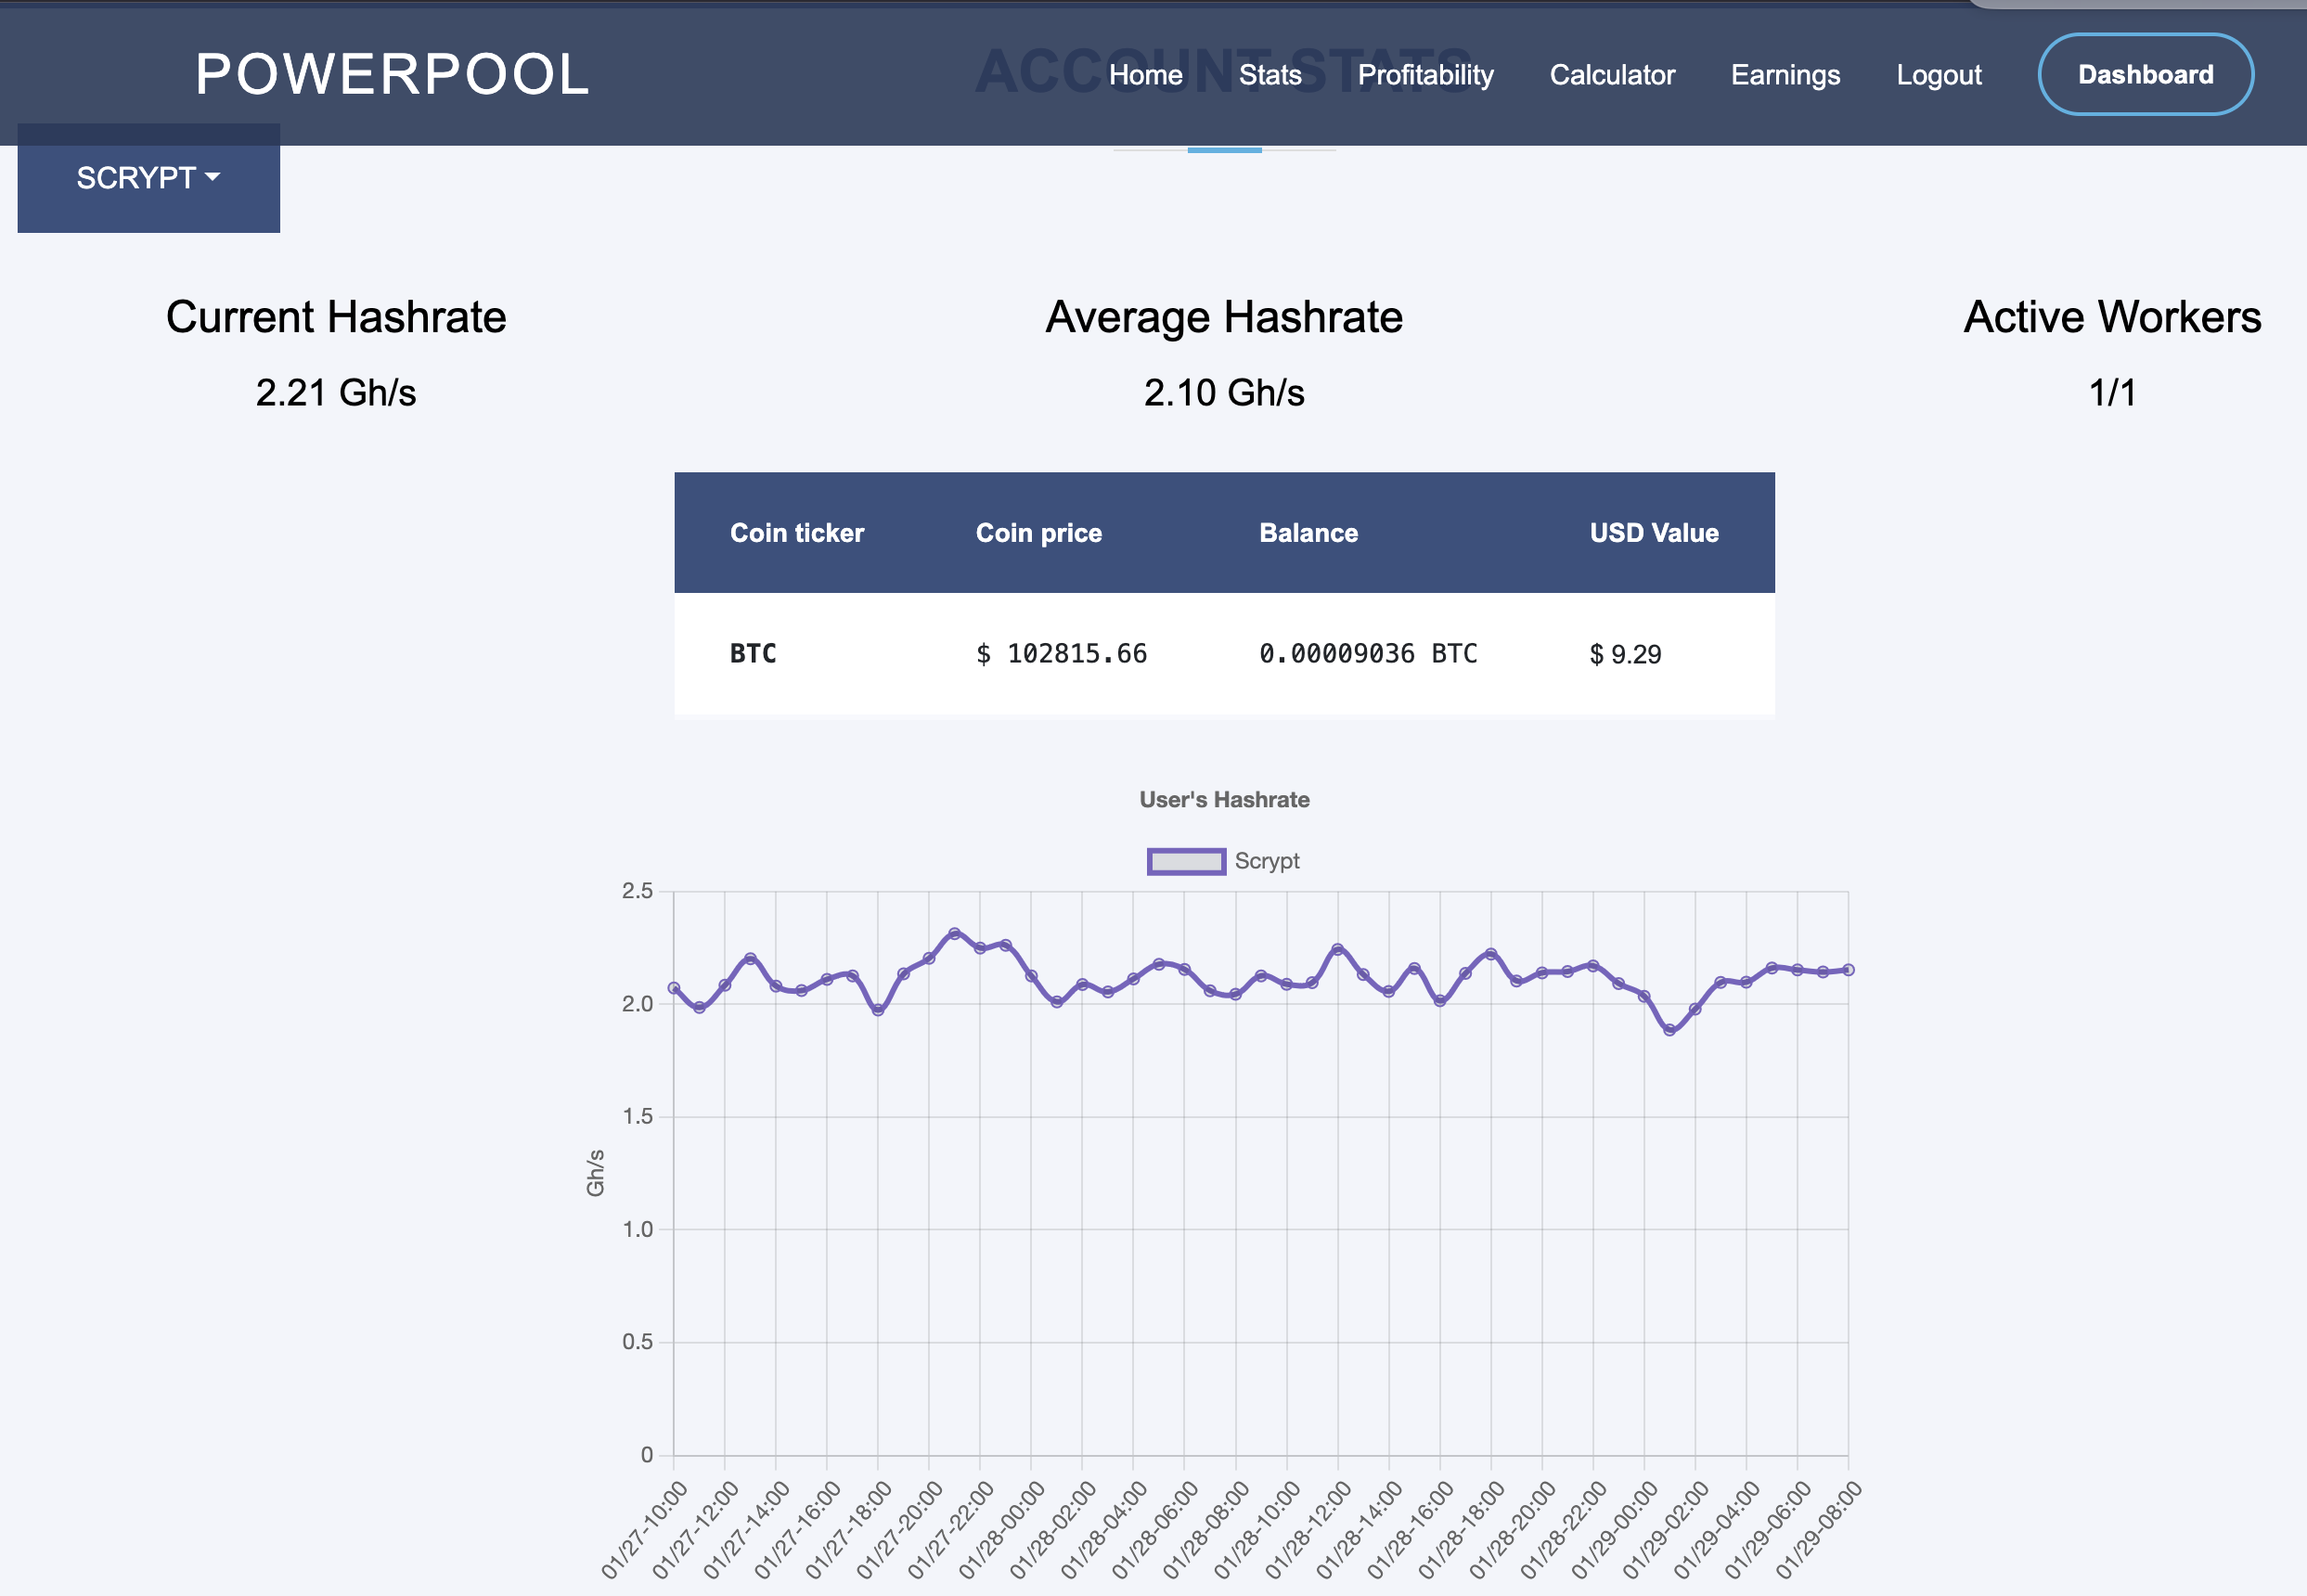
Above pictures illustrates powerpool.io and rewards in about 48 hours after I changed the configuration.
PowerPool HomeAssistant Dashboard
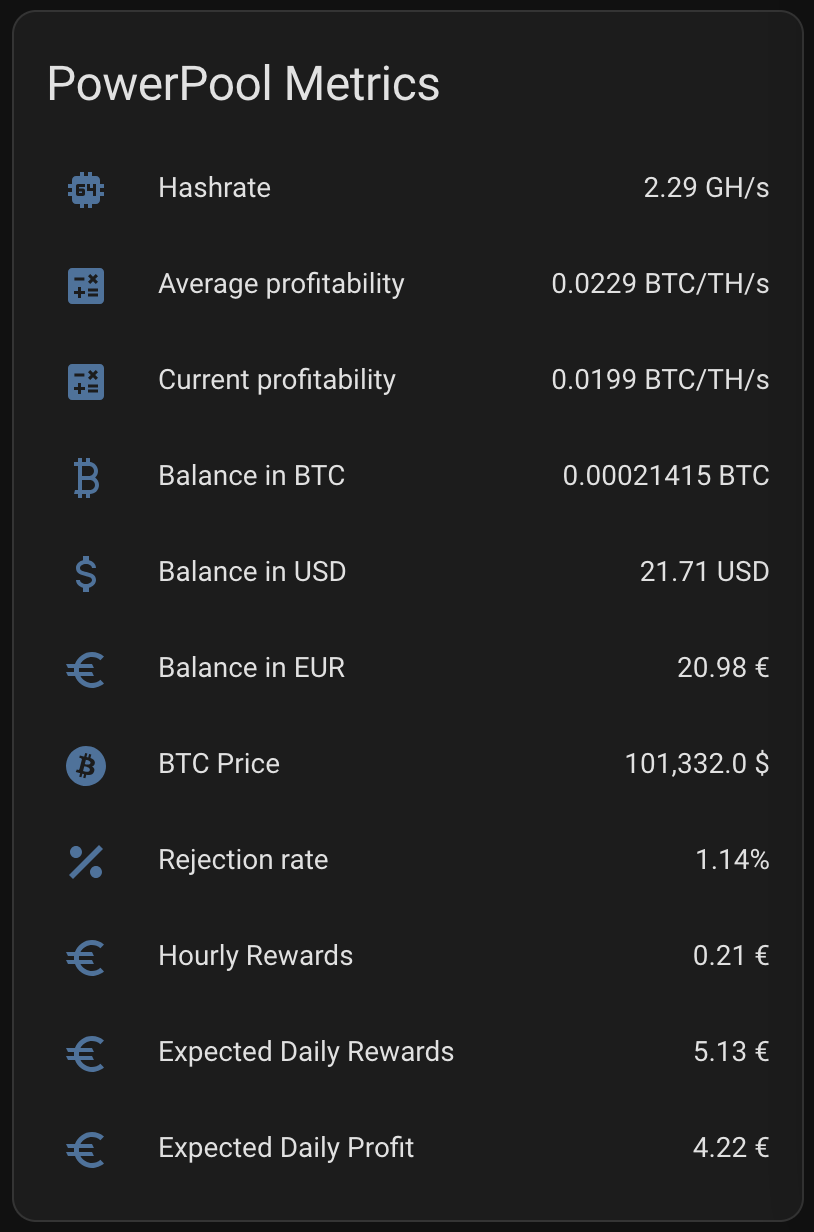
Setting up the Home Asisstant Dashboard with same setup as I have for LitecoinPool is a bit harder, since PowerPool API is missing certain reward data – expected daily rewards for example – which makes it much harder to create similar profitability values as I have setup for LitecoinPool. I have currently following confirguration for PowerPool on my sensors.yaml:
- platform: rest
  name: "PowerPool Hashrate"
  resource: !secret powerpool_user_api_url
  value_template: "{{ value_json.data.hashrate.scrypt.hashrate | float }}"
  unit_of_measurement: "GH/s"
  scan_interval: 300

- platform: rest
  name: "PowerPool Rejection Rate"
  resource: !secret powerpool_user_api_url
  value_template: "{{ value_json.data.workers[0].rejectedPercentage | float }}"
  unit_of_measurement: "%"
  scan_interval: 300

- platform: rest
  name: "PowerPool BTC Balance"
  resource: !secret powerpool_user_api_url
  value_template: >
    {% for balance in value_json.data.balances %}
      {% if balance.coinTicker == 'BTC' %}
        {{ balance.balance | float }}
        {% break %}
      {% endif %}
    {% endfor %}
  unit_of_measurement: "BTC"
  scan_interval: 300

- platform: rest
  name: "PowerPool USD Balance"
  resource: !secret powerpool_user_api_url
  value_template: >
    {% for balance in value_json.data.balances %}
      {% if balance.coinTicker == 'BTC' %}
        {{ balance.balanceUSD | float }}
        {% break %}
      {% endif %}
    {% endfor %}
  unit_of_measurement: "USD"
  scan_interval: 300

- platform: rest
  name: "PowerPool BTC Rewards"
  resource: !secret powerpool_user_api_url
  value_template: >
    {% for reward in value_json.data.workers[0].totalRewards %}
      {% if reward.coinTicker == 'BTC' %}
        {{ reward.totalRewards | float }}
        {% break %}
      {% endif %}
    {% endfor %}
  unit_of_measurement: "BTC"
  scan_interval: 300
I created following card yaml:
type: vertical-stack
cards:
  - type: history-graph
    entities:
      - entity: sensor.powerpool_hashrate
    hours_to_show: 24
    refresh_interval: 60
    name: Hashrate (Last 24h)
  - type: entities
    title: PowerPool Metrics
    entities:
      - entity: sensor.powerpool_hashrate
      - entity: sensor.powerpool_btc_balance
      - entity: sensor.powerpool_usd_balance
      - entity: sensor.powerpool_rejection_rate
  - type: entities
    title: Miner Energy Costs
    entities:
      - entity: sensor.electricity_cost_in_cents_per_kwh
        name: Electricity price
        icon: crypto:fiat-eur
      - entity: sensor.shellyplug_s_3ce90ee04b97_energy_cost_hourly
        name: Cost per Hour
        icon: crypto:fiat-eur
      - entity: sensor.shellyplug_s_3ce90ee04b97_energy_cost_daily
        name: Cost per Day
        icon: crypto:fiat-eur
      - entity: sensor.shellyplug_s_3ce90ee04b97_energy_cost_weekly
        name: Cost per Week
        icon: crypto:fiat-eur
Above card creates something like like below with running about 10 hours:
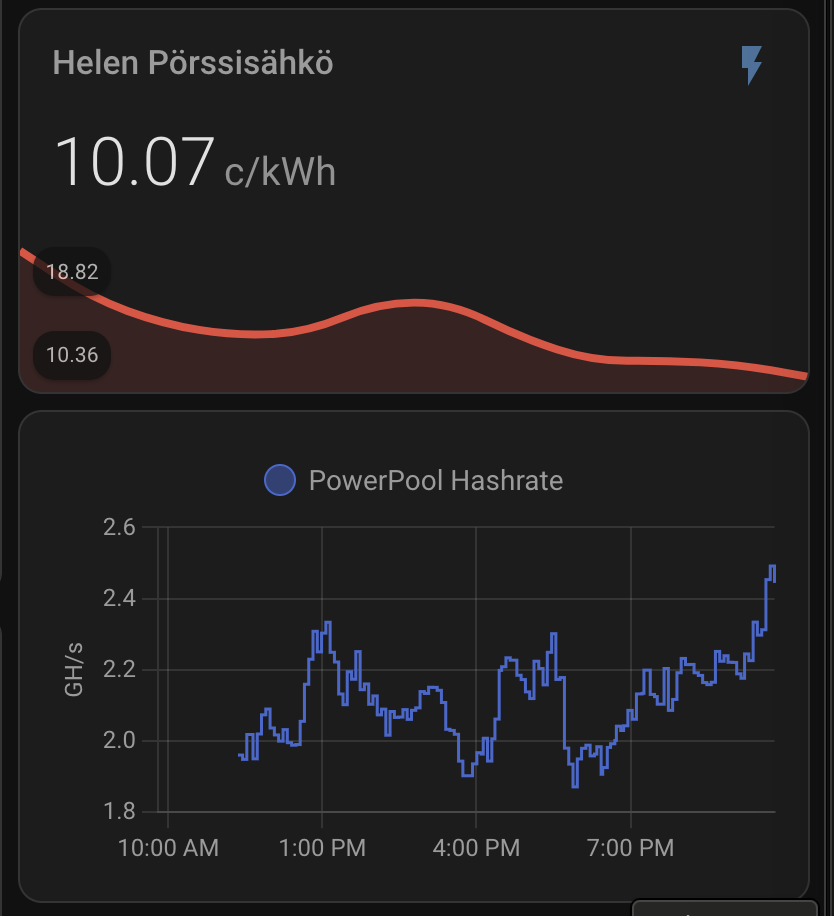
I spent a whole day figuring out how to get same configuration I had with Litecoinpool done within couple of hours. I ended up getting much more information in the end. The below card has pretty much all I could think of.
The full configuration
The code snippets above does not have my full Home Assistant configuration, but as normal you can check the whole configuration from my GitHub Repo.
 |  |  |