As mentioned on previous post Elphapex DG Home 1 has three different power modes:
Normal
Powersave
Overclock
I did some experimenting on changing the modes based on electricity prices. Throughout the summer the ASIC miner has been outside on really small shed. Typically during summer in Finland the electricity SPOT price – which various based on supply and demand – is really low. This is why I just kept the box running 24×7 in full overclock mode.
Problem
Now that we are on Autumn and weather is still relatively warm so I don’t need extra warming inside – which the miner provides during winter months – so I’ve kept the box outside. That being said, within last few weeks the SPOT price has varied a lot going from minus prices to over 30c/kWh. Switching power mode manually through Windows application is tedious and ineffective.
Solution
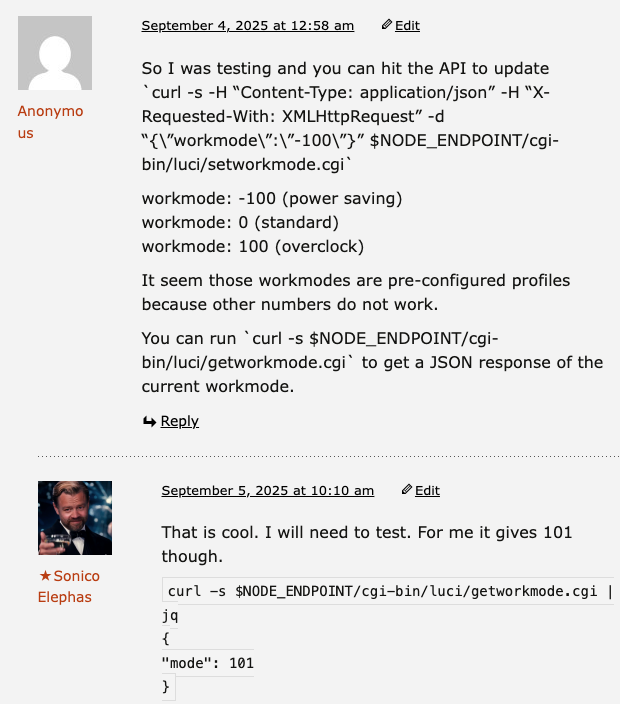
I didn’t have motivation to start reverse-engineering on how the Elphapex application changes the modes which I could have done by listening the TCP/IP packets between the Windows VM running the app and the box itself with tcpdump, for example. Instead some courageous soul named “Anonymous” provided what is needed on previous posts comment section.
Now I have what I need to both read the state and change it. I created two python scripts available on my github repo:
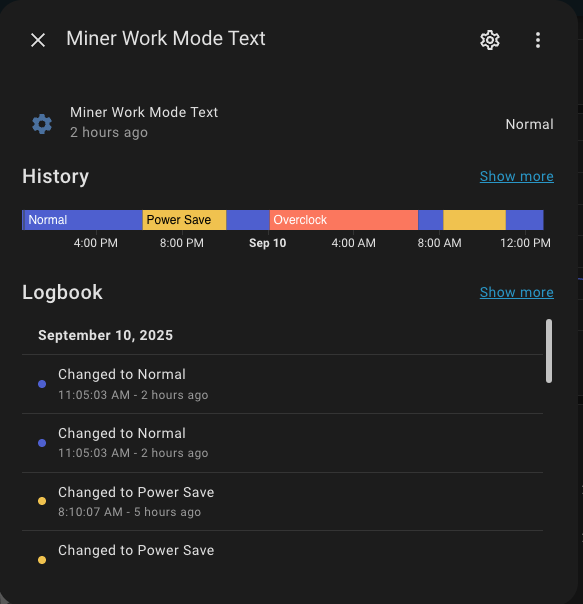
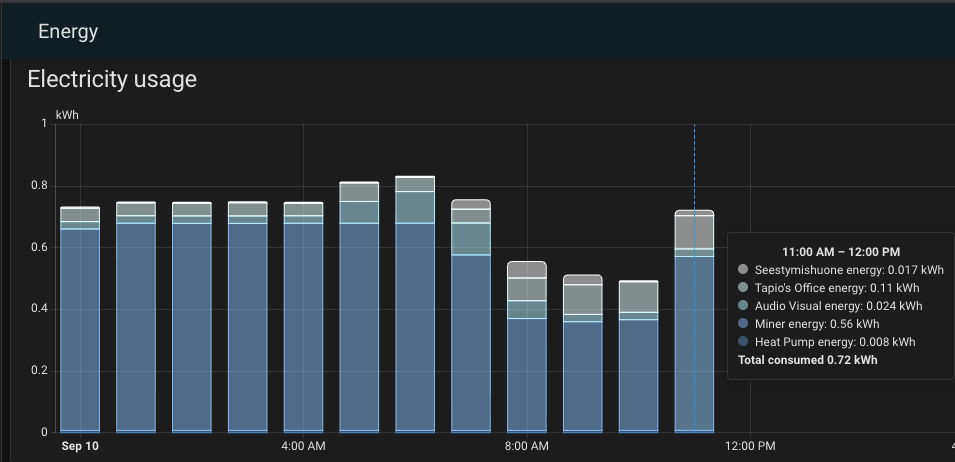
Above is pretty self explaining. I can set and read the mode with first script and second publishes the mode on MQTT Broker. Then on my Home Assistant instance I have a sensor reading the status from MQTT Broker which I can have on my HA dashboard:
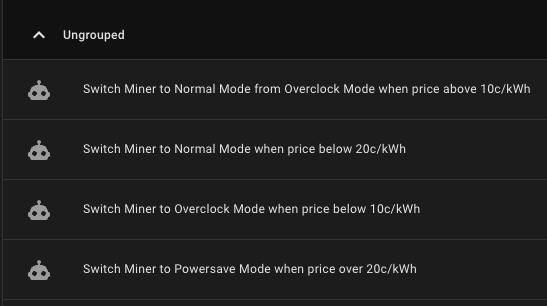
I have automated the switch between modes on HA Automations based on electricity price:
When the price goes above 30c/kWh automation shuts down the box and then turns it back on when price drops. Obviously I needed to do additional changes also on sensors.yaml and mqtt.yaml but details on these are beyond the scope of this blog post.
Conclusion
This approach was my initial idea even before I acquired any mining box and I knew it was possible to do on some ASIC miners which have documented API calls unlike Elphapex has. But with some reverse engineering and help from the community all this was in the end doable with Elphapex DG Home 1 as well.
If you check above you can see the electricity consumption for the miner various per hour. The highest it is when electricity is below 10c/kWh while running on overclock mode, lowest when price is above 20c/kWh when running on powersave mode and in between when running on normal mode. Today we haven’t had price going over 30c/kWh and that is not very often when it happens, but would it happen the miner gets the shut down.
I’m extremely satisfied on the implementation and the fact that I don’t need to raise a finger to change the modes not mention to run Windows VM on my MacBook just to change the modes.
Now that I’ve successfully tested Overclock (OC) mode on my DG Home 1, it’s time to explore how the Power Save (PS) mode works. Today seems like a perfect opportunity to switch into PS mode while continuing to mine, since the electricity price remains relatively high.
Electricity SPOT price
My electricity plan is spot-priced, so the cost per kWh fluctuates throughout the day. Most of the time it’s under 10 c/kWh (including taxes and tariffs), but it can rise quite high. At certain thresholds—specifically around 56 c/kWh—I have automated triggers to shut down the miner to avoid excessive costs.
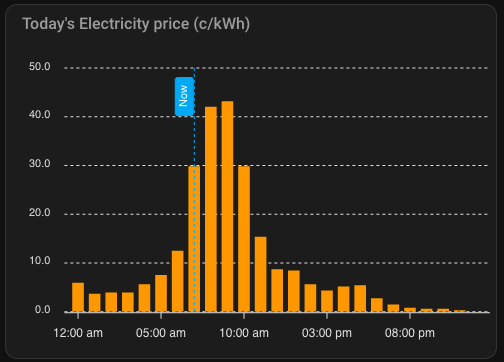
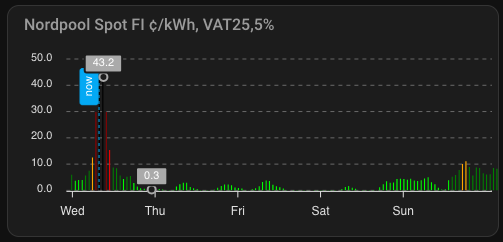
Here’s an example of the day’s electricity price chart, showing that while the price doesn’t quite reach my 56 c/kWh cutoff, it does climb above 40 c/kWh. The added transfer tariff brings the total cost even higher, so it’s a good scenario to test the benefits of Power Save mode.
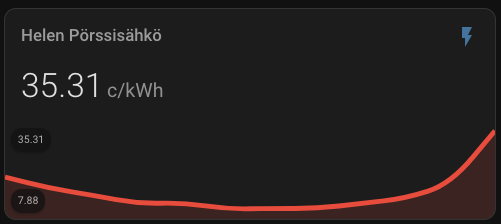
With all the taxes and transfer tariff the actual price is as shown below:
Elphapex DG Home 1 modes
As mentioned in my previous post, the Elphapex DG Home 1 miner has several power modes:
Power Save Mode
Normal Mode
Overclock Mode
These modes can be set using the ElphaPexTool, a Windows-only graphical utility that I personally find cumbersome. For one, I don’t use Windows natively, so I have to run a virtual machine. Additionally, I prefer to do everything through a web interface or via a REST API for easy automation. Nonetheless, I switched to “Power Save” using the ElphaPexTool’s “RemoteCtrl” setting:
After making the change, the miner reboots—though I’m never fully sure if this is done automatically or if I should manually reboot via the tool’s “RebootSel” option. To be safe, I did a manual reboot.
UPDATE: After doing this several times now: there is now need for reboot. The miner will by itself without manual reboot . This I can confirm to work with firmware release V1.0.5. and as far as I can remember that was the behavior also with initial V1.0.0.1 firmware.
PowerSave mode in action
In Normal mode, my DG Home 1 averages around 590 W—significantly less than the 630 W commonly advertised, possibly due to my 230 V European power standard. Shelly Plug S measurements confirm this, and it matches the miner’s own logs. In Overclock mode, the power usage climbs to about 670 W.
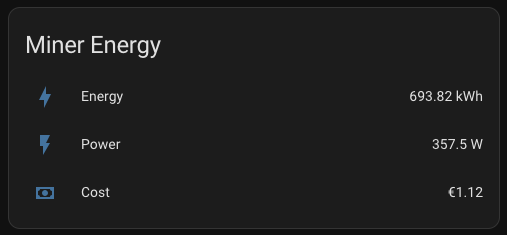
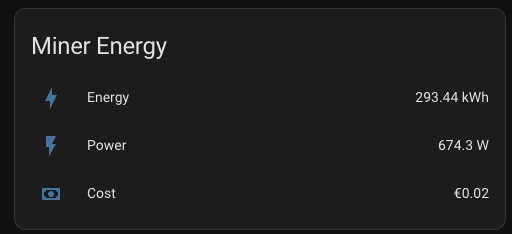
Now, in Power Save mode, the wattage drops significantly to about 360 W:
input power = 360 W, input voltage = 231 V, input current = 1 A
Below is a screenshot from my Shelly Plug S in Home Assistant, which shows the measured wattage and cumulative energy/cost data.
All of this feeds into my Home Assistant Energy Panel and a PostgreSQL database for historical tracking.
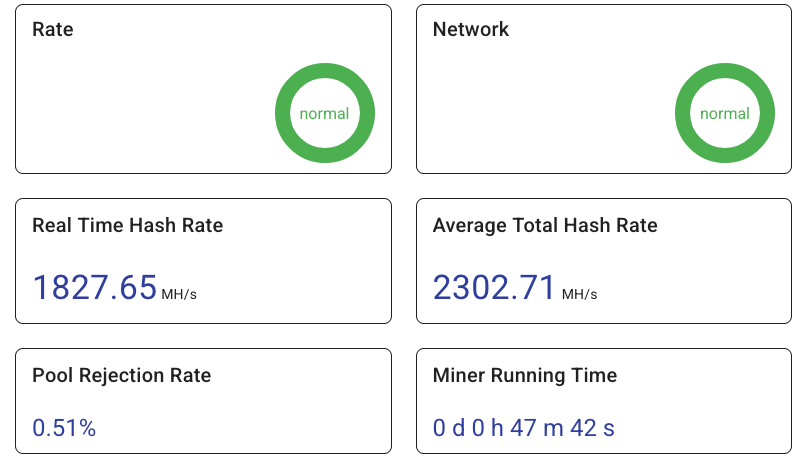
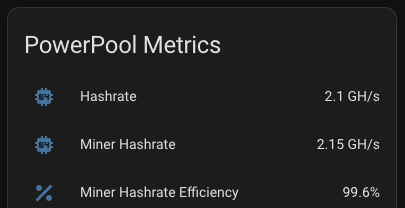
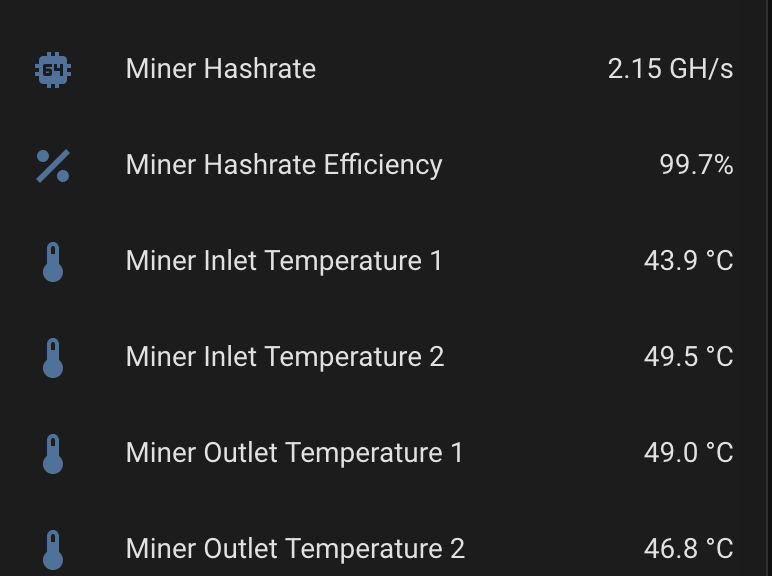
Hashrate
Naturally, the hashrate also drops. Typically, I see:
Normal Mode: ~2.1–2.2 GH/s
Overclock Mode: ~2.3–2.4 GH/s
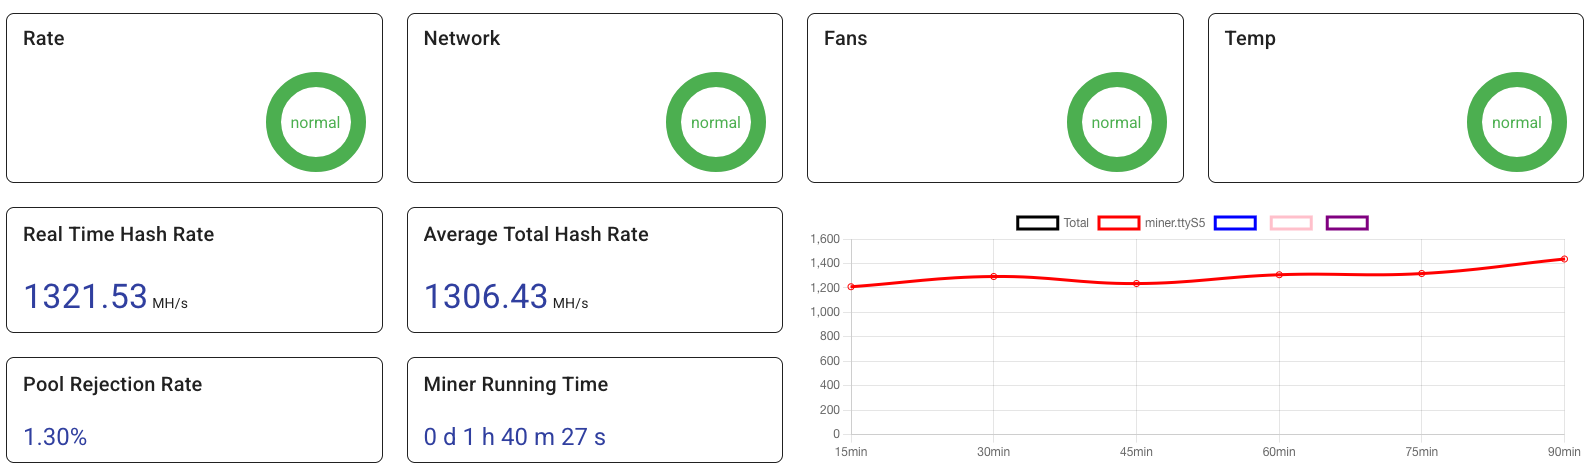
In Power Save mode, it falls to around 1.2–1.4 GH/s. Above screenshot from the ElphaPex web interface (image missing) shows the final switch to Power Save mode, and you can also see where Overclock mode was running earlier this week. Below image shows the hashrate on ElphaPex web interface:
Energy Efficiency
Using the following approximate data points:
Normal mode: 590W 2.1GH/s
OverClock mode: 670W 2.3GH/s
PowerSave mode: 360W 1.2GH/s
We can calculate energy efficiency in joules per megahash (J/MH). Lower values are more efficient:
Normal mode: 0.28 J/MH
OverClock mode: 0.29 J/MH
PowerSave mode: 0.30 J/MH
This confirms that Normal mode is the most energy-efficient (lowest J/MH), with Power Save mode being the least efficient of the three. Overclock mode falls somewhere in between. It seems logical that the device performs most optimally in its default (Normal) mode.
Conclusions
Despite Power Save mode drawing significantly less power, it also provides a proportionally lower hashrate, resulting in higher J/MH (lower overall efficiency). On the other hand, if electricity prices spike, using Power Save mode can still reduce your immediate energy bill by cutting overall power draw, even if it’s not optimal from an efficiency standpoint.
Personally, I switched into Power Save mode for just a few hours due to higher spot prices. Since the price forecast as shown below suggests near-zero cost for electricity in next few days, I consider switching back to Overclock mode for maximum hashrate.
In the future, I’d love to automate these power-mode changes based on real-time electricity prices and forecasts. Currently, the Windows-only ElphaPexTool stands in the way of such automation, so I hope ElphaPex will eventually provide a REST API or a better web-based interface for that purpose.
There are plenty of videos on how to overclock the Elphapex DG Home 1, but watching a 15-minute tutorial for a process that takes only 30 seconds seems unnecessary. In this guide, I’ll explain the process in under two minutes.
Using the Elphapex Tool
Download and Setup
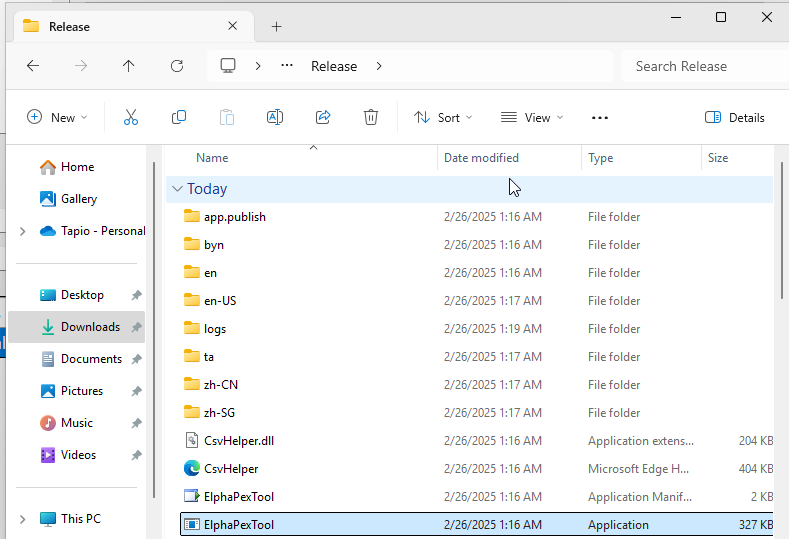
Download the tool from the official Elphapex website.
Unzip the file and run the binary named ElphaPexTool.
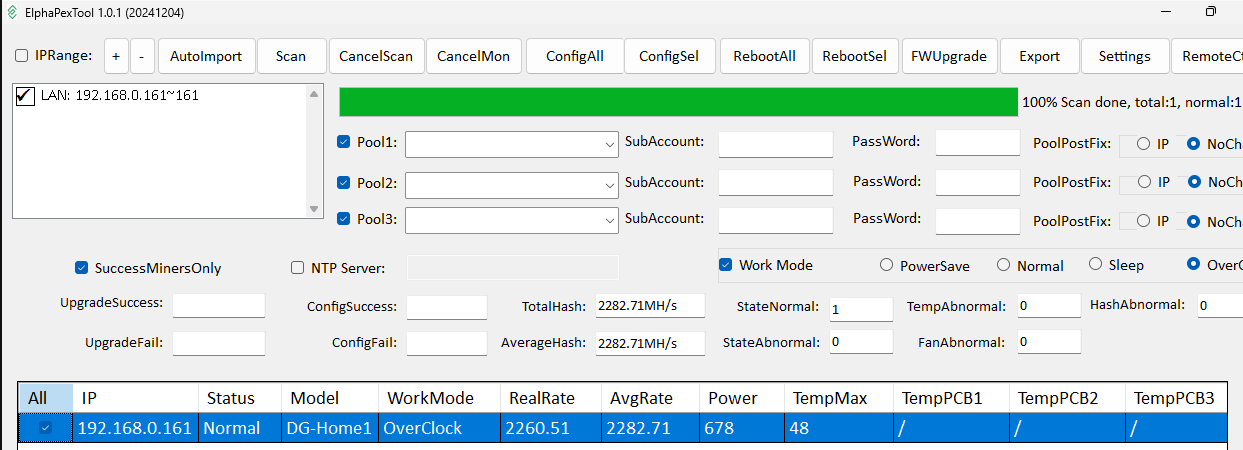
Finding Your Miner
When you launch the tool, it opens an interface that might look a bit rough.
If you know your miner’s IP address, limit the scan range (for example, from 191.168.0.161 to 192.168.0.161) to save time.
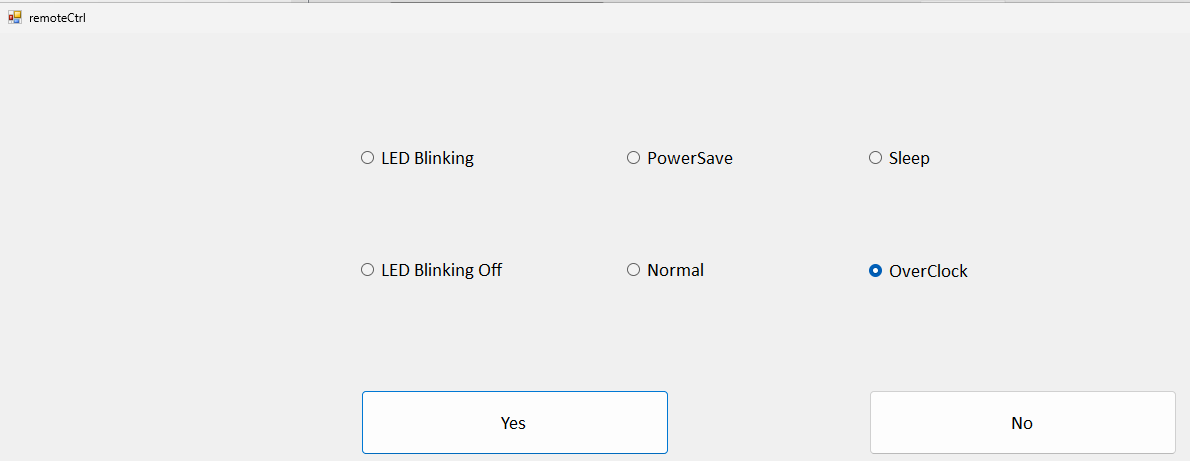
Accessing Remote Control
Click on your miner’s IP address and select RemoteCtrl.
This opens a dialogue where you can choose various modes, such as LED Blinking, Work modes, Sleep, and PowerSave.
Overclocking
For increased mining performance, select OverClock.
Confirm your choice by clicking Yes. Your miner will then reboot.
In my experience, power consumption increased from 590W to 670W. (Based on my power meter, my miner usually runs just under 700W.)
Hash Rate Impact
With the increased power consumption, the hash rate is expected to rise by approximately 10% to 15%.
Conclusions
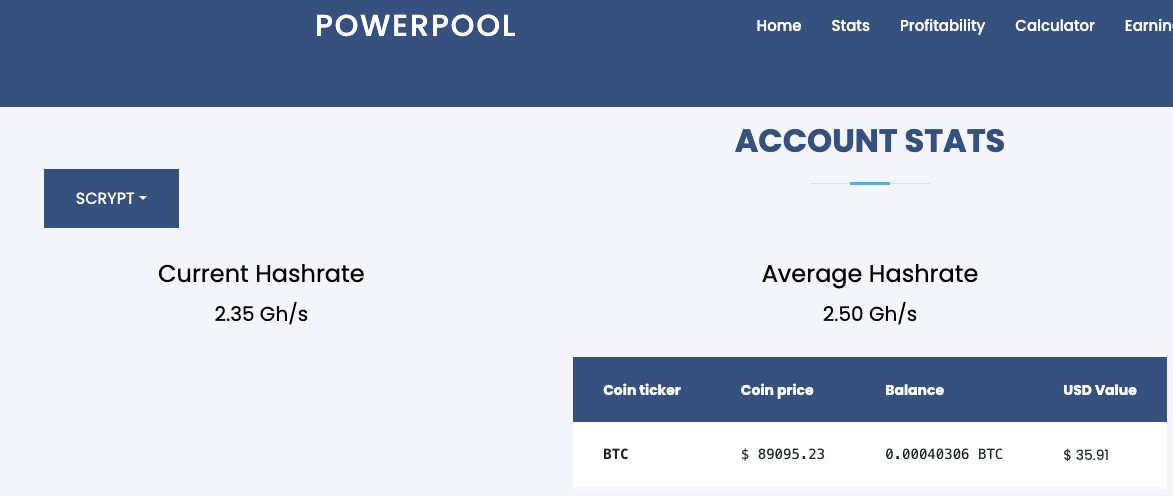
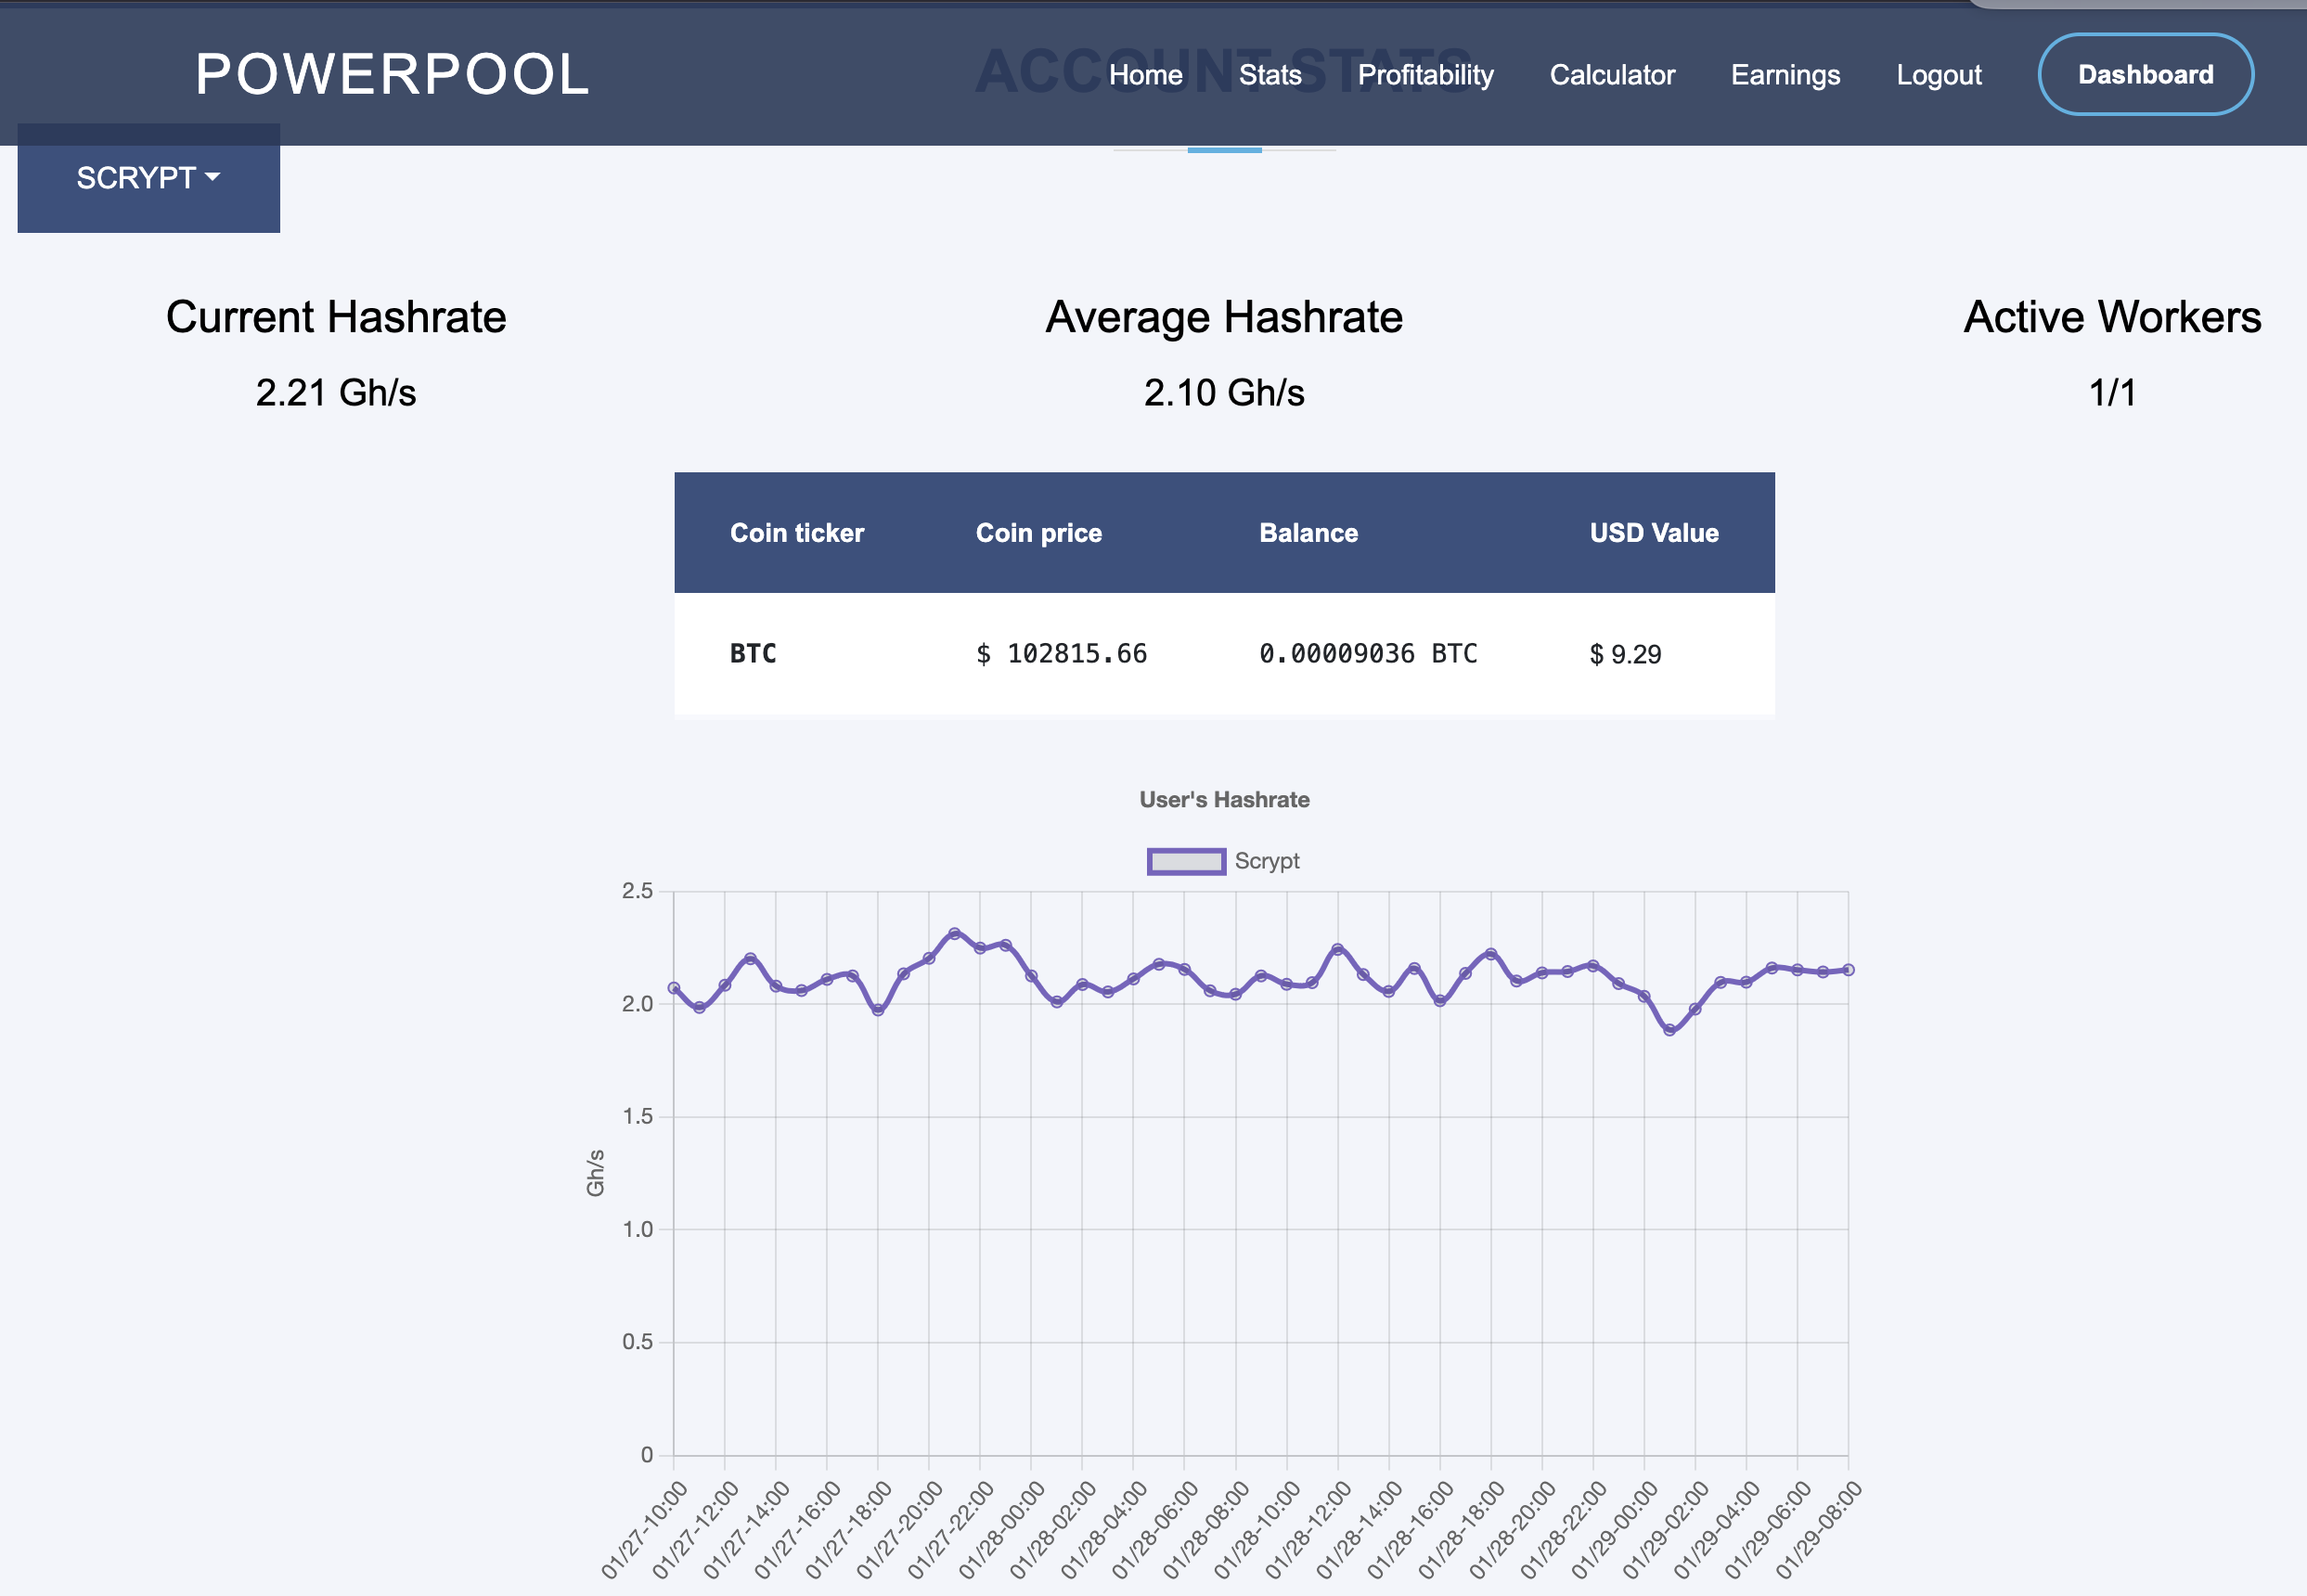
I haven’t monitored the performance long enough to offer definitive results, but I plan to update this article as more data becomes available. As you can see below, on PowerPool the average hash-rate is significantly higher then with the default Elphapex DG Home 1 settings:
While the overclocking process is simple, it requires a Windows machine—a setup I had to emulate on Ubuntu 22.04 using KVM, which was far from ideal. I hope future updates allow these changes to be made through a web interface or REST API, perhaps even adjusting settings based on electricity prices.
Overall, I’m pleased with the overclocking option since it doesn’t void the warranty and, hopefully, won’t adversely affect the miner’s lifespan.
Update
I mentioned I will update here. Unfortunately I have no idea what my fan speeds were prior the overclocking, but they are now at 1500:
They might have been and might not been lower before overclocking. The miner is significantly louder and heat is becoming an issue in small 11000sqft house I have. Hash-rate is ok:
Update: I have since swiched back to normal and as you can see the fan speeds are significantly lower:
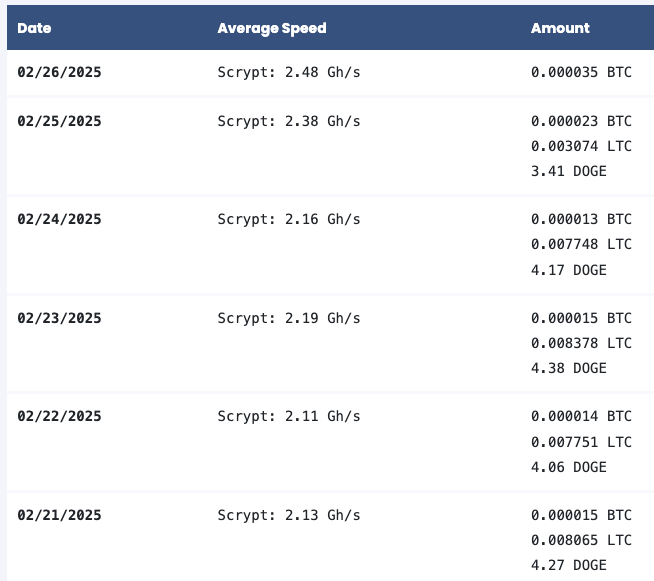
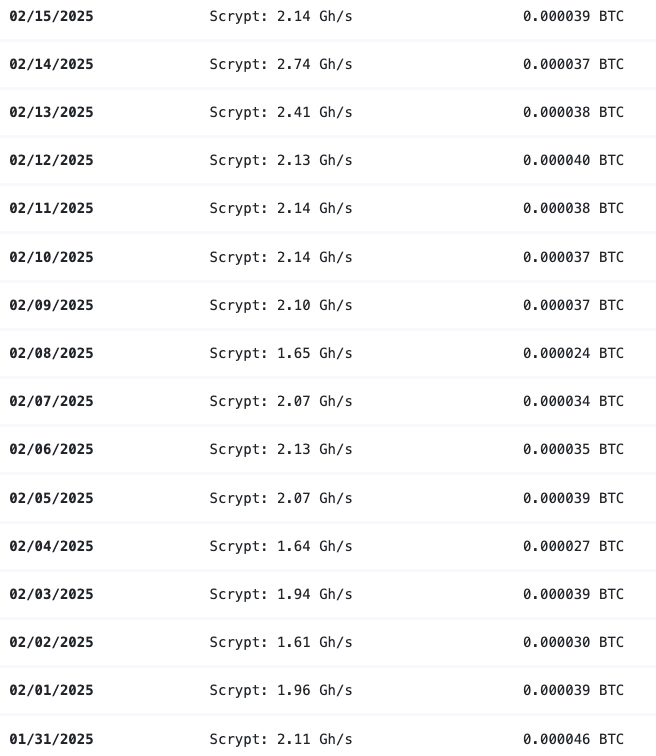
No extra reboots and no issues with internal temperatures either. How does things look on pool side then. The earnings are why we are doing this right:
Now, since DOGE is not doing so well and above I have put everything to BTC starting yesterday, so earnings are not as good as they were at best, but the boost has made things better. Still not where we were and we are not getting there without getting more appreciation on DOGE either. Although BTC is BTC is BTC the DOGE BTC ratio plays an integral part here:
I would really hope we could get back to where we were 01/31 but even with the boost it’s not going to happen as of now.
But then, all the stock rates are down everything is down and I assume this trend will be what it will be next months. Does the Elphapex DG Home 1 ever do ROI I don’t know. I suspect not, but it has been fun journey so far – a bit expensive though.
Home Assistant is an excellent tool for monitoring the ElphaPex DG Home1 miner. This post covers my observations on optimizing its setup for maximum efficiency with minimal downtime.
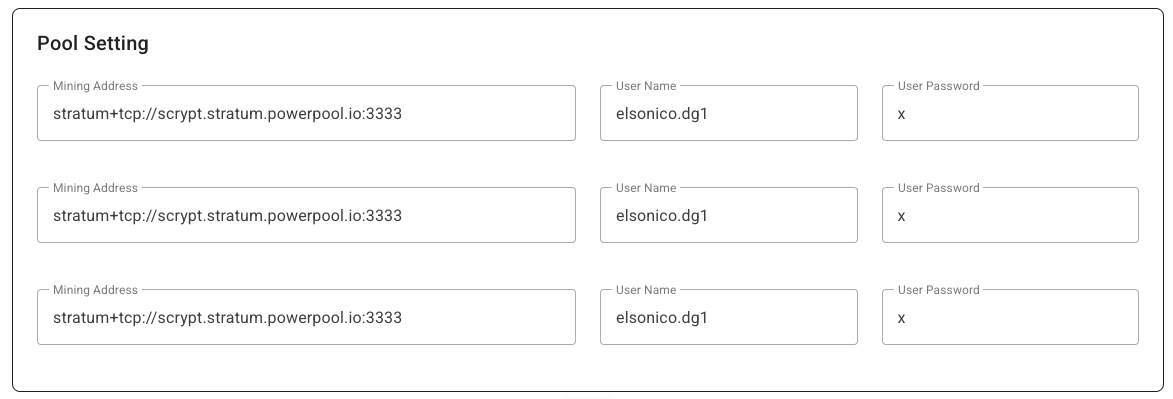
PowerPool Configuration
Setting up PowerPool is straightforward. You need to enter the PowerPool stratum address three times. This works because PowerPool addresses have multiple DNS entries. If one connection fails, the miner automatically connects to the next available address.
Configuration Example
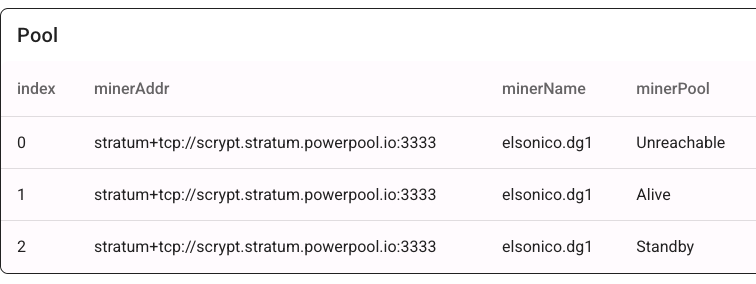
When the first active entry fails, the miner switches to the next, as shown in the ElphaPex logs:
Feb 17 08:49:34 DG-Home1 user.info health: min = 44250 max = 49812
Feb 17 08:49:49 DG-Home1 user.err cpuminer[1682]: [ttyS5][Stratum connection timed out]
Feb 17 08:49:49 DG-Home1 user.notice cpuminer[1682]: [ttyS5][current pool: stratum+tcp://scrypt.stratum.powerpool.io:3333, user: elsonico.dg1, pass: x]
Feb 17 08:49:49 DG-Home1 user.err cpuminer[1682]: [ttyS5][Stratum connection interrupted]
Feb 17 08:49:49 DG-Home1 user.info cpuminer[1682]: [ttyS5][Starting Stratum on stratum+tcp://scrypt.stratum.powerpool.io:3333]
When a connection fails, the previous pool becomes “Unreachable,” the second “Alive,” and the third remains “Standby.”
This setup works with any mining pool that has multiple resolvable IP addresses. You can verify DNS resolution using:
A low hash rate over an extended period indicates a malfunction. Initially, I monitored the hash rate via PowerPool’s API but noticed occasional inaccuracies. To address this, I now monitor the miner’s own reported hash rate alongside PowerPool’s API data.
If the hash rate stays at 0.0 for 15 minutes, Home Assistant automatically reboots the miner using the following automation:
- id: 28077b7f639644688b946f35ccf0127b
  alias: Reboot or Power Cycle Miner
  description: Reboot the miner on low hash rate, fallback to power cycle if needed
  triggers:
  - entity_id: sensor.miner_hashrate_gh
    to: '0.0'
    for:
      minutes: 15
    trigger: state
  - minutes: /15
    trigger: time_pattern
  conditions:
  - condition: numeric_state
    entity_id: sensor.miner_hashrate_gh
    below: 0.1
  - condition: numeric_state
    entity_id: sensor.electricity_cost_in_cents_per_kwh
    below: 62
  actions:
  - target:
      entity_id: switch.shellyplug_s_3ce90ee04b97
    action: switch.turn_off
    data: {}
  - delay:
      seconds: 10
  - target:
      entity_id: switch.shellyplug_s_3ce90ee04b97
    action: switch.turn_on
    data: {}
  mode: single
Note that I only do this when the electricity price is below 62c/kWh. I will go into details later why that has been set the way it has.
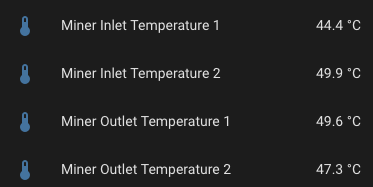
Temperature Monitoring
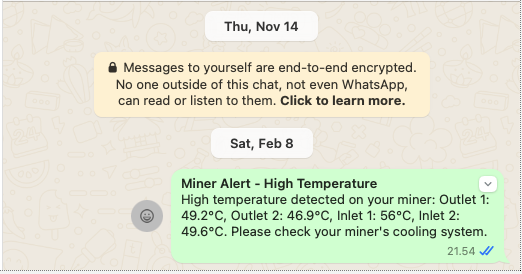
I monitor various circuit temperatures. If any exceed 55°C, an event triggers notifications via email and WhatsApp, giving me time to intervene before an automatic shutdown.
Example of WhatsApp message when any of them go above 56C:
Above is done with following snippet on my automations.yaml:
- id: miner_whats_app_temperature_alert
  alias: WhatsApp alert when miner temperatures are high
  trigger:
    platform: numeric_state
    entity_id:
    - sensor.miner_outlet_temperature_1
    - sensor.miner_outlet_temperature_2
    - sensor.miner_inlet_temperature_1
    - sensor.miner_inlet_temperature_2
    above: 55
  condition:
  - condition: template
    value_template: "{% set temps = namespace(high=false) %} {% for sensor in [\n
      \    'sensor.miner_outlet_temperature_1', \n     'sensor.miner_outlet_temperature_2',
      \n     'sensor.miner_inlet_temperature_1', \n     'sensor.miner_inlet_temperature_2'\n
      \  ] %}\n  {% if states(sensor) not in ['unknown', 'unavailable'] %}\n    {%
      if states(sensor) | float > 55 %}\n      {% set temps.high = true %}\n    {%
      endif %}\n  {% endif %}\n{% endfor %} {{ temps.high }}\n"
  mode: single
  action:
  - service: persistent_notification.create
    data:
      title: 'Debug: Miner Temperature Alert Triggered'
      message: 'Current temperatures: Outlet 1: {{ states(''sensor.miner_outlet_temperature_1'')
        }}°C, Outlet 2: {{ states(''sensor.miner_outlet_temperature_2'') }}°C, Inlet
        1: {{ states(''sensor.miner_inlet_temperature_1'') }}°C, Inlet 2: {{ states(''sensor.miner_inlet_temperature_2'')
        }}°C'
  - service: notify.email_notify
    data:
      title: Miner Alert - High Temperature
      message: 'High temperature detected on your miner: Outlet 1: {{ states(''sensor.miner_outlet_temperature_1'')
        }}°C, Outlet 2: {{ states(''sensor.miner_outlet_temperature_2'') }}°C, Inlet
        1: {{ states(''sensor.miner_inlet_temperature_1'') }}°C, Inlet 2: {{ states(''sensor.miner_inlet_temperature_2'')
        }}°C. Please check your miner''s cooling system.'
  - service: notify.whatsapp
    data:
      title: Miner Alert - High Temperature
      message: 'High temperature detected on your miner: Outlet 1: {{ states(''sensor.miner_outlet_temperature_1'')
        }}°C, Outlet 2: {{ states(''sensor.miner_outlet_temperature_2'') }}°C, Inlet
        1: {{ states(''sensor.miner_inlet_temperature_1'') }}°C, Inlet 2: {{ states(''sensor.miner_inlet_temperature_2'')
        }}°C. Please check your miner''s cooling system.'
      target: 14164327184@c.us
Electricity Price Monitoring
Mining is only profitable below a certain electricity cost. Based on AI-assisted calculations, I set my limit to 62c/kWh. If the price rises above this, Home Assistant turns off the miner:
- id: 634d0fe360ec41c3ac1ea0f3473ad603
  alias: Turn Off Miner When Electricity Price Is High
  description: Turns off the miner when electricity price goes above 62c/kWh
  triggers:
  - entity_id:
    - sensor.electricity_cost_in_cents_per_kwh
    above: 62
    trigger: numeric_state
  actions:
  - target:
      entity_id: switch.shellyplug_s_3ce90ee04b97
    action: switch.turn_off
    data: {}
- id: 9c4564819e404cff95fcc447532bd19b
  alias: Turn On Miner When Electricity Price Is Low
  description: Turns on the miner when electricity price goes below 62c/kWh
  triggers:
  - entity_id:
    - sensor.electricity_cost_in_cents_per_kwh
    below: 62
    trigger: numeric_state
  actions:
  - target:
      entity_id: switch.shellyplug_s_3ce90ee04b97
    action: switch.turn_on
    data: {}
Room Temperature Monitoring
Since I also use a heat pump, I monitor indoor temperatures. If the bedroom temperature drops below 20°C, the heat pump turns on:
- id: bedroom_temperature_control
  alias: Bedroom Temperature Control
  description: Control bedroom heating based on temperature between 9 AM and 7 PM
  trigger:
  - platform: numeric_state
    entity_id: sensor.temperature_bedroom
    below: 20
  - platform: numeric_state
    entity_id: sensor.temperature_bedroom
    above: 20
  - platform: time_pattern
    minutes: /15
  condition:
  - condition: time
    after: 09:00:00
    before: '19:00:00'
  action:
  - choose:
    - conditions:
      - condition: numeric_state
        entity_id: sensor.temperature_bedroom
        below: 20
      sequence:
      - service: climate.set_hvac_mode
        target:
          entity_id: climate.ac_12488762
        data:
          hvac_mode: heat
      - service: climate.set_temperature
        target:
          entity_id: climate.ac_12488762
        data:
          temperature: 20
    - conditions:
      - condition: numeric_state
        entity_id: sensor.temperature_bedroom
        above: 21
      sequence:
      - service: climate.turn_off
        target:
          entity_id: climate.ac_12488762
  mode: single
Rewards and Taxation
Initially, I set my mining rewards to be paid in BTC. However, I now distribute them as 1/3 BTC, 1/3 DOGE, and 1/3 LTC, balancing risk and market fluctuations.
For tax reporting, I direct rewards to Binance to simplify tracking. Home Assistant helps by exporting electricity costs directly from its database, making expense calculations easier.
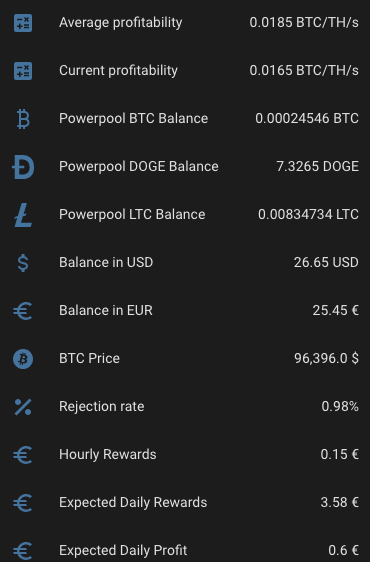
I want to see plenty of things with one look from my mobile Home Assistant Companion App. Expected Rewards, current expenses, temperatures, unpaid rewards in BTC, DOGE, LTC, USD and EUR. I want to see current electricity price with everything including transfer tariff and taxes. Some of the things I want see in graphs, some in numbers. The one thing I want to add is uptime, but other than that I’m cool with my current setup.
As you can see, the current expected profit for whole day is only 0.60€. This does not take into consideration that I also heating the whole house with the miner. As you can also see, the current electricity SPOT price is way higher than average. Same time DOGE is valued significantly lower than the average which lowers the expected rewards.
Reward payments and taxation
When I initially setup the miner and payments I decided to have them on de-centralized wallet. But then the conversion fees there are way higher than on Binance for example. I decided to to get the rewards paid directly to Binance for that reason.
Maybe later when I’m doing millions with this I might consider de-centralized wallet, but at the moment when it seems the miner is not going to be paying itself within next two years if ever I don’t feel pressure to get the little I earn from this to anywhere outside Binance.
I feel also that it is easiest to do tax return when everything I earn is on Binance. Home assistant certainly helps in regards calculating the expenses since I can export monthly electricity costs directly from Home Assistant database tables. I’ve already created few views there to make that part of the mining easier.
Final Thoughts
This setup provides an efficient and automated mining operation while reducing downtime. Let me know if you have suggestions for improvement or spot any flaws in my approach!
This is a quick update on my mining experience over the past couple of weeks. As mentioned before, I’ve found PowerPool.io to be the most efficient option. However, rewards have dropped significantly recently, likely due to rising mining difficulty and declining DOGE and LTC prices. Both factors have negatively impacted profitability.
In my case, these changes alone have reduced profitability by about 25%–35%. Previously, I could earn up to €0.20 per hour at best, but now it’s closer to €0.15.
Monitoring
Several other factors also affect profitability, one of which is monitoring. Over the last two weeks, my miner has gone offline multiple times. I can spot this by keeping an eye on the hashrate for my worker on PowerPool.io and then automate a reboot, but that doesn’t really help me understand the root cause.
Initially, I suspected a firmware issue—maybe when it loses the primary pool, it fails to properly connect to the next one in line. However, whenever the miner goes down, it also becomes unreachable via its web interface, indicating something else might be wrong. Since the DG Home1 miner doesn’t provide persistent logs, it’s impossible to diagnose the issue after the fact.
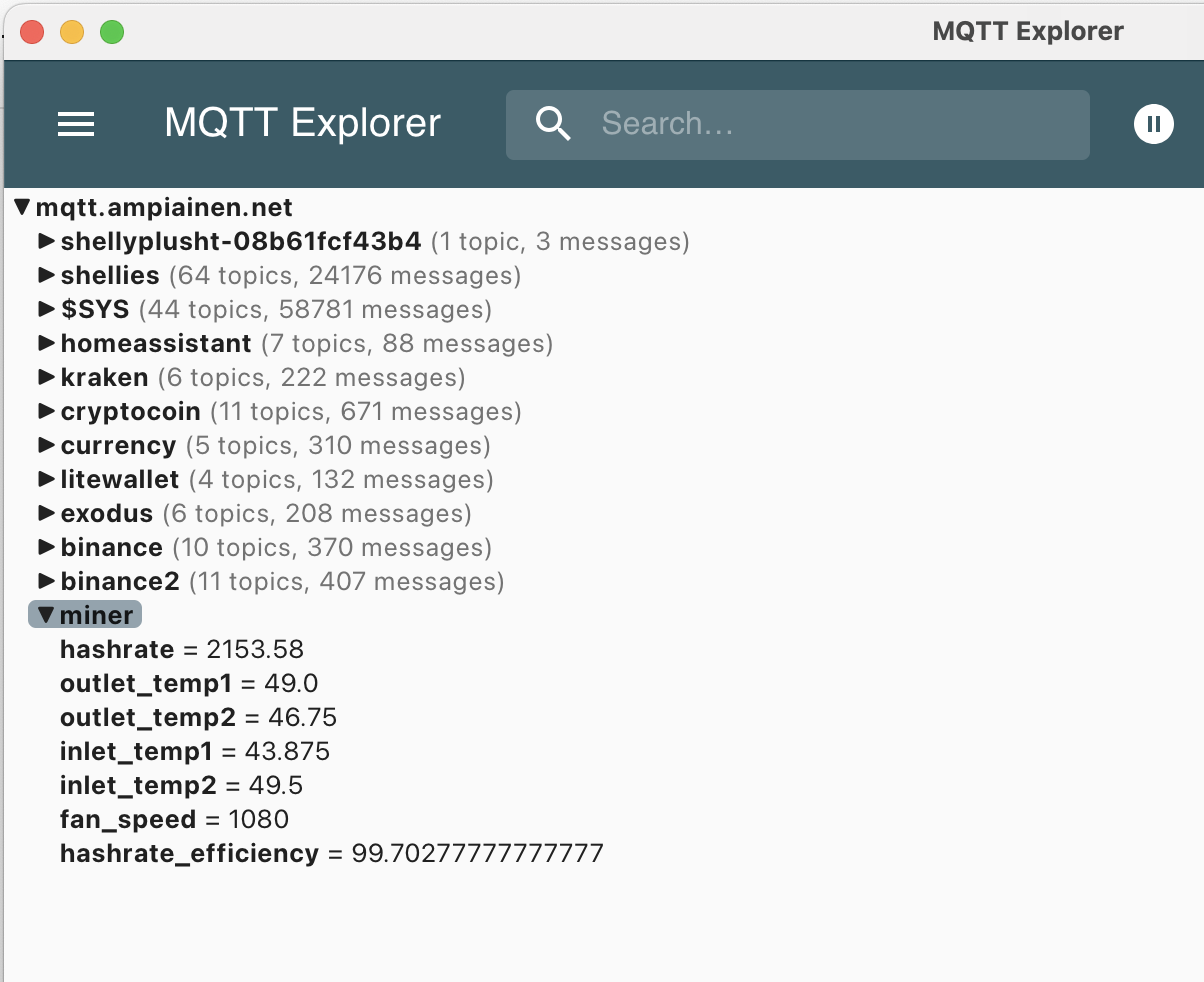
There’s also no straightforward way to monitor the miner remotely, short of writing a custom script. To address this, I created a script called miner_monitor.py that generates a simple log and publishes certain parameters to an MQTT Broker:
Through my mqtt.yaml, I then create sensor templates and can keep track of these metrics in real time.
Temperatures
One of the most important metrics to watch is temperature. I suspect that if cooling fails, the miner may overheat. According to the documentation, the upper limit is 85°C, at which point the miner shuts down automatically. I’ve set up a system that sends me both email and WhatsApp alerts if any temperature sensor exceeds a specified threshold.
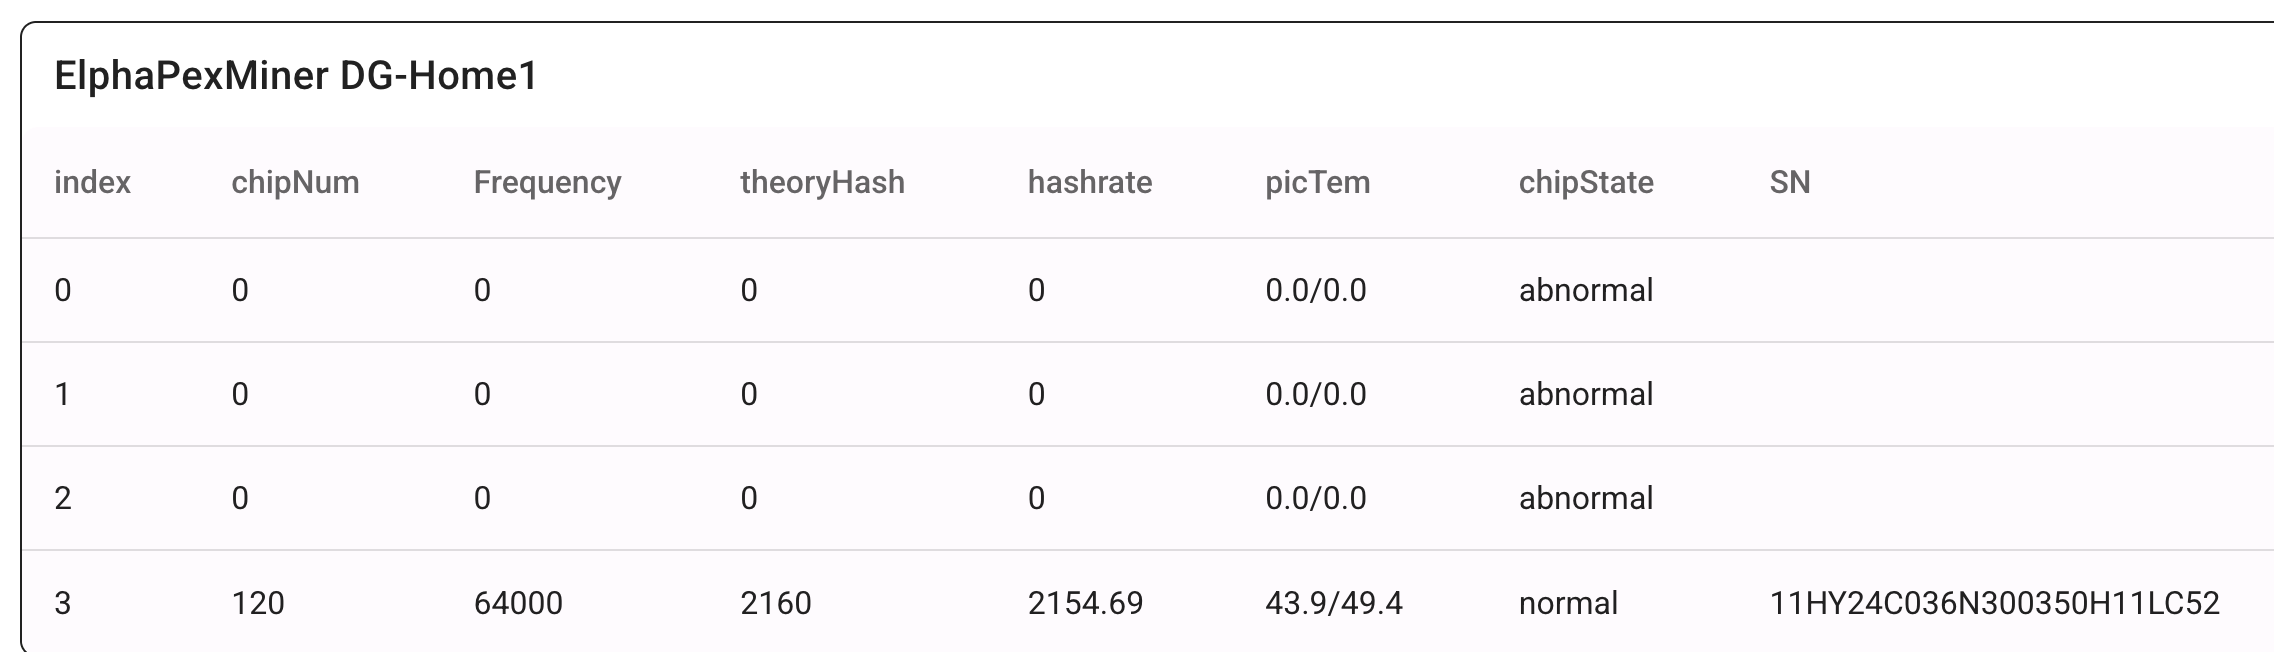
These parameters are similar to the ones shown in the table abowe, plus two additional temperature readings not available through the web interface shown below.
Notifications
With this setup, my miner not only reboots automatically when hashrate drops, but it also sends notifications explaining why it went offline in the first place.
Conclusion
I hope this simple setup helps others as well. My configuration is somewhat messy, but if you develop an easier or more elegant monitoring system, please let me know. As always, my entire configuration is available on my GitHub repository.
I’ve been running a DOGE miner for about a week and a half now. I never really thought DOGE was going to be “the next big thing.” I see a bit more potential in Litecoin, but I’m mostly focused on Bitcoin. However, my miner currently doesn’t mine BTC. The BTC miners earns about one-tenth of the profit compared to mining LTC or DOGE. So I rather mine where the money is and put everything to BTC. To be clear: I mine altcoins and take the profit in bitcoin.
To be honest, I’m skeptical about the future of altcoins—especially meme coins. So why am I mining, given that I don’t see much sense in home BTC mining, and I’m not really sold on other cryptocurrencies either? The main reason is that I want to understand the technology. I’ve decided to only invest in BTC, but I still want to explore how other coins work and whether mining Bitcoin at home can ever be truly profitable.
Lately, I’ve become more interested in decentralized AI. The idea is that many of us—myself, you, and others—have GPUs at home. Instead of using them for crypto mining, we could put them to work on decentralized AI projects. Yes, it still consumes electricity, but at least it could serve a more meaningful purpose. We could even apply the same incentive structure that exists in blockchain to reward participants.
Rather than sending our money to large operations in China or the U.S., we could invest in our own local communities by redirecting home mining capacity to AI development. Let’s break free from the current systems!
I know I’m not the only one thinking this. Let’s collaborate and make it happen!
How to Set Up Litecoin Mining with LitecoinPool and Home Assistant
In this guide, we will walk through setting up a Elphapex DG Home 1 miner on LitecoinPool and integrating it with Home Assistant. You’ll learn how to monitor your miner, track profitability, and automate energy management, making your mining experience efficient and cost-effective.
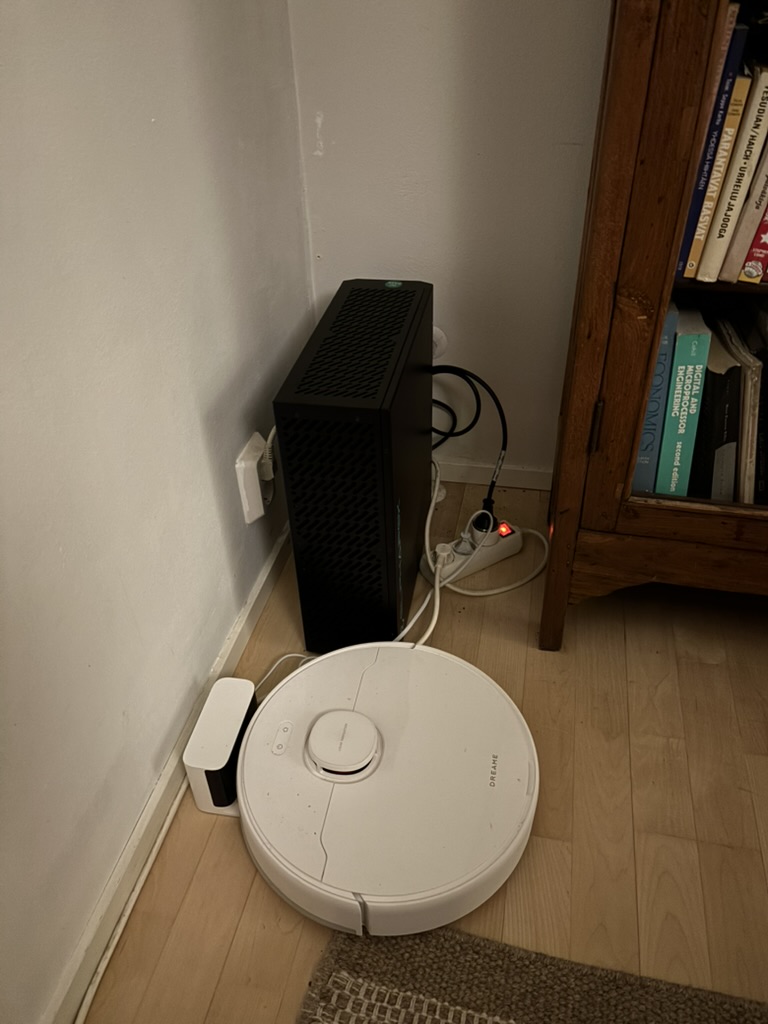
Above the robovacuum in front showing how small the miner actually is. I decided to move the miner later under the stairs for spreading the heat across the apartment more evenly. The noise level is acceptable – around 50db – and comparable what my heat pump generates. I could live without it but I can also tolerate it. It is noticeable but not disturbingly noticeable. That’s what printing money sounds I guess.
Why Mine LTC and DOGE with LitecoinPool?
No fees: LitecoinPool offers fee-free mining, maximizing your earnings.
Pay-per-Share (PPS): Guaranteed payout per share submitted.
Secure payouts: You can receive rewards directly to your wallet.
Log in to your account and navigate to the “Settings” section to retrieve your worker credentials.
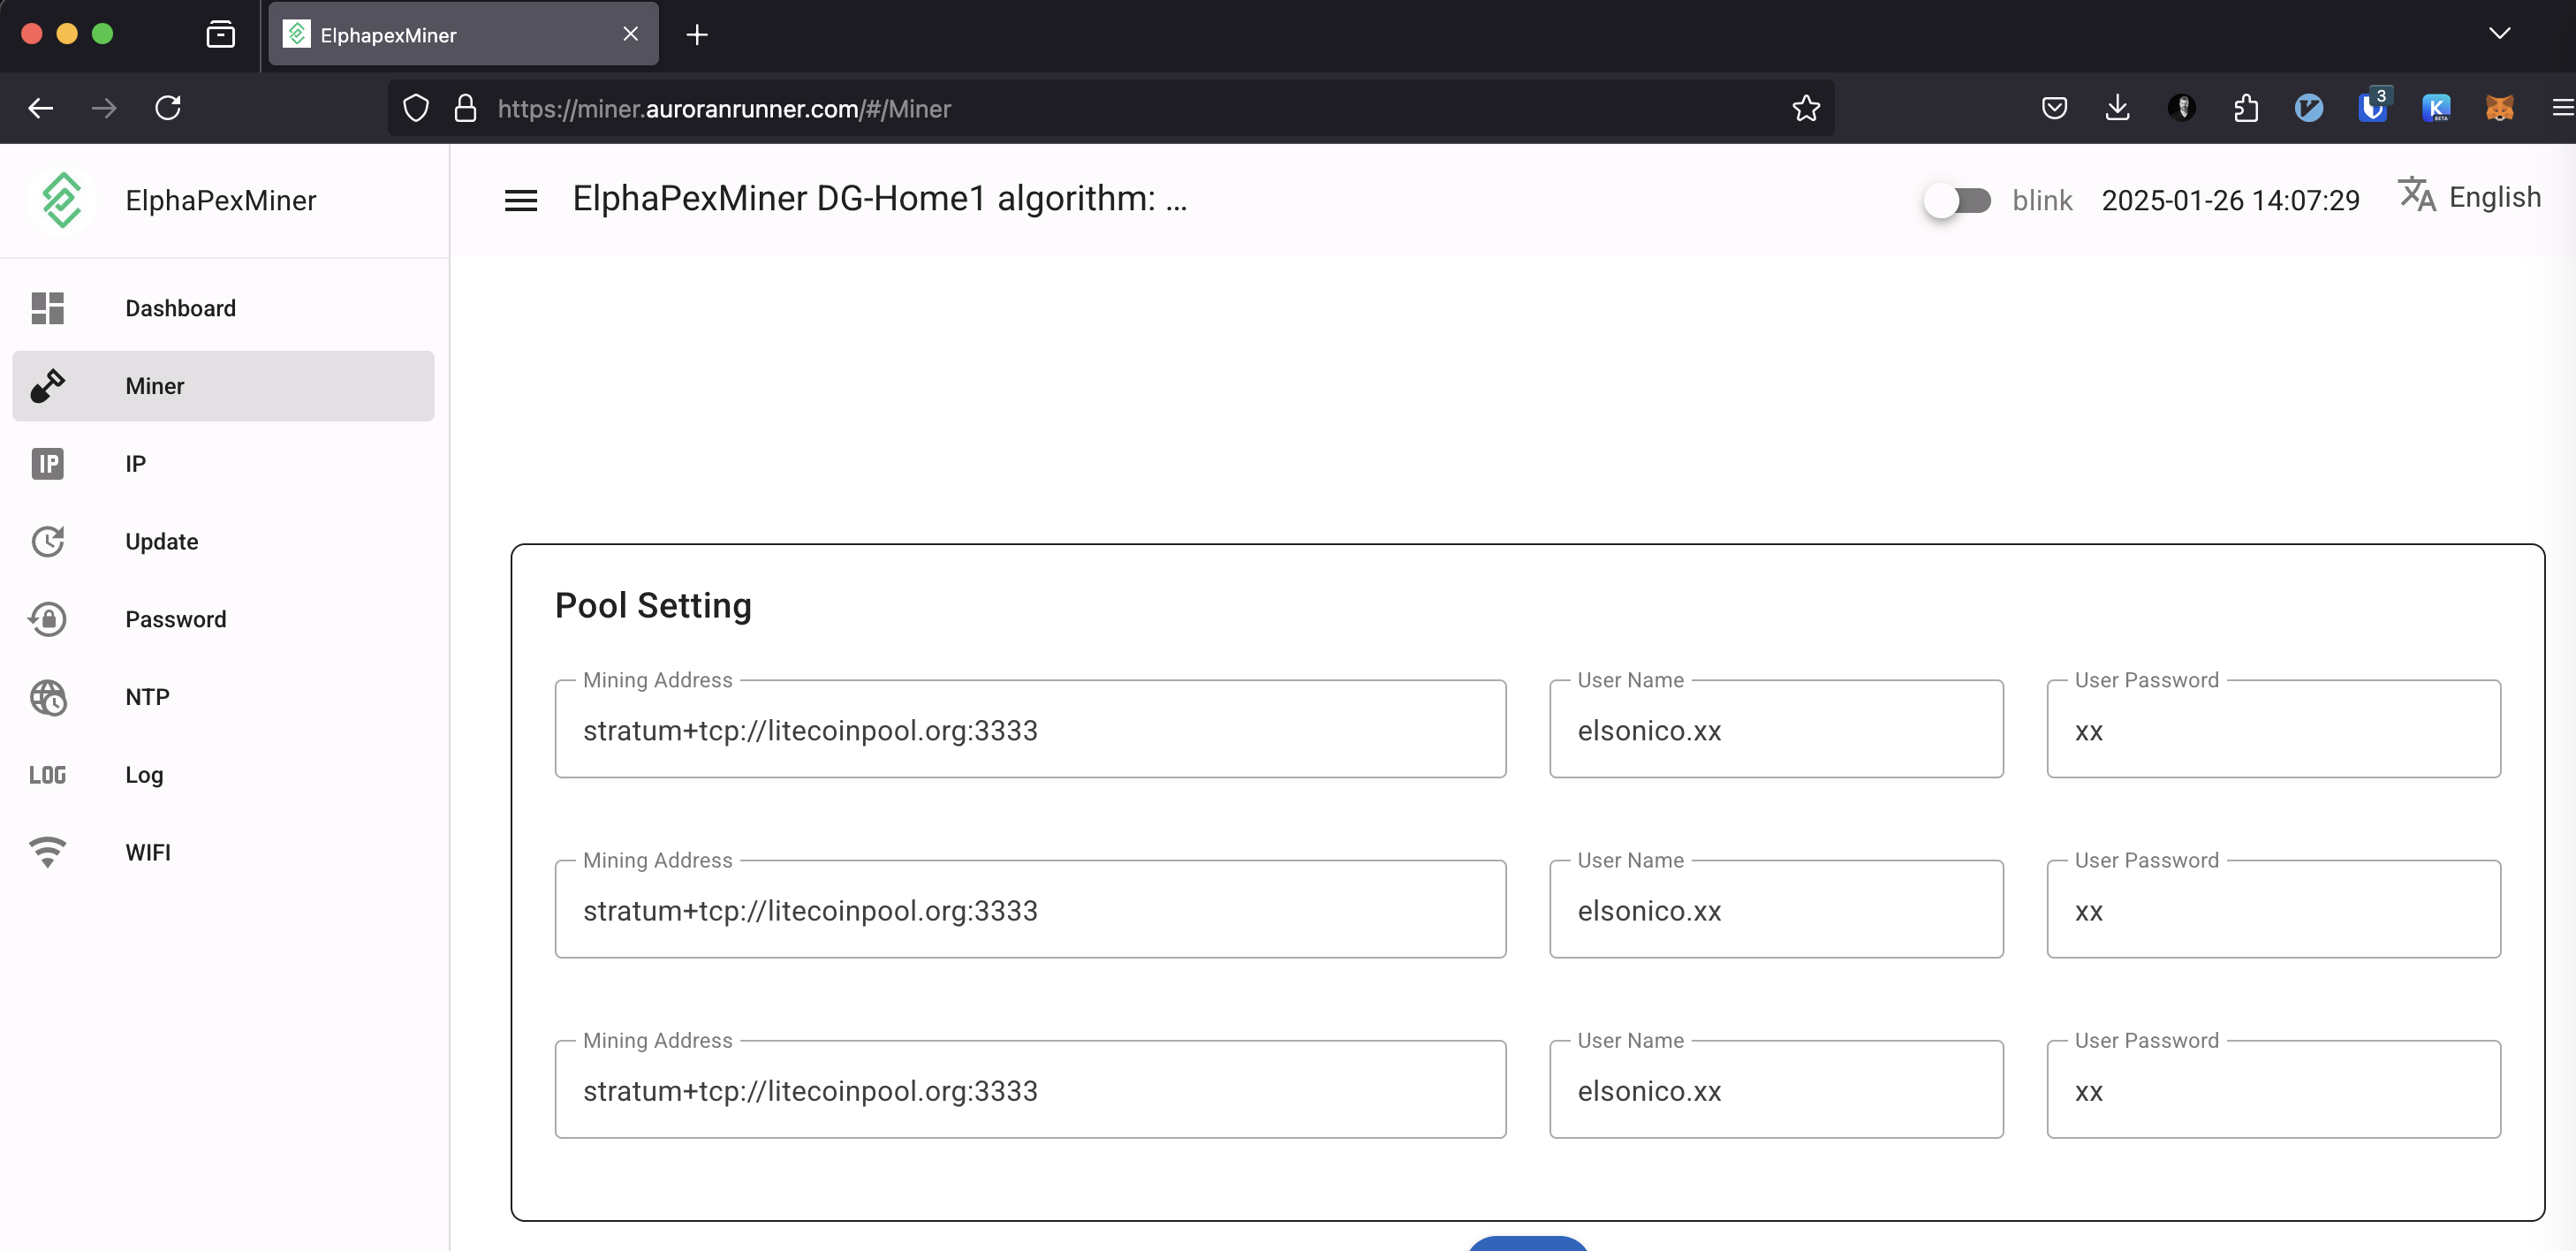
Configure your miner with the following pool details:
URL: stratum+tcp://litecoinpool.org:3333
Username: Your LitecoinPool username
Password: Your chosen worker password
Ensure your miner is online and submitting shares to the pool.
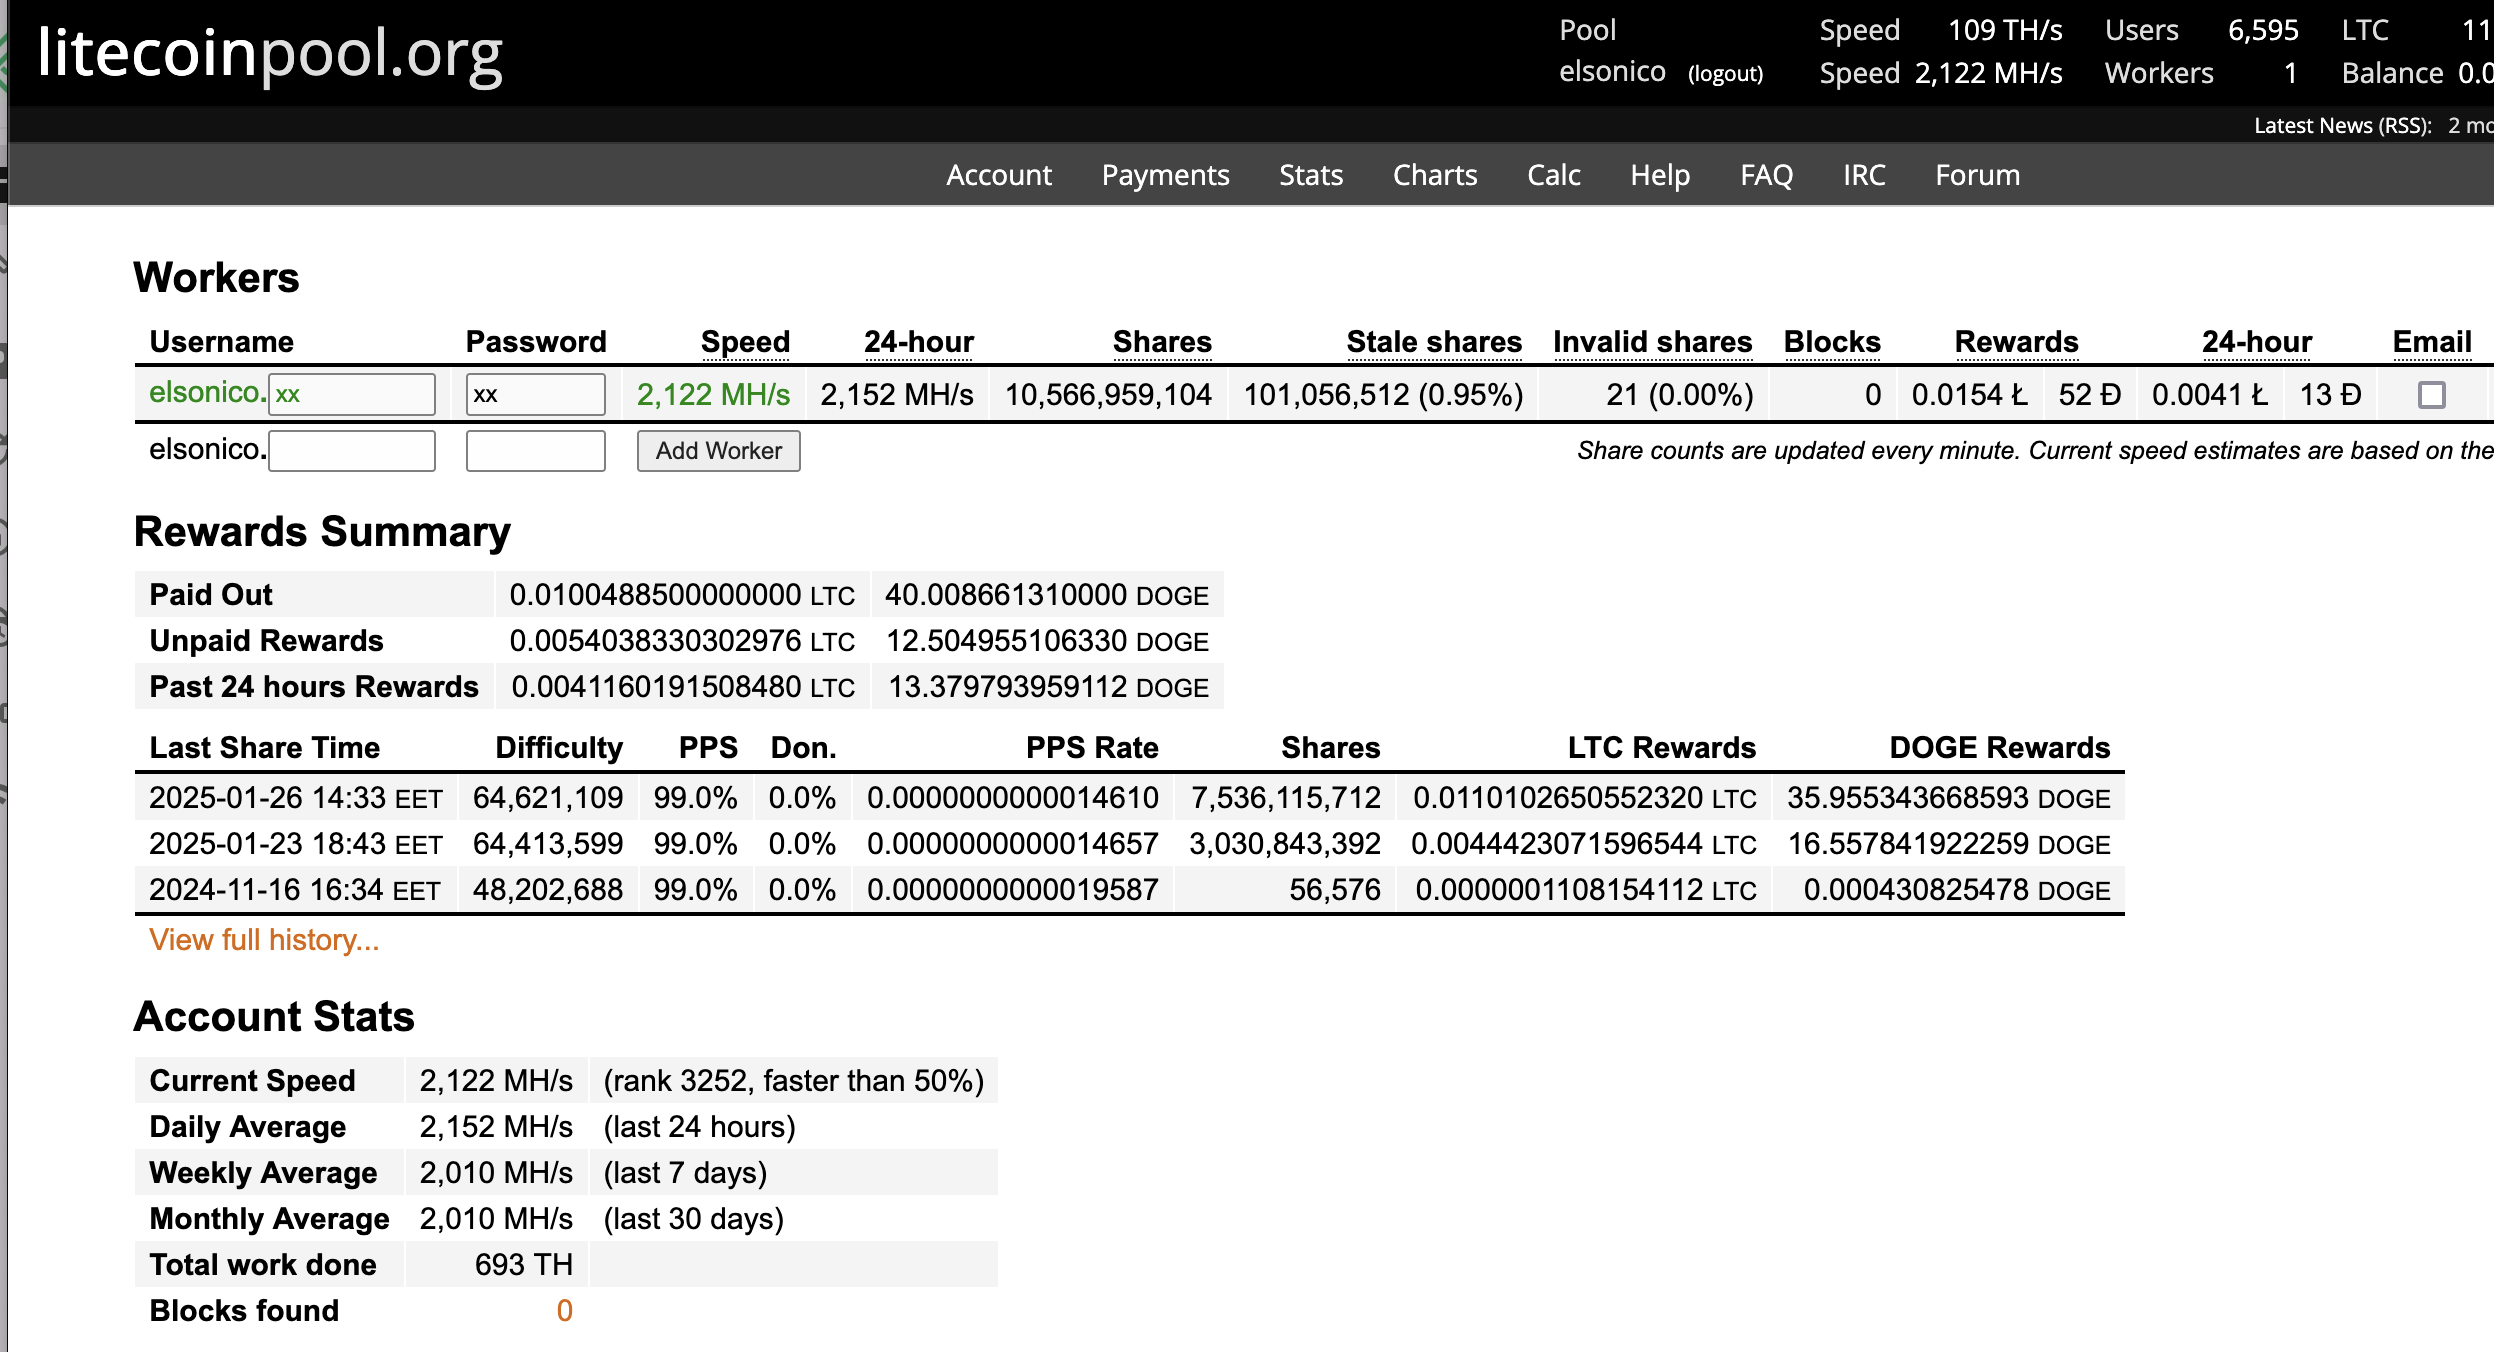
In the end I ended up setting litecoinpool.org thrice on the miner configuration as seen below. The litecoinpool.org resolves to several IPs so there’s high availability through round robin effect on DNS. The default litecoinpool.org is located in Europe AFAIK and I could have used also us.litecoinpool.org as well us2.litecoinpool.org or even other mining pools, but after tinkering with the idea I figured out this is the most reasonable setup. Initially I had only one pool, and when that thread died, I wasn’ä’t mining anything either. I have covered that issue also on my Home Assistant configuration later on.
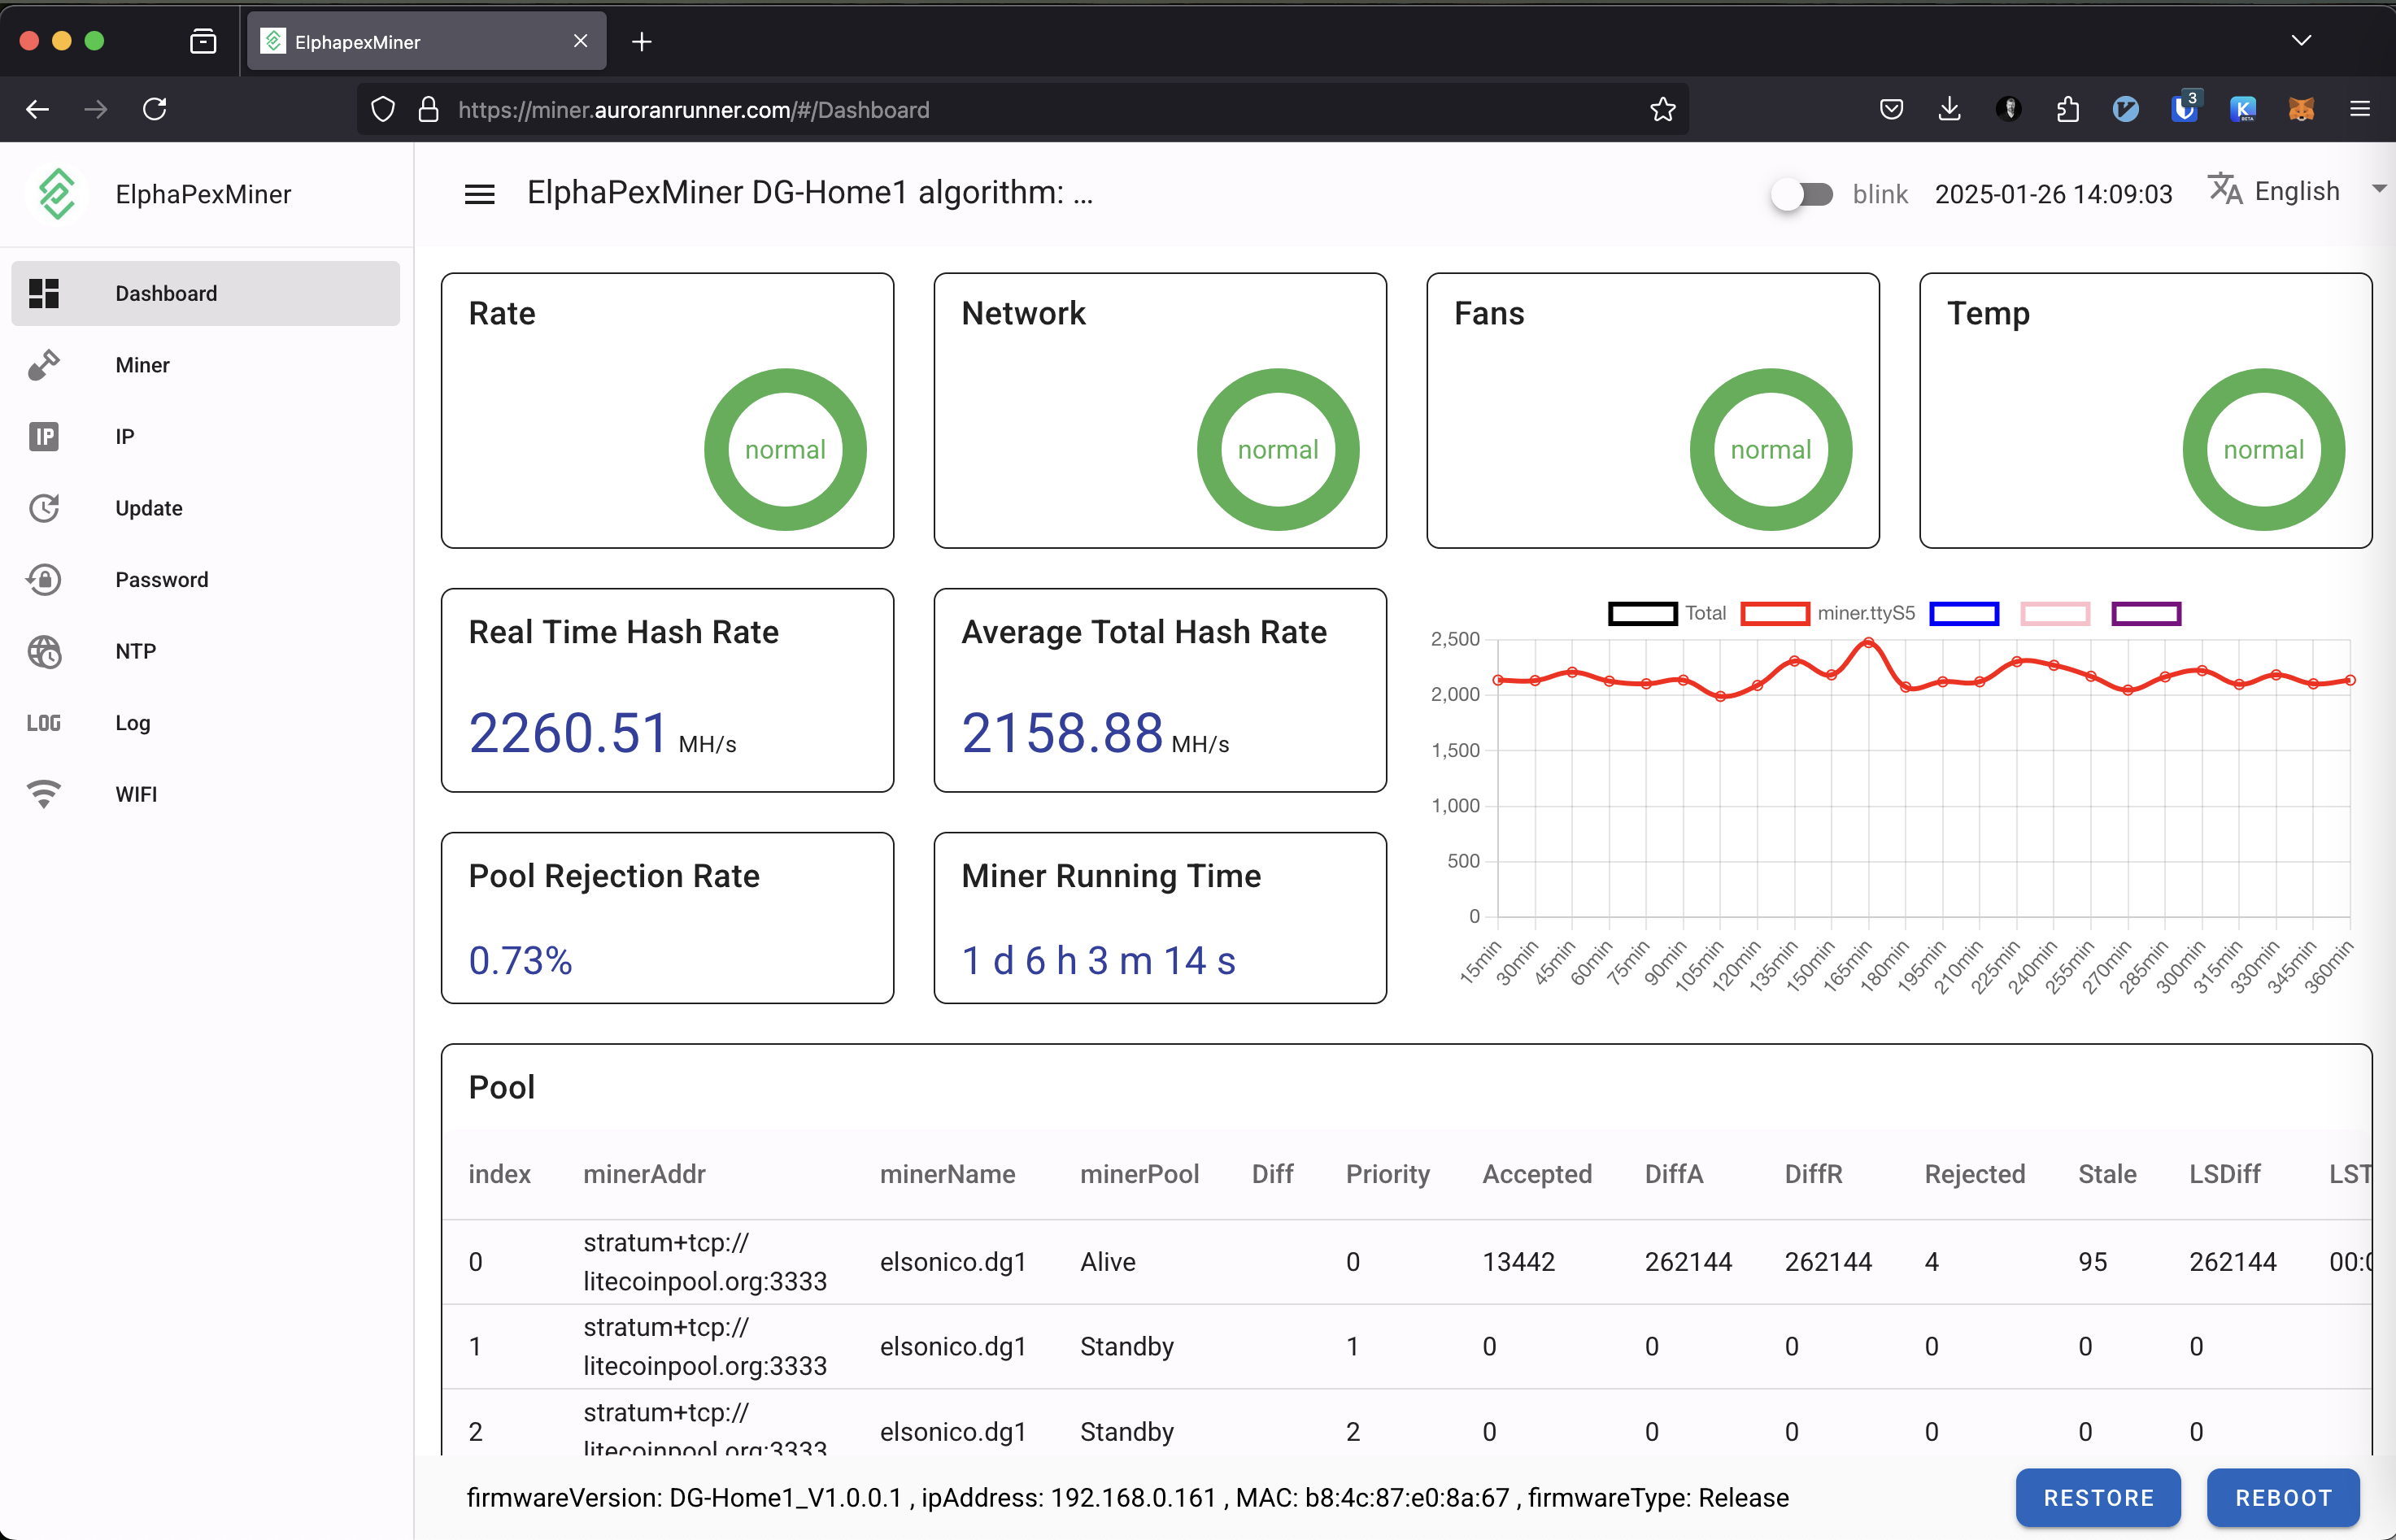
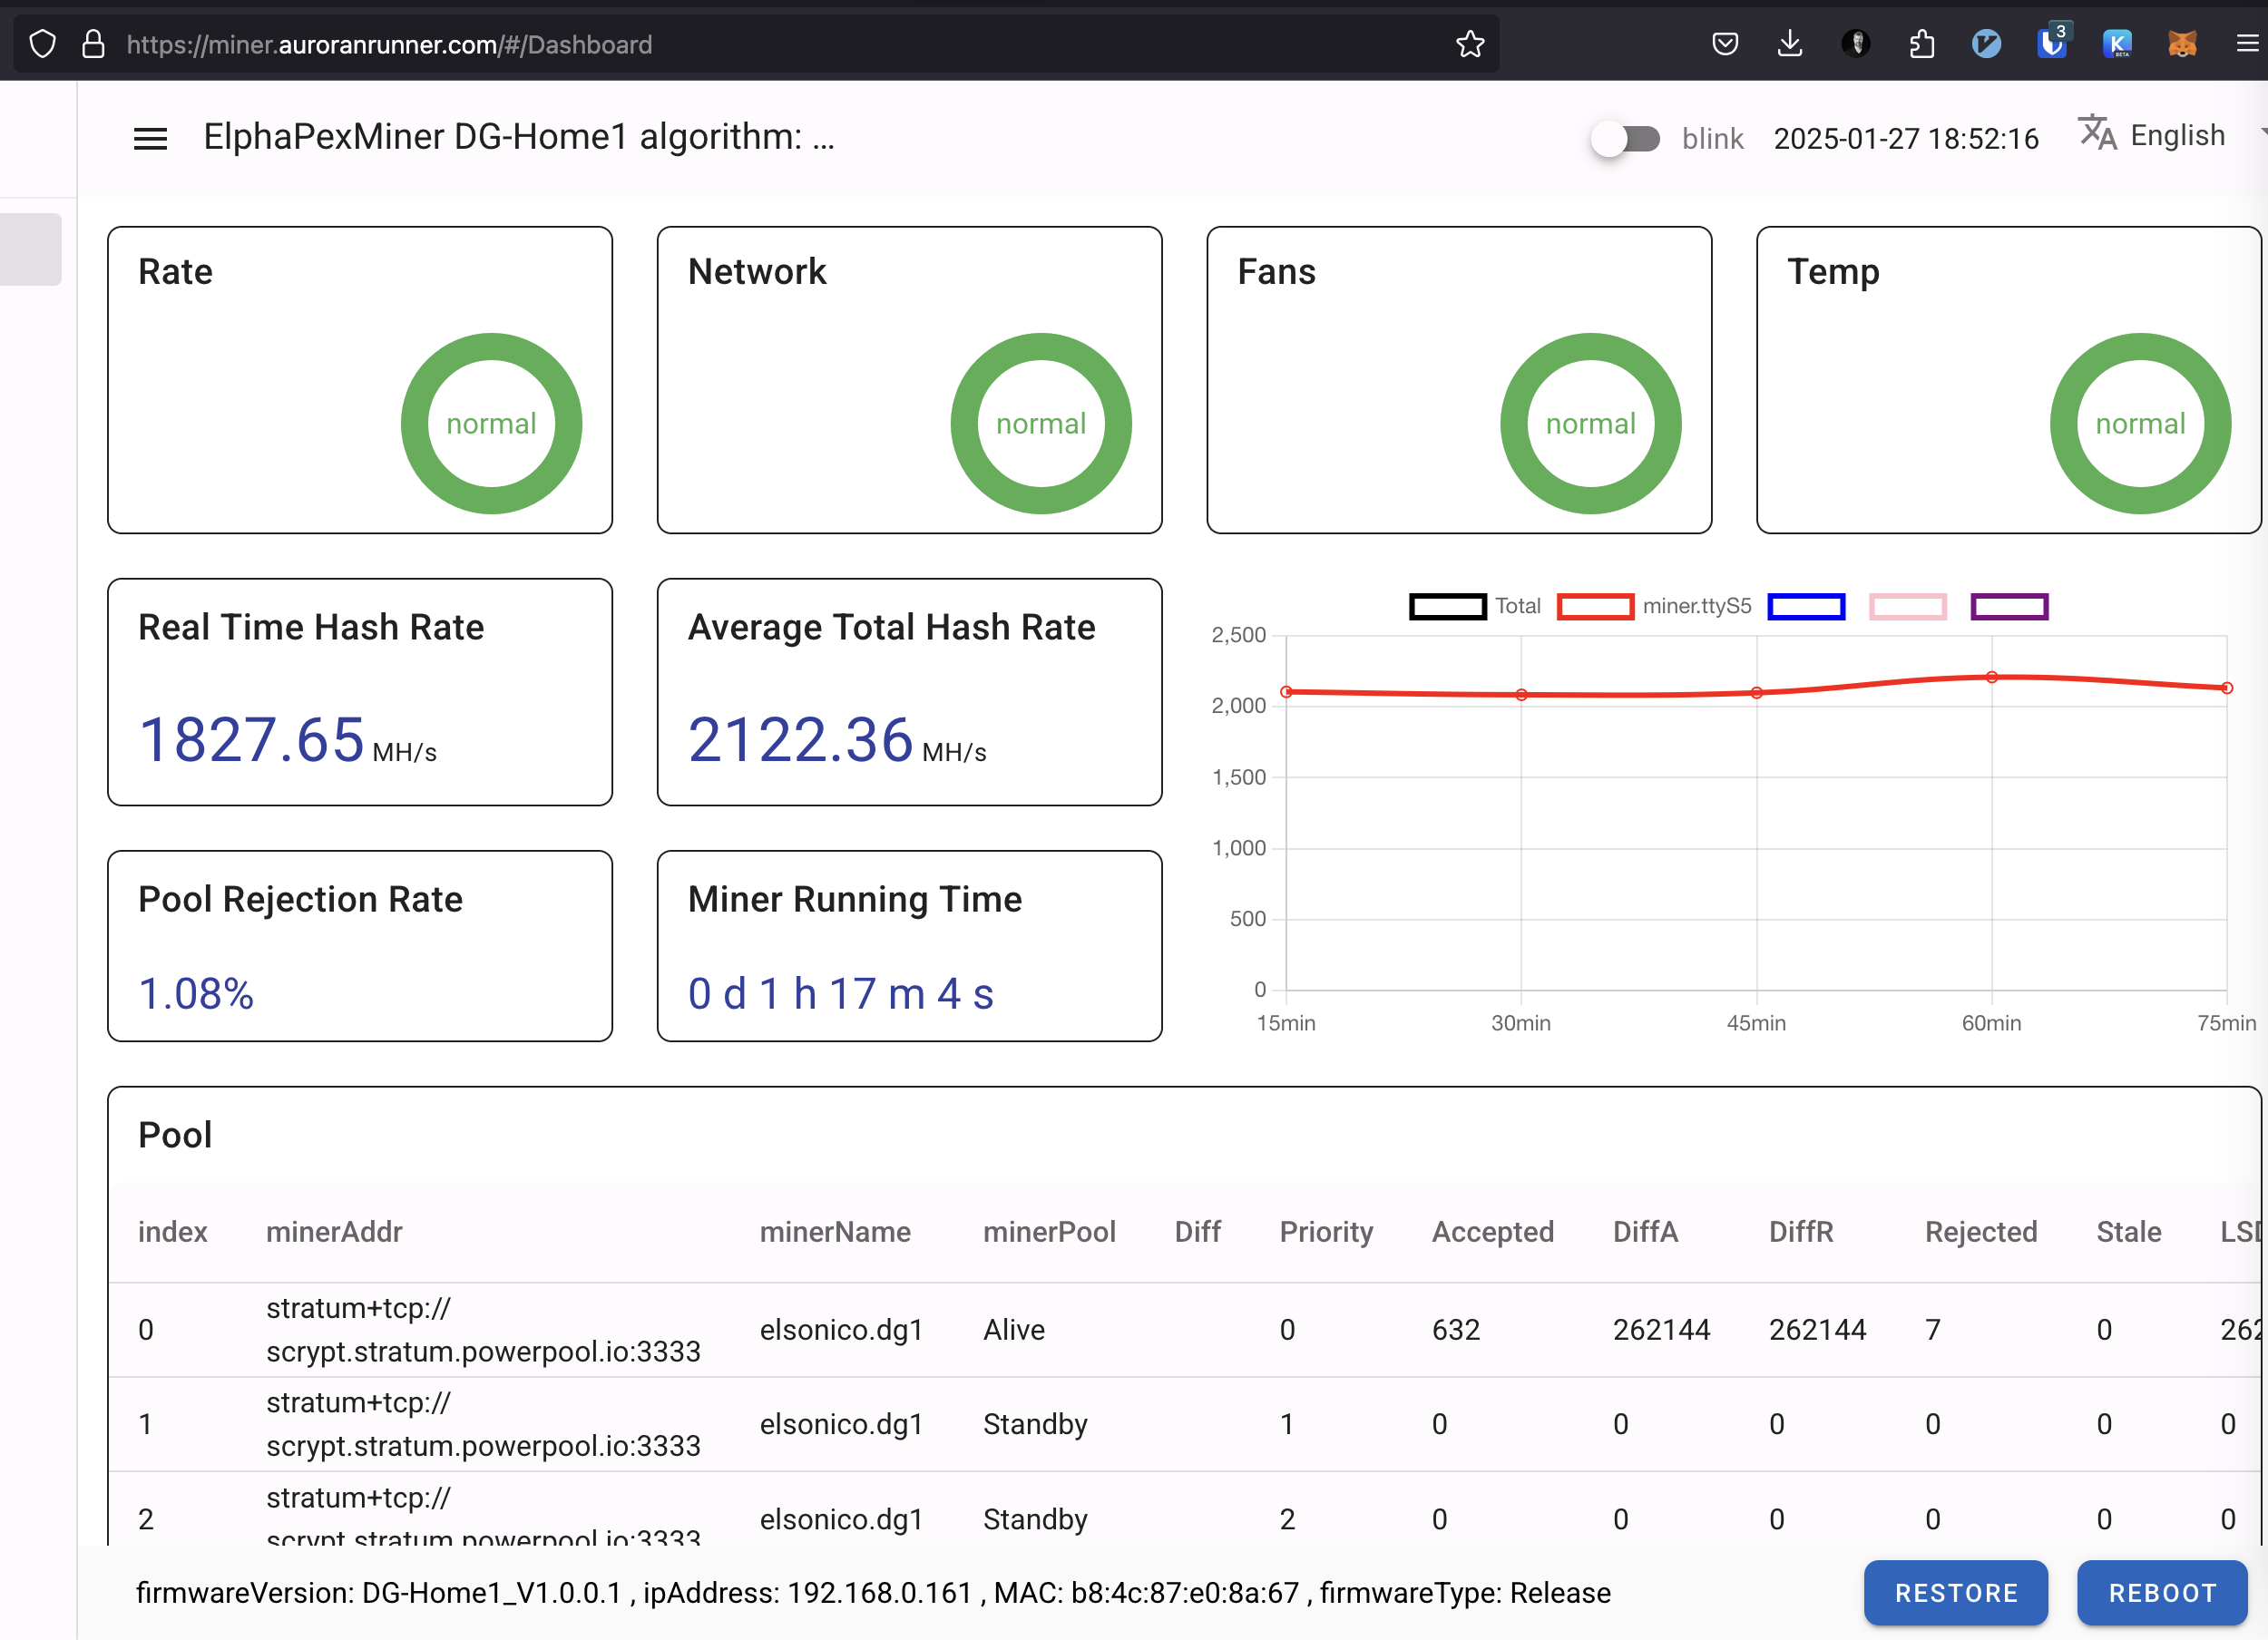
When running the miner the dashboard looks like below on mine setup:
The miner itself is easy to setup so I’m not going much to details here. The default user/password is root/root and I got the IP from my router. It had an issue when using both wireless and wired and I ended up not being able to disable wireless due to that, but I’m ok with it, since I only want to have wireless in the end, although the issue indicates how unfinished the current firmware is.
If you wonder the https URL I’m using above it is because I’ve setup accessing the miner through nginx and I have my own DNS as well. The box is not accessible outside my home network without VPN though.
The box does have ssh daemon listening, but I’m not able to log into it with using root / [web password] which is a bit of a shame. Hopefully that will change with future firmwares.
Step 2: Integrating Your Miner with Home Assistant
Home Assistant provides advanced monitoring and automation capabilities for your mining setup. Here’s how to integrate it:
Requirements
A running instance of Home Assistant
The REST API URL and API key from LitecoinPool
A smart plug for controlling your miner (e.g., Shelly Plug)
Adding LitecoinPool API to Home Assistant
First, add the REST API integration to Home Assistant:
I have also created sensor template for my SPOT electricity price both in €/kWh and c/kWh:
- platform: template
  sensors:
    electricity_cost_per_kwh:
      friendly_name: "Electricity Cost Per kWh"
      unit_of_measurement: "€/kWh"
      value_template: >
        {% set spot_price = (states('sensor.nordpool_kwh_fi_eur_3_10_0255') | float(0)) / 100 %}
        {% set electricity_tax = 0.0283 %}
        {% set transfer_day = 0.0262 %}
        {% set transfer_night = 0.0137 %}
        {% set now = now() %}
        {% set transfer_cost = transfer_night if now.hour >= 22 or now.hour < 7 else transfer_day %}
        {{ (spot_price + electricity_tax + transfer_cost) | round(4) }}
    electricity_cost_in_cents_per_kwh:
      friendly_name: "Electricity Cost in Cents Per kWh"
      unit_of_measurement: "c/kWh"
      value_template: >
        {% set spot_price = (states('sensor.nordpool_kwh_fi_eur_3_10_0255') | float(0)) %}
        {% set electricity_tax = 2.83 %}
        {% set transfer_day = 2.62 %}
        {% set transfer_night = 1.37 %}
        {% set now = now() %}
        {% set transfer_cost = transfer_night if now.hour >= 22 or now.hour < 7 else transfer_day %}
        {{ (spot_price + electricity_tax + transfer_cost) | round(4) }}
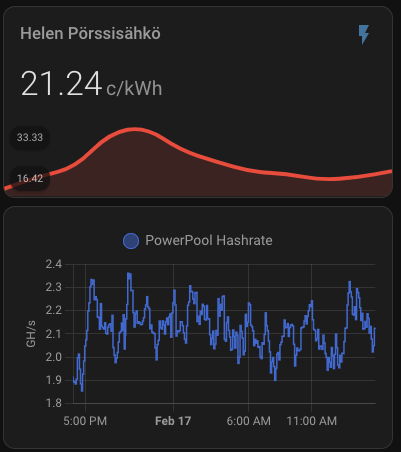
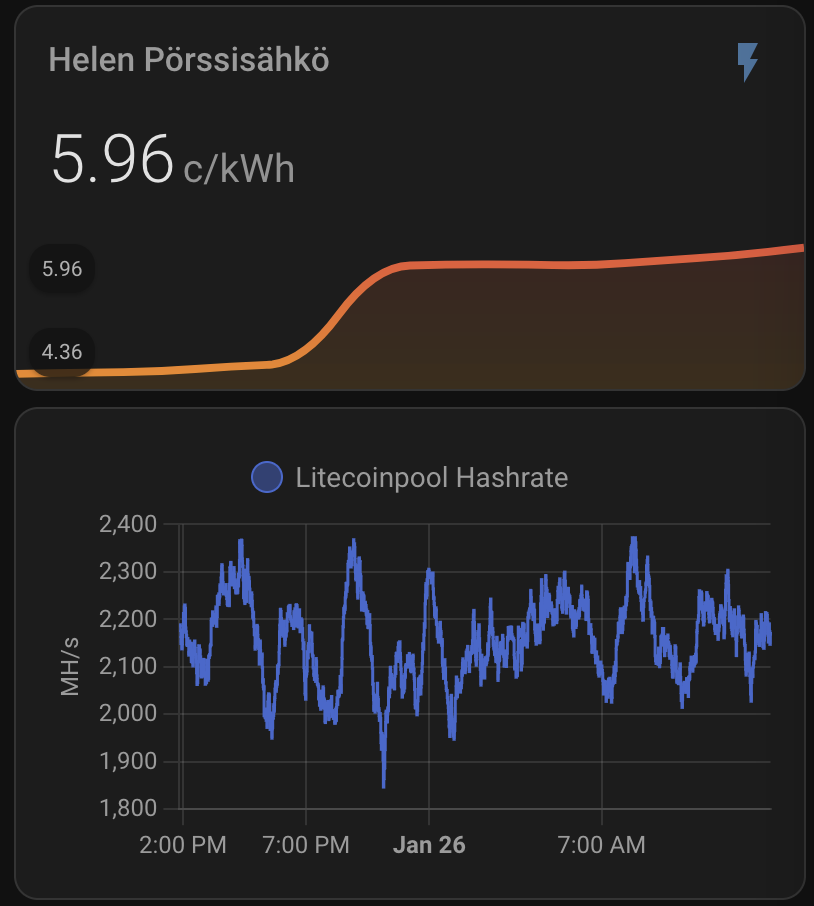
When above are set I get nice graph for my hash rate and real electricity price including taxes and transfer fees:
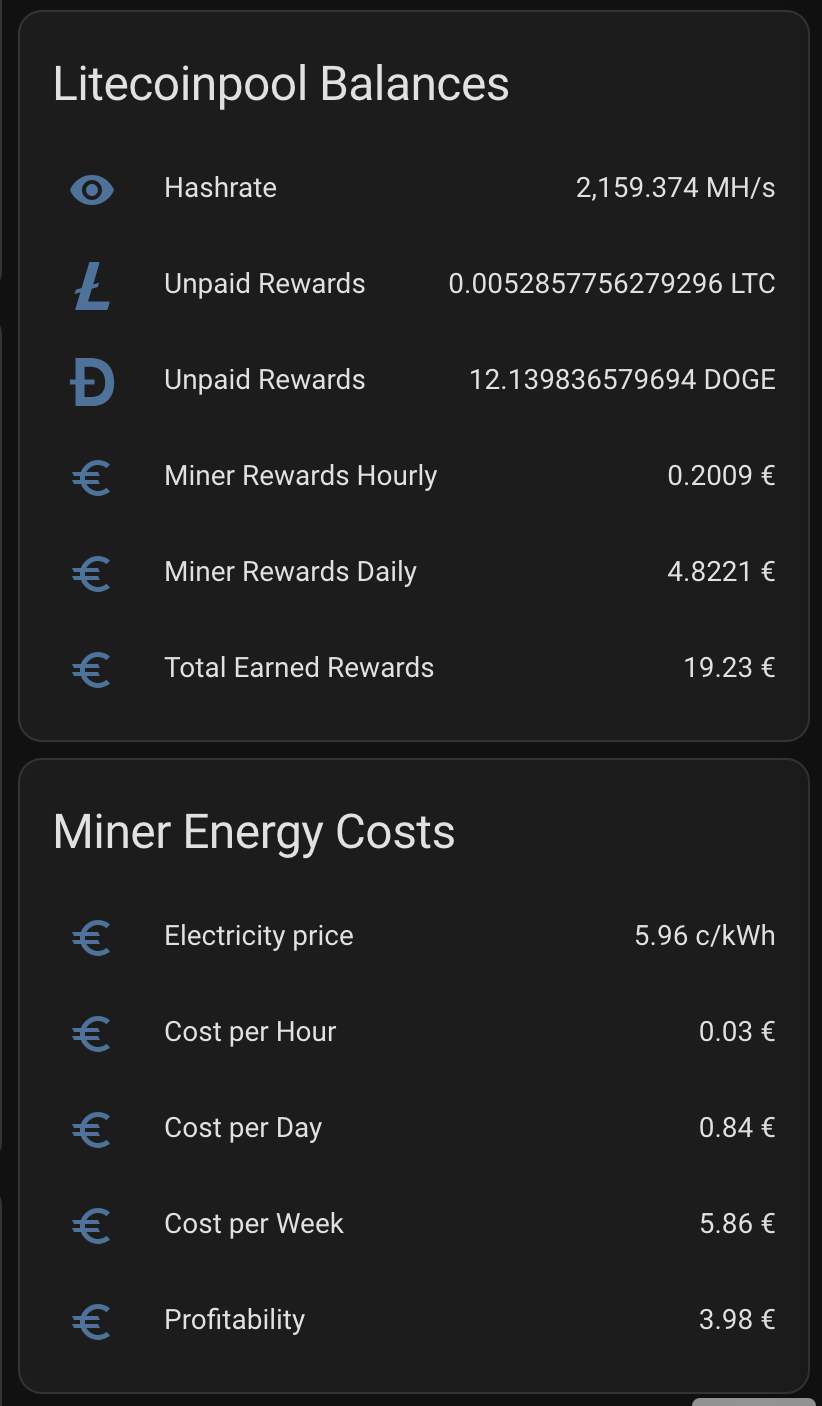
Plus I get daily rewards, paid rewards, profitability, electricity consumption and all key parameters to monitor the appliance.
Automating Miner Power Management and Crash Detection
I created an automation to turn off the miner if electricity prices exceed a threshold when it is not profitable anymore. When electricity price goes lower the miner will be powered on again. I might need to change the threshold, but below is based on current profitability calculation without taking profit generated by heating the house:
 alias: Turn Off Miner When Electricity Price Is High
  description: "Turns off the miner when electricity price goes above 33c/kWh"
  trigger:
    - platform: numeric_state
      entity_id: sensor.electricity_cost_in_cents_per_kwh
      above: 33
  action:
    - service: switch.turn_off
      target:
        entity_id: switch.shellyplug_s_3ce90ee04b97

- alias: Turn On Miner When Electricity Price Is Low
  description: "Turns on the miner when electricity price goes below 33c/kWh"
  trigger:
    - platform: numeric_state
      entity_id: sensor.electricity_cost_in_cents_per_kwh
      below: 33
  action:
    - service: switch.turn_on
      target:
        entity_id: switch.shellyplug_s_3ce90ee04b97
I also wanted to restart the miner if there is no mining detected on Litecoinpool. For this I use hashrate. If hashrate is 0 then I will reboot the miner.
- alias: Reboot or Power Cycle Miner
  description: Reboot the miner on low hash rate, fallback to power cycle if needed
  trigger:
    - platform: state
      entity_id: sensor.litecoinpool_hashrate
      to: "0"
      for: "00:15:00"
  condition: []
  action:
    - service: button.press
      target:
        entity_id: button.shellyplug_s_3ce90ee04b97_reboot
    - delay: "00:10:00"  # Wait 10 minutes to see if reboot resolves the issue
    - condition: state
      entity_id: sensor.litecoinpool_hashrate
      state: "0"  # Hashrate is still 0
    - service: switch.turn_off
      target:
        entity_id: switch.shellyplug_s_3ce90ee04b97
    - delay: "00:00:10"  # Wait 10 seconds
    - service: switch.turn_on
      target:
        entity_id: switch.shellyplug_s_3ce90ee04b97
  mode: single
Benefits of Integrating Mining with Home Assistant
Real-time monitoring: Track hash rate, rewards, and energy consumption.
Profitability tracking: Automatically calculate earnings and costs.
Energy efficiency: Automate miner power based on electricity prices.
Profitability
This is small miner so it will not generate much profit, but at best it is around 4€/day. It also generates a lot of heat which saves me on heating costs. That being said, I have heat pump which is more effective on heating. On the other hand I save on heating more than just the direct cost, since I can deduct the electricity cost from tax return on profit
We will see where the average profit will land – that depends on DOGE price as well as on how the mining rewards will progress in the future. I’d expect the miner not to be gold mine, but I also assume it will generate some profit and capital gain within next five years. It is more of a hobby than real money maker though.
Initial conclusion
By combining LitecoinPool and Home Assistant, you can optimize your mining setup for maximum profitability and efficiency. The integration allows you to monitor rewards, manage costs, and automate operations seamlessly.
Choosing the mining pool
I initially chose LitecoinPool because it has good profitability and easy to setup. LitecoinPool is excellent choice in my opinion but obviously no one should not settle with the first choice. I investigated a bit more. It seems at least if you check from powerpool.io that PowePool has the highest rewards and litecoinpool.org comes 2.4% with less rewards when I checked. Obviously PowerPool is biased on this, so I need to monitor longer to do the final decision.
Anyhow since powerpool.io lets choose the crypto currency to get the rewards paid on I decided to give it a try. In my case just getting everything in BTC makes sense, since I have actually planned to convert all the rewards to BTC anyway. I haven’t really decided what my final strategy will be though.
LitecoinPool.org
Within my first week of experimenting I started with litecoinpool.org where I ended up earning around 25€ for the few days there. I liked the API options available and how the web page is simple. The reward are payed on both DOGE and LTC and payments are easy to set up. When you set for example payments to 30DOGE and 0,001LTC you get paid almost every second day around 11€.
Powerpool.io
Powerpool.io is my cohice for now, since it seems to provide be best profitability and I can get paid everything in BTC so I don’t need to do any conversions which in my country are by the way all taxable operations and needs to be reported on tax return.
mining-dutch.nl
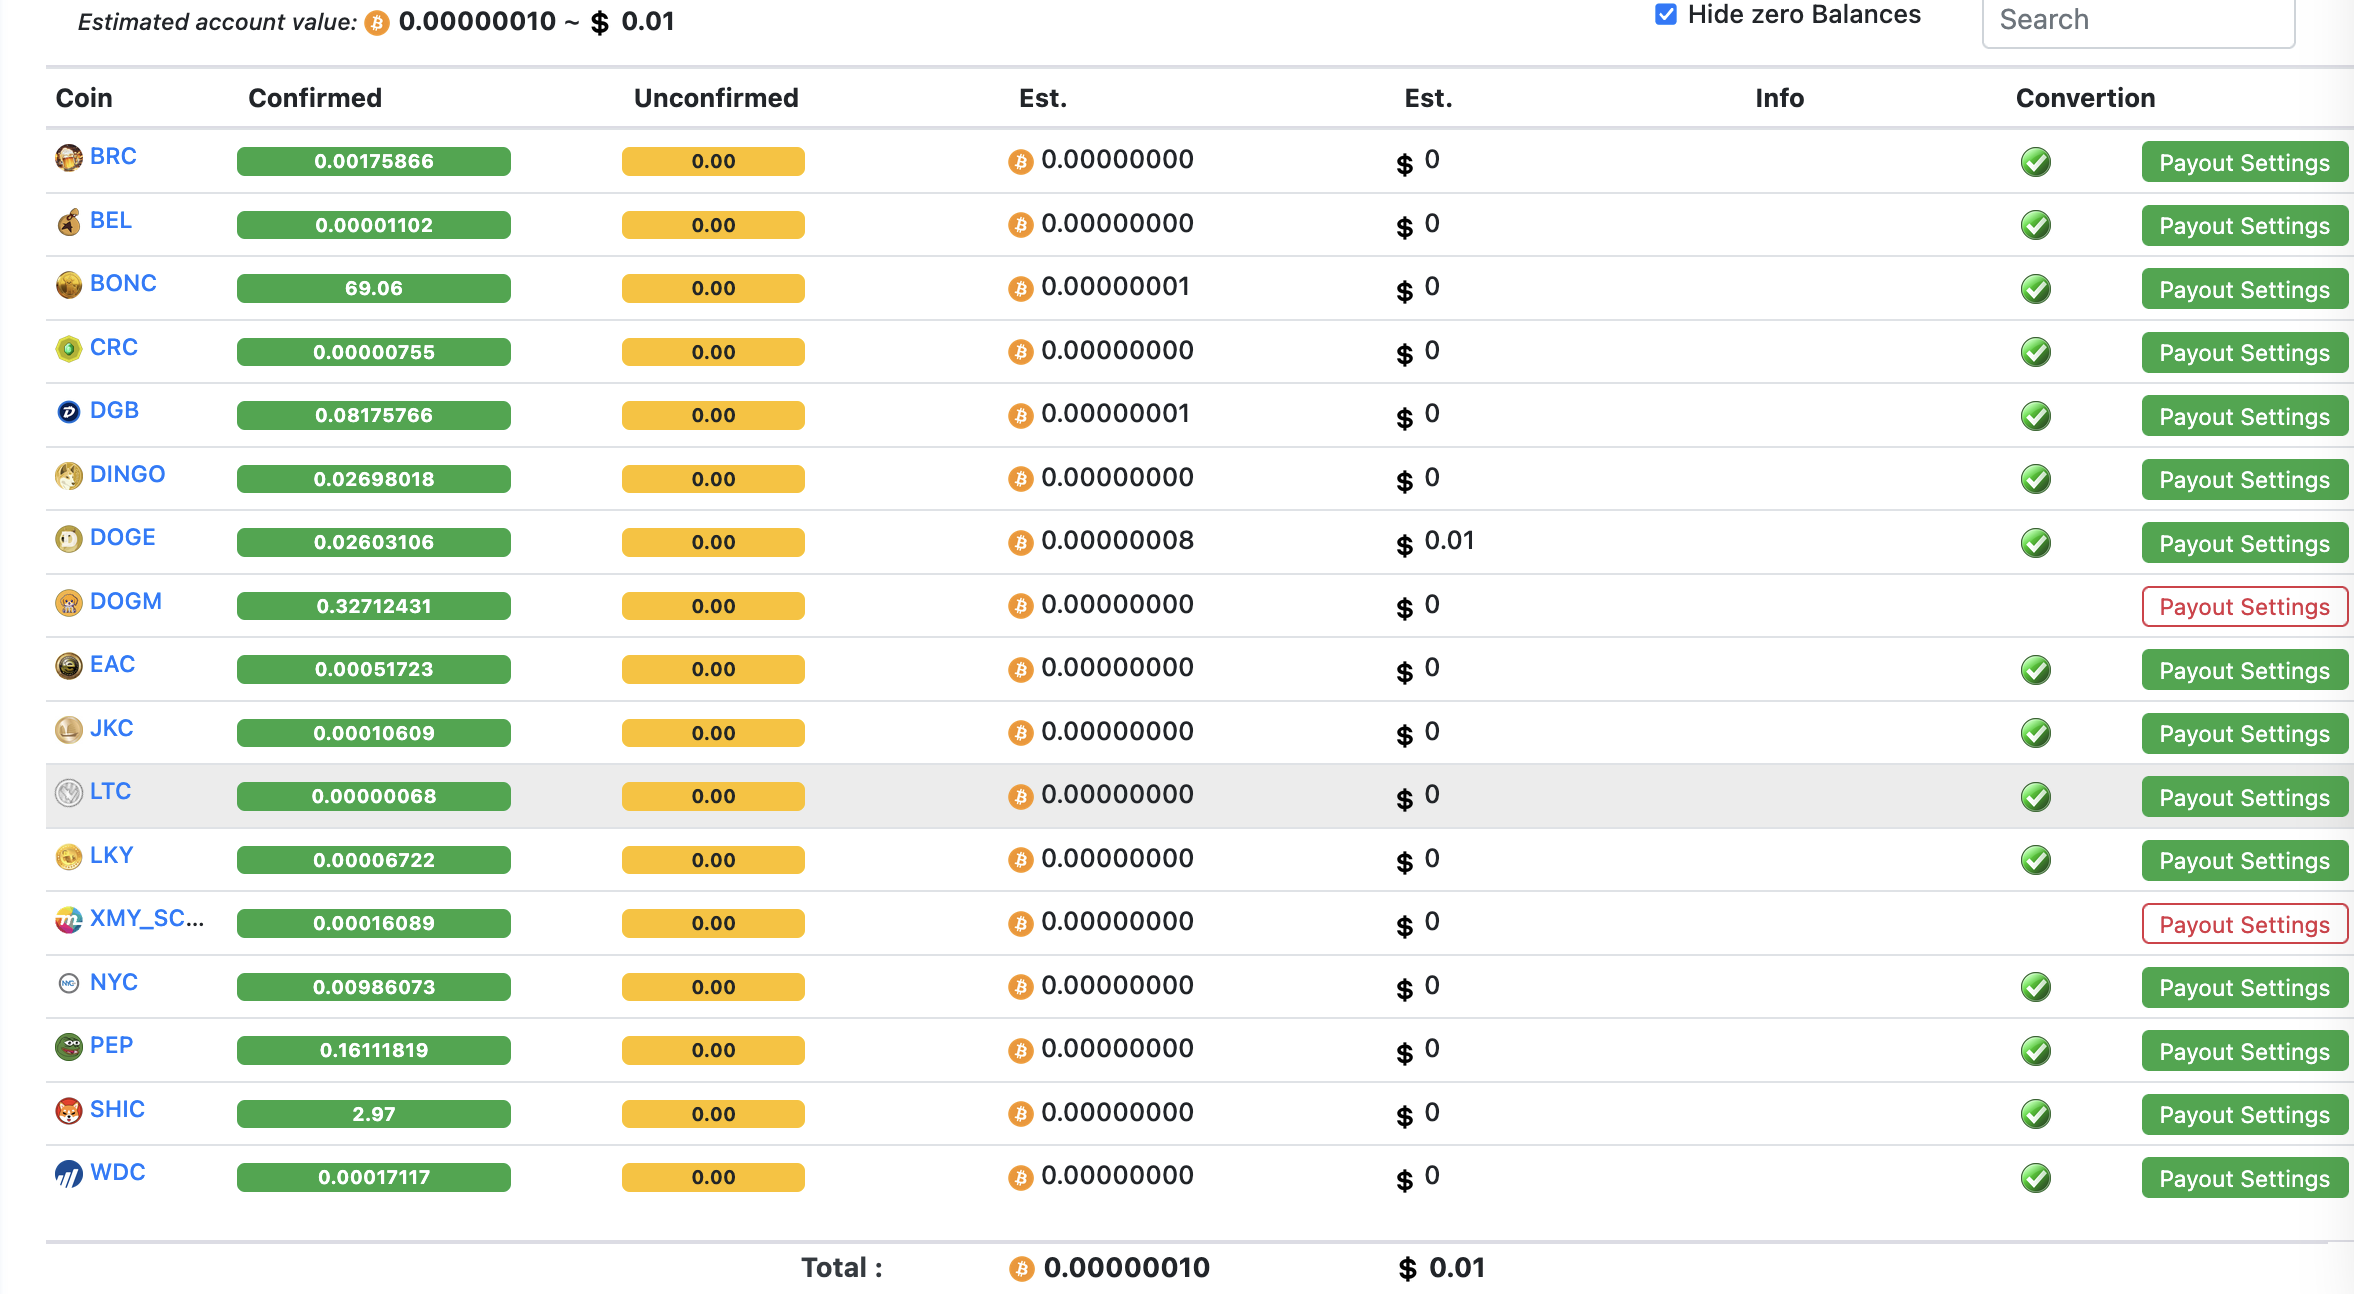
I tried out also mining-dutch.nl. It has the widest selection of options and coins you can get your rewards. The profitability on all these three depends on various factors. I didn’t run on mining-dutch.nl to really receive any rewards. BUt as you can see from below picture, it truly supports several coins in a way miner can see exactly what he or she is mining.
Switching to to a different pool means basically just changing the stratum UR, username and password. These
Elphapex configuration for PowerPool
Since I decided in the end stick on PowerPool here are the few things I did there.
Setting up another pool is as easy as create an account and the new miner URLs on Elphapex miner page and save. Even restart is not necessarily needed.
Above pictures illustrates powerpool.io and rewards in about 48 hours after I changed the configuration.
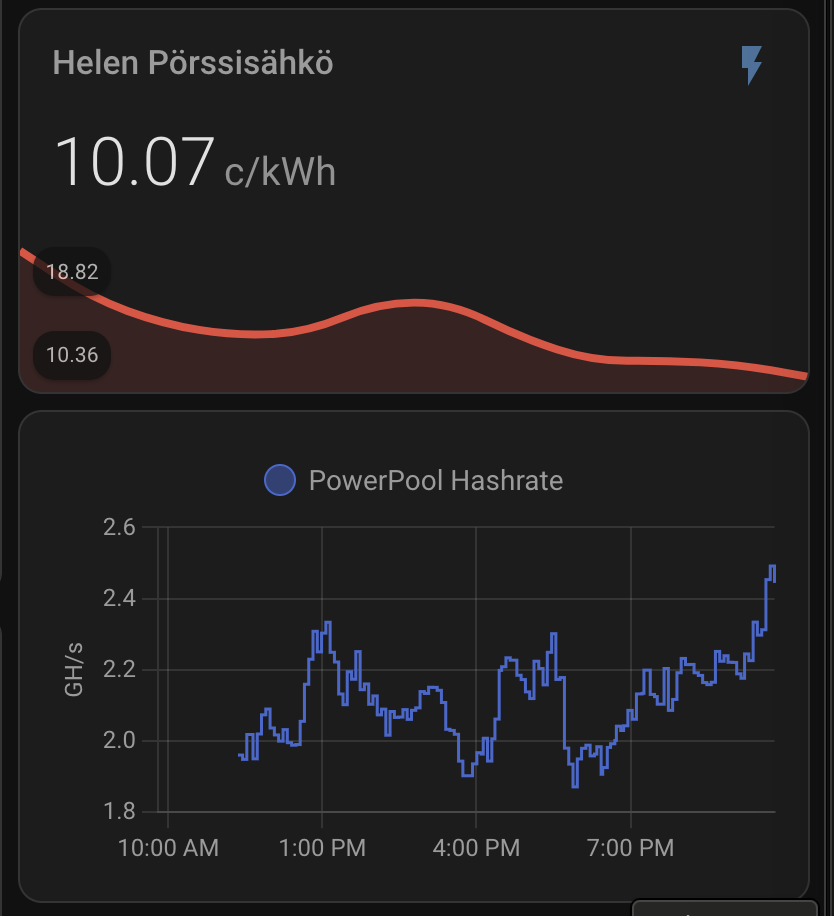
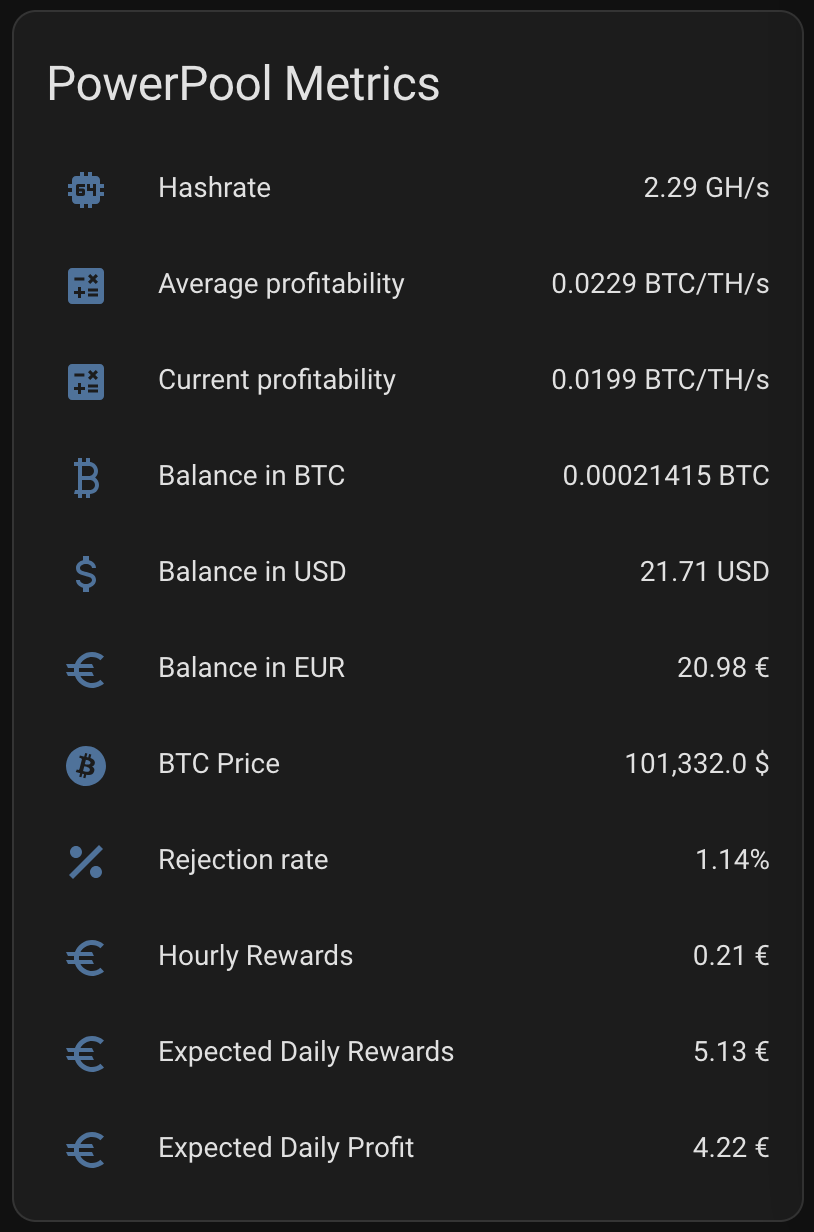
PowerPool HomeAssistant Dashboard
Setting up the Home Asisstant Dashboard with same setup as I have for LitecoinPool is a bit harder, since PowerPool API is missing certain reward data – expected daily rewards for example – which makes it much harder to create similar profitability values as I have setup for LitecoinPool. I have currently following confirguration for PowerPool on my sensors.yaml:
Above card creates something like like below with running about 10 hours:
I spent a whole day figuring out how to get same configuration I had with Litecoinpool done within couple of hours. I ended up getting much more information in the end. The below card has pretty much all I could think of.
The full configuration
The code snippets above does not have my full Home Assistant configuration, but as normal you can check the whole configuration from my GitHub Repo.